Table of Contents
Advertisement
Quick Links
Advertisement
Table of Contents

Subscribe to Our Youtube Channel
Related Manuals for FujiFilm EF-W1


Summary of Contents for FujiFilm EF-W1
- Page 1 WIRELESS COMMANDER EF-W1 Owner’s Manual WIRELESS COMMANDER EF-W1...
- Page 2 Thank you for your purchase of this product. Before using this commander unit, please read this owner’ s manual and refer to the owner’ s manual of your camera carefully to get a better understanding of the proper operation to enjoy flash photography.
-
Page 3: Table Of Contents
Contents Name of the Components and Accessories Power Saving Mode Before using Inserting batteries Paring setting Basic Operation Mounting on the camera / Removing from the camera Turn on the power Group Setting and Operation Group setting of flash Commander group setting and operation method 11~12 Open Mode Mode Setting... -
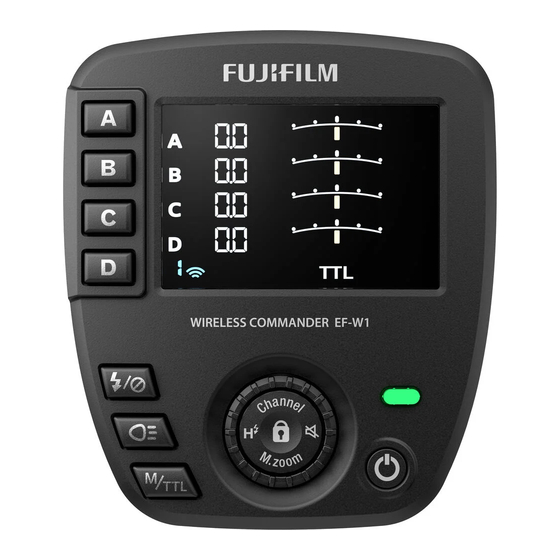
Page 4: Name Of The Components And Accessories
Name of the Components and Accessories Group selection button Pilot button (Test flash button) Group on/off button Power On/Off button Modeling light button Strap hole Shutter cable socket (2.5mm) Unlock button M/TTL Mode button Micro SD card slot LCD Panel Battery compartment door Control Wheel and buttons Mounting foot... -
Page 5: Power Saving Mode
Power Saving Mode The EF-W1 has a power saving mode to prevent battery drain. After 30 seconds from idle, the LCD will go dark and it will turn off in sync with the camera power. In the power saving mode, the pilot lamp blinks every 2 seconds. -
Page 6: Before Using
Before Using Inserting batteries Batteries that can be used: Ni-MH batteries, alkaline batteries Opens the battery compartment door and insert 2 x size AAA batteries as shown in the right figure. Make sure the + and - battery contacts are correctly inserted in the battery compartment. -
Page 7: Paring Setting 7~8
Before using Paring Setting Before performing wireless shooting, follow the procedure below to set up EF-W1 and flash for pairing. Caution Be sure to set the pairing when using for the first time. Step … Turn off the commander and flash power. - Page 8 Caution The pairing settings will remain stored even if the power is turned off. * Press the Pilot button of the Commander EF-W1 for test flash.
-
Page 9: Basic Operation
Caution When attaching EF-W1 to a camera, do not grab or lift EF-W1. The mounting foot of EF-W1 or the hot shoe of the camera may be damaged. Turn on the power • When you press the Power button and... -
Page 10: Group Setting And Operation
Group Settings and Operations EF-W1 has 8 groups of A, B, C, D, A, B, C, D, and you can control each group or multiple groups simultaneously. However, note that the groups that can be used are limited depending on the flash used. -
Page 11: Commander Group Setting And Operation Method 11~12
Group Settings and Operations Commander group setting and operation method EF-W1 has eight groups. A, B, C, D and A, B, C, D cannot be operated on the same screen, so press and hold to switch screens. Caution Group D, A, B, C, D are available for Nissin Digital MG10, MG8 and MG80 Pro. - Page 12 3 points at the same time. 4. If you want to stop firing for a WIRELESS COMMANDER EF-W1 specific group, press the “Group on / off button” while the group is blinking. When the LCD screen shows "---", the flash will be stopped.
-
Page 13: Open Mode
• Press and hold the "M/TTL mode button” for more than 1 second to switch to open mode. • Set EF-W1 and flash channel to the same channel. Caution When controlling the Nissin Digital MG series flashes that are not... -
Page 14: Mode Setting
Mode Setting The EF-W1 has two modes: "TTL mode" for automatic light control and "M (manual) mode" for manual light control. Use the "M/TTL Mode Button" to switch modes. What is the TTL memory function? WIRELESS COMMAN When switching from TTL mode to M mode,... - Page 15 3. Turn the control wheel and buttons to change the correction value in 1/3EV* steps. 4. Turn the dial clockwise to WIRELESS COMMANDER EF-W1 make it brighter and counterclockwise to make it darker. M/TTL Mode Button * For models and firmware that do not support 1/3EV, 1/2EV step...
-
Page 16: Manual Mode 16~17
Mode Setting M (Manual) Mode Once setting the mode to M (Manual), “M” (manual) is displayed at the bottom of the LCD screen. The M (manual) mode is a mode for manually adjusting the light emission amount. Turn the control wheel and buttons to change the light emission amount in 1/3EV steps. - Page 17 3. Turn the control wheel and buttons to change the flash output in 1/3EV steps. 4. Turn the dial clockwise to make it brighter and counterclockwise to make it darker. WIRELESS COMMANDER EF-W1 M/TTL Mode Button...
-
Page 18: Control Wheel And Buttons
Control Wheel and Buttons Channel Setting Although it does not need to be changed during normal use, there are rare cases that the NAS may not operate properly due to radio wave interference in locations where other communication devices that use the 2.4 GHz band such as wireless LAN, Bluetooth, handy phone, and hands-free microphone are often used. -
Page 19: Channel Setting 18~19
10 seconds to return to the original screen. Channel Button Control Wheel and Buttons Caution Before using, set the commander EF-W1 and flash pairing. At that time, make sure that the channel on the flash side is “AUTO” or the same channel as EF-W1. -
Page 20: Setting The Coverage (Zoom)
Control Wheel and Buttons Setting the coverage (zoom) With the EF-W1, the coverage (zoom) of the receiving flash can be switched remotely. The coverage (zoom) can be set to A (auto), 24, 28, 35, 50, 70, 85, 105, 135, 200 mm. -
Page 21: Beep Sound On/Off
Control Wheel and Buttons Beep Sound on/off EF-W1 is set by default to emit a beep sound when the remote flash is charging or when the commander setting value is changed. The beeper on / off settings for all remote flashes can be controlled at once via the commander beep button. -
Page 22: Panel Lock/Unlock Button
Control Wheel and Buttons Panel Lock / Unlock button How to lock the operation Equipped with "operation lock" mode to prevent accidental operation. To lock the operation, press and hold the Panel Lock/Unlock button ( ). To release it, press and hold the Panel Lock/Unlock button again. -
Page 23: Other Function Buttons
In order to simulate the directionality of the flash light and how the light diffuses when a modifier is attached, EF-W1 can control the modeling light emission function. How to use Modeling light 1. Press the group button for Modeling light to make the group display blink. -
Page 24: Other Functions
M mode. How to enable high speed sync With EF-W1 attached to the camera and the camera and EF-W1 turned on, set the sync mode to [AUTO FP (HSS)] in the [FLASH FUNCTION SETTING] menu on the camera. Function button [ ] on EF-W1 does not work. -
Page 25: About Firmware Update
About Firmware Update You can update the file downloaded from our site by writing it to a micro SD card and inserting it into the product's card slot. For details, please check the EF-W1 product information page on our website. -
Page 26: Specifications
Weight Approx. 73g (without battery) *1. For the latest compatibility information, please see https://fujifilm-x.com/support/compatibility/accessories/ *2. NAS (Nissin Air System) is a registered trademark of Nissin Japan Ltd. (https://nissin-japan.com/) *3. Compatible with MG10, MG8, MG80 Pro manufactured by Nissin Digital. (https://nissindigital.com) Ver. 20071101...
Need help?
Do you have a question about the EF-W1 and is the answer not in the manual?
Questions and answers