Table of Contents
Advertisement
Quick Links
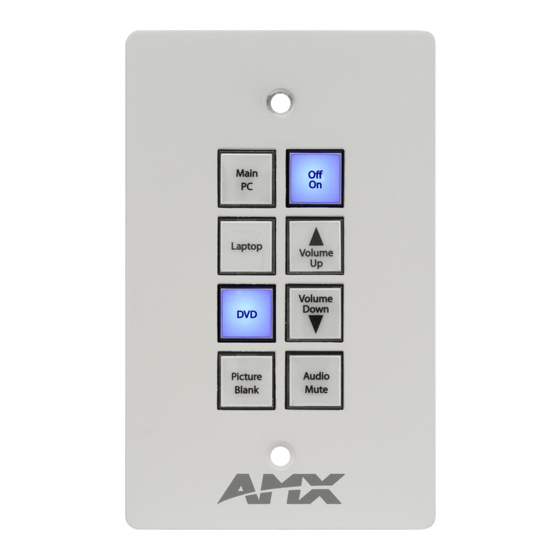
Overview
This guide pertains to the Novara SP-08-E-US 8-Button Keypad with Ethernet
(FG1312-08). The purpose of this document is to illustrate how the device is to
be installed and set up in its simplest configuration by a trained technician.
What's in the Box?
The following items are included with the SP-08-E-US:
•
(1) sheet of 50 pre-printed button labels
Dimensions
4 11/16" x 2 15/16" x 1 1/16" (119 mm x 74 mm x 26.2 mm)
Weight
Approximately 0.3 lbs. (0.14 kg)
Environmental Requirements
The environmental requirements for the SP-08-E-US are as follows:
•
Operating Temperature: 32° F (0° C) to 104° F (40° C)
•
Storage Temperature: 4° F (-15° C) to 140° F (60° C)
•
Operating Humidity: 5% to 85% RH
Note: Intended for indoor use only.
Power
You can apply power to the SP-08-E-US via any Power-over-Ethernet (PoE)
injector or switch which conforms to the 802.3af standard. Before installing and
mounting the Keypad, test to see that it can receive power.
Note: For mounting space considerations, do not use category cable with
overmold.
Applying Power
Applying power to the SP-08-E-US requires category cable and a PoE injector,
FG423-83
such as the PS-POE-AF-TC (
must be connected through the PoE injector to send power to the Keypad. The
category cable should only run through a common building. (A common building
is defined as: Where the walls of the structure(s) are physically connected and
the structure(s) share a single ground reference.)
1.
Connect the PoE injector to an AC outlet (~100-240V) using a standard
power cord.
2.
Connect the switch category cable to the Data In port on the PoE injector.
3.
Using a separate category cable, connect the Data & Power Out port on
the PoE injector to LAN Port on the Keypad.
Button Labeling
Novara Keypads come with a set of clear plastic Key Caps, which are designed
to fit tightly over the pushbuttons, and allow you to place a label on each button
according to the requirements of your particular installation.
Novara Keypads also come with a pre-printed acetate sheet with a range of 50
(pre-cut) button label inserts. The button labels provided will accommodate most
Installations, but it is also possible to print your own button labels on acetate for
custom button labeling.
Disassembling the Keypad
This procedure requires a Phillips-head screwdriver.
Important: Before touching the device, discharge the static electricity from your
body by touching a grounded metal object.
1.
Use a Phillips-head screwdriver to remove the three screws that secure
the circuit board to the faceplate. All three screws are connected to the
bottom circuit board. (see FIG. 1).
FIG. 1
Remove the screws to separate the circuit board from the faceplate
Novara SP-08-E-US 8-Button Keypad (US) with Ethernet
) available from AMX. The network
Quick Start Guide
2.
Carefully pull the top circuit board straight up and off the standoffs. Note
the orientation of the circuit board. You must replace it with the circuit
board oriented in the same direction.
Installing Acetate Button Labels
Once the circuit board has been removed, you have full access to the
pushbuttons.
1.
Carefully pry the Key Cap off of each pushbutton that you need to re-label.
2.
Punch out the desired Button Label from the included acetate sheet. If you
have printed your own custom button labels on acetate, cut each button
label to fit inside the Key Caps.
•
Custom button labels must be cut to a 0.472" (12 mm) square to fit
securely inside the Key Caps.
•
The thickness of the acetate used must not exceed .004" (0.10 mm).
3.
Place the Key Cap face-down, and insert the Button Label into the bottom
of the Key Cap.
Acetate Button Label
(face down)
Clip
FIG. 2
Placing a button label inside a key cap
•
Orient the Button Label inside the Key Cap so that the two clips are located
on the left and right sides of the readable text on the Button Label, as
indicated in FIG. 2.
•
Be sure to place the Button Label face-down inside the Key Cap (see
FIG. 2), otherwise the label will be seen in reverse once the Key Cap is
installed.
4.
Install the key cap on the pushbutton (FIG. 3):
Key Cap - tilted so that the bottom
of the Cap is placed on the bottom
of the pushbutton first
Clip
Pushbutton on keypad
Press the top of the Key Cap
down to engage both clips at
once, securing the Key Cap
to the pushbutton
Once the clips are engaged,
the Key Cap is secured
to the pushbutton
FIG. 3
Installing the key cap on the pushbutton
Note: Verify that the vertical orientation of the Button Label is correct relative to
the keypad.
•
Gently press the bottom of the Key Cap (no clip) onto the pushbutton. Do
not allow the clips on either side to engage.
•
With the bottom of the Key Cap secured, gently press the top of the Key
Cap. This action will engage both clips simultaneously, and the Key Cap
will snap into place on the push button.
Note: Be careful to follow these procedures closely - the bottom of the Key Cap
must be installed on the pushbutton before the Key Cap clips engage, or there is
a risk of the button being misaligned.
Clip
Key Cap (face-down)
At this point, do not allow the clips
on the sides of the Key Cap to engage
1
Clip
2
3
Advertisement
Table of Contents

Subscribe to Our Youtube Channel
Related Manuals for AMX Novara SP-08-E-US


Summary of Contents for AMX Novara SP-08-E-US
- Page 1 Overview the orientation of the circuit board. You must replace it with the circuit This guide pertains to the Novara SP-08-E-US 8-Button Keypad with Ethernet board oriented in the same direction. (FG1312-08). The purpose of this document is to illustrate how the device is to Installing Acetate Button Labels be installed and set up in its simplest configuration by a trained technician.
- Page 2 REV: A 3/15 ©2015 AMX. All rights reserved. AMX and the AMX logo are registered trademarks of AMX. AMX reserves the right to alter specifications without notice at any time. 3000 RESEARCH DRIVE, RICHARDSON, TX 75082 • 800.222.0193 • fax 469.624.7153 • technical support 800.932.6993 •...
Need help?
Do you have a question about the Novara SP-08-E-US and is the answer not in the manual?
Questions and answers