
Related Manuals for SunTech ST940


Summary of Contents for SunTech ST940
- Page 1 Doc. Title ST940 User Manual Concerning: Rev. Date (dd-mm-yy) Page of Pages 1.19 19-06-15 1 of 51 Features and how to configure ST940 Personal / Asset Tracker ST940 User Manual...
-
Page 2: Table Of Contents
Rev. Date (dd-mm-yy) Page of Pages 1.19 19-06-15 2 of 51 Features and how to configure ST940 Table of Contents Revision History ................................4 1. Introduction ................................. 5 2. Key Features ................................6 2-1. GSM/GPRS Specifications ..........................7 2-2. GPS Specifications ............................8 2-3. - Page 3 Suntech International Ltd., which is hereinafter referred to as “Suntech”. The information in this manual is believed to be accurate and reliable at the time of releasing. We, at Suntech, also assume no responsibility for any damage or loss resulting from the use of this manual, and expressly disclaim any...
-
Page 4: Revision History
Doc. Title ST940 User Manual Concerning: Rev. Date (dd-mm-yy) Page of Pages 1.19 19-06-15 4 of 51 Features and how to configure ST940 Revision History Rev. No. Date Contents of Revision FirmwareNumber Author reflecting the latest revision 1.00 11 Aug. 2014... -
Page 5: Introduction
Without any efforts for connecting wires, the ST940 (hereinafter referred to as ‘device’) works autonomously with its built-in battery. If users want to track an object with the ST940, all they have to do is just simply put it into the box or the carry bag where the object is contained. -
Page 6: Key Features
19-06-15 6 of 51 Features and how to configure ST940 algorithms and motion checking. *In case the ST940 is placed inside a metal container, it may not work. 2. Key Features New technology and the latest GPS Chipset ... -
Page 7: Gsm/Gprs Specifications
ST940 User Manual Concerning: Rev. Date (dd-mm-yy) Page of Pages 1.19 19-06-15 7 of 51 Features and how to configure ST940 2-1. GSM/GPRS Specifications Item Description Battery Rechargeable 3.7V, Li-ion Battery- 1500mAh Motion Detection Built-in 3-axis Acceleration sensor Standby time *with 1,500mA/h Li-ion battery Standby Time with GSM “On/Off”... -
Page 8: Gps Specifications
ST940 User Manual Concerning: Rev. Date (dd-mm-yy) Page of Pages 1.19 19-06-15 8 of 51 Features and how to configure ST940 2-2. GPS Specifications Item Description 56-channel U-blox7 engine Receiver Type GPS & QZSS L1 C/A, GLONASS L1OF, Galileo* E1B/L1, Compass* ready... -
Page 9: Operational Features
ST940 User Manual Concerning: Rev. Date (dd-mm-yy) Page of Pages 1.19 19-06-15 9 of 51 Features and how to configure ST940 2-3. Operational Features Item Description Configuration either by SMS or PC Parameter Change either by SMS or GPRS Command /Control... -
Page 10: Accessories
USB Cable (for charging and setting) 4. How to insert SIM cardby step There are 5 steps in inserting a SIM card into the ST940 as shown below in the pictures. Step 1.:Please, unscrew SIM cover. Step2.:Please, insert SIM #1. -
Page 11: Charging Battery
<Caution!!> The ST940 (device) should be charged by using the USB cable that Suntech provides the user with. In such a case, however, Suntech does not guarantee that charging the device can be done completely. It is highly recommended that... -
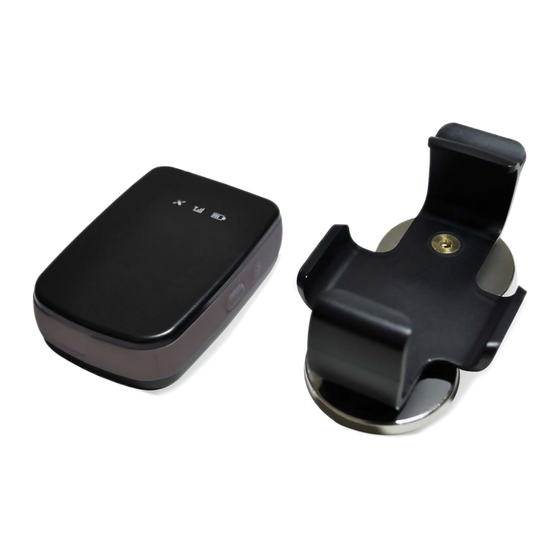
Page 12: Appearance
6. Appearance 7. How to operate The ST940,a multifunctional battery-powered mini GPS tracker, is ideal for tracking personnel, valuable assets like merchandises that are delivered by putting it onto anobject. While tracking, it reports locationinformation about the object at apredefinedinterval and alerts if it detects motion of the object. - Page 13 Page of Pages 1.19 19-06-15 13 of 51 Features and how to configure ST940 Power Turn On If you press POWER button for more than 3 seconds, the device will be turned on. When the power is on, LEDs blink as below.
- Page 14 Page of Pages 1.19 19-06-15 14 of 51 Features and how to configure ST940 Red LED GPS status indicator Right after the device is turned on, the red LED starts to blink as below. Five (5) minutes after the red LED starts to blink, it is turned off automatically to save battery. If you press the power button again, the red LED will be on just for short time, for some seconds, to show you the current status of the GPS connectivity.
- Page 15 Page of Pages 1.19 19-06-15 15 of 51 Features and how to configure ST940 Blue& Red LEDs GSM network & Operating Status indicator (2 colors) Right after the device is turned on, the blue LED starts to blink as below. Five (5) minutes after the blue LED starts to blink, it is turned off automatically to save battery.
-
Page 16: Commands
1.19 19-06-15 16 of 51 Features and how to configure ST940 8. Commands This chapter explains how command is made and sent to the device from its server. Before using the device, you should set the network and the cyclic report parameters via SMS or RS232 at first. - Page 17 Page of Pages 1.19 19-06-15 17 of 51 Features and how to configure ST940 phone numbers were registered can be accepted as command. The SMS of which phone numbers have not been pre-set, those SMS messages coming from those phone numbers are disregarded.
- Page 18 1.19 19-06-15 18 of 51 Features and how to configure ST940 domain name (for example, suntechint.com). If this field is written by domain, the device will find real IP address by DNS and sends reports to IP address. How to set ‘Additional Parameters’...
- Page 19 Doc. Title ST940 User Manual Concerning: Rev. Date (dd-mm-yy) Page of Pages 1.19 19-06-15 19 of 51 Features and how to configure ST940 ‘0’ Reserved ‘0’ Reserved ‘0’ Reserved ‘0’ Reserved ‘0’ Reserved ‘0’ Reserved <Example> [command] ST910;ADP;123456789;T;T;0;8051;0;0;0;0;0;0 [command] ST910;ADP;456789;T;T;0;8051;0;0;0;0;0;0 [response]ST910;RES;ADP;123456789;T;T;0;8051;0;0;0;0;0;0...
- Page 20 ST940 User Manual Concerning: Rev. Date (dd-mm-yy) Page of Pages 1.19 19-06-15 20 of 51 Features and how to configure ST940 “Location”, ”Emergency” and “Alert” reports. ‘0’ / ‘1’ MAGNET_ALERT 0 : Disable Alert 1 : Enable Alert VI_ON_THRES String...
- Page 21 Driving or Parking is decided by Motion Sensor. If VI_ON_THRES is equal to zero, it cannot recognize ‘driving’. Please do not forget that the ST940 may show you a bigger distance than the real one while the vehicle is parked, if you make an optional configuration to enable the device not to check motion.
- Page 22 Doc. Title ST940 User Manual Concerning: Rev. Date (dd-mm-yy) Page of Pages 1.19 19-06-15 22 of 51 Features and how to configure ST940 <Example> [command] ST910;CGF;123456789;1;1;36.923548;127.309570;29;1;1 ST910;CGF;456789;1;1;36.923548;127.309570;29;1;1 [response] ST910;RES;CGF;123456789;1;1;36.923548;127.309570;29;1;1 ST910;RES;CGF;456789;1;1;36.923548;127.309570;29;1;1 How to set ‘Report Parameters’ ● The following table shows how to set intervals of location report, alert and how to set sensor value to sense if any motion is made.
- Page 23 Concerning: Rev. Date (dd-mm-yy) Page of Pages 1.19 19-06-15 23 of 51 Features and how to configure ST940 ST910;REPORT;123456789;180;180;60;3;0.10 ST910;REPORT;456789;180;180;60;3;0.10 [response] ST910;RES;REPORT;123456789;180;180;60;3;0.10 ST910;RES;REPORT;456789;180;180;60;3;0.10 How to set ‘Function Parameters’ ● The following table shows how to make a command to enable or disable the functions:...
- Page 24 Page of Pages 1.19 19-06-15 24 of 51 Features and how to configure ST940 Off (Power off) ● The following table shows how to make a command for power off remotely for a time period of the “minutes” predefined. Field...
- Page 25 Date (dd-mm-yy) Page of Pages 1.19 19-06-15 25 of 51 Features and how to configure ST940 Erase Reports ● The following table shows how to make a command to erase all the reports which have been stored. Field Marks Value Meaning “ST910”...
- Page 26 Page of Pages 1.19 19-06-15 26 of 51 Features and how to configure ST940 If the command is sent through RS232, the device responds with location string and sends location string through GPRS or SMS. ACK (Server Acknowledgement about Alert) ●...
- Page 27 Concerning: Rev. Date (dd-mm-yy) Page of Pages 1.19 19-06-15 27 of 51 Features and how to configure ST940 ST910;RES;PRESET;456789;NETWORK;1;ict;dip;dip;183.109.78.85;8020;;;1;111.111.111.111;8021;REPORT;1 80;180;60;3;0.10;FUNCTION;1;0 Preset ALL ● The following table shows how to make a command to read all of the parameters: Field Marks...
- Page 28 Concerning: Rev. Date (dd-mm-yy) Page of Pages 1.19 19-06-15 28 of 51 Features and how to configure ST940 SetDist ● The following table shows how to setting the movement distance which has been accumulated so far. Field Marks Value Meaning “ST910”...
- Page 29 ST940 User Manual Concerning: Rev. Date (dd-mm-yy) Page of Pages 1.19 19-06-15 29 of 51 Features and how to configure ST940 [response] ST910;RES;SetGoogleMap;http://maps.google.com/maps?q=;123456 [response] ST910;RES;SetGoogleMap;http://maps.google.com/[Lat],[Lon]/maps?q;123456 [command] ST910;SetGoogleMap=http://maps.google.com/maps?q=;123456789 [command] ST910;SetGoogleMap=http://maps.google.com/[Lat],[Lon]/maps?q;123456789 [response] ST910;RES;SetGoogleMap;http://maps.google.com/maps?q=;123456789 [response] ST910;RES;SetGoogleMap;http://maps.google.com/[Lat],[Lon]/maps?q;123456789 <Note> The max of input string is 64 characters.
- Page 30 Page of Pages 1.19 19-06-15 30 of 51 Features and how to configure ST940 ReqCircleGeo ● This command is used if the device is required to report to the server all of the geo-fence parameters that are pre- set. Field...
- Page 31 Doc. Title ST940 User Manual Concerning: Rev. Date (dd-mm-yy) Page of Pages 1.19 19-06-15 31 of 51 Features and how to configure ST940 checkthe “DEV_ID_TYPE” setting.
- Page 32 Doc. Title ST940 User Manual Concerning: Rev. Date (dd-mm-yy) Page of Pages 1.19 19-06-15 32 of 51 Features and how to configure ST940 <Example> [command] ST910;InitCircleGeo;123456789 [command] ST910;InitCircleGeo;456789 [response] ST910;RES;InitCircleGeo;123456789 [response] ST910;RES;InitCircleGeo;456789 ReqICCID ● Once this command is made, some interactions will be made between the server and the device as described in the ‘Meaning’...
- Page 33 1.19 19-06-15 33 of 51 Features and how to configure ST940 TurnOff This table shows how to turn off the device, which is operated under the option that the power button should not allow the device to be turned off. The option is described in a chapter of this document, ‘How to set ‘Function Parameters’...
- Page 34 (Note): In a case that user utilizes this option (“1” to be selected in the SyncTrak, a setting tool of Suntech) which is operational only while the device (in a vehicle, for example) is moving, power of the battery can be consumed less than in a case that this option is not selected.
- Page 35 Doc. Title ST940 User Manual Concerning: Rev. Date (dd-mm-yy) Page of Pages 1.19 19-06-15 35 of 51 Features and how to configure ST940 Field Marks Value Meaning “ST910” Model Name “SetProtType” COMMAND Command Type DEV_ID 6 or 9 char. Digits ID of device. It is a part of IMEI. Please checkthe “DEV_ID_TYPE”...
- Page 36 Doc. Title ST940 User Manual Concerning: Rev. Date (dd-mm-yy) Page of Pages 1.19 19-06-15 36 of 51 Features and how to configure ST940 Field Marks Value Meaning “ST910” Model Name “ReqMcuVer” COMMAND Command Type DEV_ID 6 or 9 char. Digits ID of device. It is a part of IMEI. Please check the “DEV_ID_TYPE”...
- Page 37 19-06-15 37 of 51 Features and how to configure ST940 the time period of <GPS Module On> in order to enable the device to catch GPS signal of satellites to better facilitate the time period of <GPS Fix>. In such a case, the user can set a Value of time period of <GPS Module On>...
- Page 38 1.19 19-06-15 38 of 51 Features and how to configure ST940 Location Query using Smart-Phone ● If you are smart phone user, you can easily find the location on the Google Maps in real time. Just send one of the following messages via your smart phone: “Where are you”, “whereareyou”, “Where r u”, “whereru”...
- Page 39 Page of Pages 1.19 19-06-15 39 of 51 Features and how to configure ST940 GPRS_SIGNAL: GPRS signal strength (0 ~ 100) : Higher number means better signal. You should compare this with golden sample. BATTERY: Battery's voltage level Model Identification Table...
-
Page 40: Reporting To Server
Concerning: Rev. Date (dd-mm-yy) Page of Pages 1.19 19-06-15 40 of 51 Features and how to configure ST940 9. Reporting to server This Chapter explains how device makes a report and sends it to theserver. Location Report Field Marks Meaning “ST910”... - Page 41 Rev. Date (dd-mm-yy) Page of Pages 1.19 19-06-15 41 of 51 Features and how to configure ST940 BSIC(2 digits decimal). This information will be here only if “ PROT_TYPE = 0” String Information of Mobile Country Code String Information of Mobile Network Code...
- Page 42 Doc. Title ST940 User Manual Concerning: Rev. Date (dd-mm-yy) Page of Pages 1.19 19-06-15 42 of 51 Features and how to configure ST940 Emergency Report Field Marks Meaning “ST910” Model Name “Emergency” RPT_TYPE Report Type DEV_ID 6 or 9 char.
- Page 43 ST940 User Manual Concerning: Rev. Date (dd-mm-yy) Page of Pages 1.19 19-06-15 43 of 51 Features and how to configure ST940 String Information of Mobile Country Code String Information of Mobile Network Code RSSI String Information of Signal Strength String...
- Page 44 Date (dd-mm-yy) Page of Pages 1.19 19-06-15 44 of 51 Features and how to configure ST940 <Note> When this message is sent, please charge battery of the device immediately.This information will be here only if “ ADD_INF = 0” Alive Report...
- Page 45 Doc. Title ST940 User Manual Concerning: Rev. Date (dd-mm-yy) Page of Pages 1.19 19-06-15 45 of 51 Features and how to configure ST940 String Latitude in degree String Longitude in degree SPEED String Speed over the ground in Km/h COURSE...
- Page 46 ST940 User Manual Concerning: Rev. Date (dd-mm-yy) Page of Pages 1.19 19-06-15 46 of 51 Features and how to configure ST940 ST910;Alert;456789;20141018;18:30:13;0310000100;+37.478774;+126.889690;000.000;000.00;0;100;6002 // PROT_TYPE = 1 and ADD_INF = 0 ST910;Alert;456789;20141018;18:30:13;0310000100;+37.478774;+126.889690;000.000;000.00;0;100;6002 ;02;450;01;-282;70;255;3;0 // PROT_TYPE = 1 and ADD_INF = 1...
-
Page 47: Appendices
This Appendix (10.1.) shows the fields reported on Location, Emergency and Alert Report for all the possible combinations of PROT_TYPE and ADD_INF variables. <Note> The ST940 protocol can report the same strings as the ones of ST910. In order to achieve this, users of the ST940 should configure PROT_TYPE = 1 and ADD_INF = 0. -
Page 48: How To Install Usb Driver On Pc Under Environment Of Window 7
How to install USB Driver on PC under environment of WINDOW 7 10.2. If you start usingWINDOW 7 on your PC and connect the PC, for the first time by using a USB cable, with the ST940 which is off, you SHOULD take the procedure by step as described below. - Page 49 Disconnect internet if internet was already connected to the PC. Step 3. Please connect the ST940 with PC by using the USB cable. Step 4. If “Device Manager” of your PCdisplays the 2 ports such as “MTK USB Debug Port (COMX)” and “MTK USB Debug Port (COMY)”...
-
Page 50: What To Do If Pc Displays "Alcatel Single Rndis Interface
Step 1. Probable problem in connecting a PC with the ST940 by using a USB Cable There is one thing that you, as a user of the ST940, should be very careful in a case that you have never installed a ‘USB driver’... -
Page 51: How To Output Gps Nmea In A Form Of String
19-06-15 51 of 51 Features and how to configure ST940 10.4. How to output GPS NMEA in a form of STRING The NMEA data can be received via GPS session by using a USB Cable of device and can be output in a form of STRING.
Need help?
Do you have a question about the ST940 and is the answer not in the manual?
Questions and answers