Table of Contents
Advertisement
Instruction Manual
For all Premium Hotplates and Hotplate Stirrers
PREMIUM DIGITAL INTERFACE HOTPLATE PRODUCTS
SP150x, SP150x/120 SP152x, SP152x/120, CP152x, CP152x/120
x is used for the letter denoting colour variant blue (B), black (K) , white (W),
avocado (G), red (R), tangerine (T), violet (V) and pink (P)
Advertisement
Table of Contents

Related Manuals for Cole Parmer Stuart SP152B


Summary of Contents for Cole Parmer Stuart SP152B
- Page 1 Instruction Manual For all Premium Hotplates and Hotplate Stirrers PREMIUM DIGITAL INTERFACE HOTPLATE PRODUCTS SP150x, SP150x/120 SP152x, SP152x/120, CP152x, CP152x/120 x is used for the letter denoting colour variant blue (B), black (K) , white (W), avocado (G), red (R), tangerine (T), violet (V) and pink (P)
-
Page 2: Table Of Contents
Table of Contents About This Manual............2 Safety Information .............2 Product Symbols ............2 Warnings ..............3 Personal Injury ............3 Electric Shock ............3 Product Damage ............ 3 Operating Conditions ..........4 Unpacking & Contents ..........4 Catalogue Number Coding Description ......4 Product Identification .......... -
Page 3: About This Manual
About This Manual This manual is designed to assist you in optimal usage of your new premium hotplate. To get the best performance from your equipment and for your own personal safety, please read these instructions carefully before use Before discarding the packaging check that all parts are present and correct Product Voltages All hotplate stirrers and hotplates are available in different voltages (230/120VAC) -
Page 4: Warnings
Warnings Personal Injury • Do not use this product in a manner other than stated in the operating conditions section of the manual as protection provided to the equipment may be impaired • This equipment is designed for use in laboratory environments by persons knowledgeable in safe laboratory practices •... -
Page 5: Operating Conditions
Operating Conditions Hotplates and stirrers are designed for safe functioning under the following conditions: • For indoor use in a well ventilated area • Ensure equipment is used on a dry, non-combustible, solid work surface with at least 300mm suitable clearance all around from other equipment •... -
Page 6: Product Identification
Product Identification Premium Hotplate / Stirrer - 230VAC Premium Hotplate / Stirrer - 120VAC Colour Metal (Aluminium) Ceramic Colour Metal (Aluminium) Ceramic Blue SP152B CP152B Blue SP152B/120 CP152B/120 White SP152W CP152W White SP152W/120 CP152W/120 Black SP152K CP152K Black SP152K/120 CP152K/120 Avocado SP152G CP152G... -
Page 7: Product Connections
GREEN/YELLOW - EARTH Should the mains lead need replacement, a cable of 1mm of harmonised code H05RR-F or H05RN-F connected to an IEC hot condition plug should be used. IF IN DOUBT CONSULT A QUALIFIED ELECTRICIAN American mains wire colours required (section Electrical Installation) Black - LIVE White - NEUTRAL Green - EARTH/GROUND... -
Page 8: Ceramic Hotplate Hot Zone
Ceramic Hotplate Hot Zone When using the ceramic hotplates at temperatures over 180 C, the base of any vessel must not make contact with the ceramic plate top outside of the hot-zone - this is to avoid damaging the ceramic hotplate surface. Note: Modular heating blocks are not suitable for use with ceramic top hotplates 120 mm... -
Page 9: Premium Hotplate
Premium Hotplate SP150, SP150/120 1. Top casting (blue, white, black, avocado, red, tangerine, violet and pink) 2. Control interface 3. Ceramic top plate 4. Aluminium top Surface 5. Heater control dial 6. TFT - LCD Digital display 7. Hot LED 8. -
Page 10: Adjusting The Display Brightness
Adjusting the Display Brightness a. At power up the display screen will be greyed out ---C b. Click down on the heat control knob for 1.5 seconds to enter the menu carousel ---C c. Check if the set-up icon is displayed centrally inside the circle. If not turn the heat knob until the set-up icon is displayed in the circle d. - Page 11 e. Using the heat control knob scroll through the menu to select the brightness icon option f. Click down on the heat control knob to enter brightness set-up. The default setting is 5, with a scale of 1 to 10 with the brightest level being level 10 and the darkest level 1 g.
- Page 12 i. This will then return you to the set-up mode screen j. To return to the display screen hold down the heat control knob for 1.5 seconds ---C...
-
Page 13: Finding Out Information About The Unit
Finding out Information About the Unit a. After power up the display will be greyed out ---C b. Click down on the heat control knob for 1.5 seconds to enter the menu carousel ---C c. Check if the about icon is displayed centrally inside the circle. If not turn the heat knob until the about icon is displayed in the circle... - Page 14 d. Click down on the heat control knob to enter about mode. The screen will display the software version and Cole-Parmer Ltd details HSM V1.0.5 HCFv01.12.08 Aug 20 2019 www.coleparmer.com e. Click the back arrow icon and click to return to the menu carousel HSM V1.0.5 HCFv01.12.08 Aug 20 2019...
-
Page 15: Setting The Heater Temperature
Setting the Heater Temperature a. At power up the display screen will be greyed out until activated ---C b. Click down on the heat control knob to activate the heat function, the red crescent and heat graphics will then illuminate in red c. - Page 16 e. The real time temperature starts to increase to the target temperature 1 degree steps f. Once the target temperature has been reached the Celsius C turns red 250C g. To turn off the heat function, click on the heat control knob 250C...
-
Page 17: Adding A Hotplate Program
Adding a Hotplate Programme Accessing the Programming Page a. At power up the display screen will be greyed out ---C b. Click down on the heat control knob for 3 seconds to enter the menu carousel ---C c. Check if the program icon is displayed centrally inside the circle. If not turn the heat knob until the programme icon is displayed in the circle... - Page 18 d. Click down on the heat control knob to enter programme mode e. Scroll with the heater control knob to the add programme icon, click down once f. The time and heater temperature icons are set to zero and a selection box appears round the function options icons 00:00:00 0 C 00:00:00...
-
Page 19: Single-Stage Program
Single-Stage Programme g. Once in the programme editing screen, click down the heat knob once more to enter function editing A multi-stage icon is displayed at the left of the screen (do not 00:00:00 0 C 00:00:00 h. Scroll the heat control knob to select time. Click once to enter the time selection mode. - Page 20 Scroll the heat c temperature. Click once to input the set temperature (in this example j. When you have finished programming, hold down the heat control knob for 2 seconds to go back to the function editing screen 00:32:21 00:00:00 0 C 250 C k.
-
Page 21: Multi Stage Program
n. The lines go green to indicate it is playing 00:32:21 250 C o. Selecting the stop icon stops the program and returns to the programme main screen 00:32:21 250 C Multi stage Programme a. To set up a multitage programme set up a single stage programme as detailed on page 18 b. - Page 22 d. To add an additional multi-stage program, scroll down to the add a new programme icon below 00:15:00 150 C 00:00:00 0 C e. Enter the 1b time and temperature settings and repeat for additional multi-stage settings if required 00:15:00 150 C 00:00:00 0 C 00:30:00 250 C f.
- Page 23 h. To play the multi-stage programme select play icon 00:15:00 150 C 00:00:00 0 C 00:30:00 250 C i. The display will show the first stage e.g. 1a of the multi stage programme and the lines will turn green to indicate it is playing 01:12:21 150 C j.
-
Page 24: Run Selective Stages Of The Multi-Stage Program
Run Selective Stages of the Multi-Stage Programme a. From the main programme screen, a selection box will appear round the functions of the first programme on the list 00:15:00 150 C 00:00:00 0 C 0 N/A 00:30:00 250 C 00:30:00 250 C b. - Page 25 c. This will display the list of stages associated with the multi stage list (1a, 1b ...)with the program a box will be around the first stage of the programme list 00:00:00 0 C 00:15:00 150 C 0 N/A 00:30:00 250 C 00:30:00 250 C d.
- Page 26 g. Selecting the stop icon then stops the programme and returns to the programme main screen 00:32:21 250 C...
-
Page 27: Editing An Existing Program
Editing an Existing Programme 00:00:00 0 C 0 N/A 3a 00:30:00 250 C Single and Multi Stage Programme Editing a. On the main programme screen, a selection box will appear round the functions of the first programme on the list 00:15:00 150 C 00:00:00 0 C 0 N/A... -
Page 28: Deleting An Existing Program
d. Scroll to the feild you want to edit and edit the funnction in the same was as you input, as detailed on page 18 Deleting an Existing Programme Deleting a Single or Top Level Multistage Programme a. From the main programme screen, a selection box will appear around the actions the program you want to delete, then click down to delete 00:30:00 250 C 00:00:00 0 C... -
Page 29: Delete An Individual Stage Multi Stage Program
Delete an Individual Stage Multi Stage Programme a. From the main programme screen, a selection box will appear round the functions of the first programme on the list 01:15:00 250 C 00:12:30 b. Scroll to the multi-stage stage programme you wish to delete the individual stage 01:15:00 250 C 00:12:30 c. - Page 30 e. Scroll down the list of programmes to the one you wish to delete, click once to select the delete icon 00:32:21 250 C 00:20:00 100 C f. Click again to delete the individual stage of the multi stage programme (in this example 1b) 00:32:21 250 C...
-
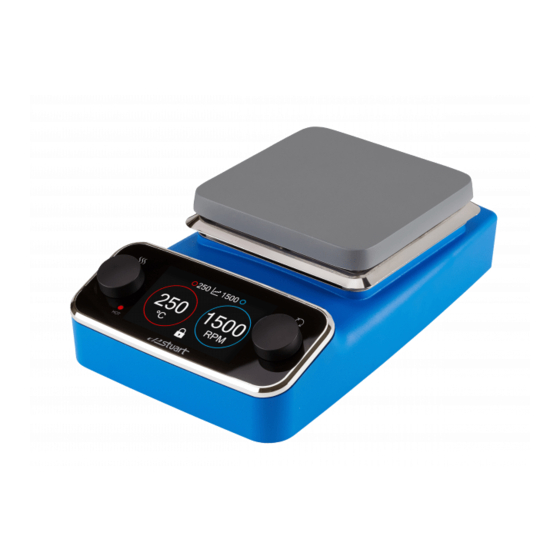
Page 31: Premium Hotplate Stirrer
Premium Hotplate Stirrer SP152, SP152/120, CP152, CP152/120 1. Top casting (blue, white, black, avocado, red, tangerine, violet and pink) 2. Control interface 3. Ceramic top plate 4. Aluminium top plate 5. Heating control dial 6. Stirrer control dial 7. TFT - LCD Digital display 8. -
Page 32: Adjusting The Display Brightness
Adjusting the Display Brightness a. At power up the display screen will be greyed out ---C b. Click down on heat or stir control knob for 1.5 seconds to enter the menu carousel ---C c. Check if the set-up icon is displayed centrally inside the circle. If not turn the heat or stir knob until the set-up icon is displayed in the circle 1250 1250... - Page 33 d. Click down on the heat control knob to enter set-up mode 1250 e. Using the heat control knob scroll through the menu to select the brightness icon option 1250 f. Click down on the heat control knob to enter brightness set-up. The default setting is 5, with a scale of 1 to 10 with the brightest level being level 10 and the darkest level 1 1250...
- Page 34 g. Click once to enter brightness adjustment (box appears around the number) 1250 h. Scroll through the brightness level options and select the desired brightness level, click once to select this level (in this example Level 7) 1250 i. The unit will then return to the settings main screen 1250...
- Page 35 j. To return to the main screen hold down the heat control knob for 3 seconds 1250 1250 1250...
-
Page 36: Finding Out Information About The Unit
Finding out Information About the Unit a. After power up the display will be greyed out ---C b. Click down on the heat control knob for 3 seconds to enter the menu carousel ---C c. Check if the about icon is displayed centrally inside the circle. If not turn the heat knob until the about icon is displayed in the circle 1250 1250... - Page 37 d. Click down on the heat control knob to enter about mode. The screen will display the software version and Cole-Parmer Ltd details HSM V1.0.5 HCFv01.12.08 Aug 20 2019 www.coleparmer.com 1500 e. Scroll to the back arrow icon and click to return to the menu carousel HSM V1.0.5 HCFv01.12.08 Aug 20 2019...
- Page 38 f. To return to the main screen hold down the heat control knob for 3 second 1250 1250 1250 Setting the Heater Temperature a. At power up the display screen will be greyed out until activated ---C b. Click down on the heat control knob to activate the heat function, the red crescent and hockey stick line will illuminate to red and the ambient temperature...
- Page 39 c. The minimum target set-point temperature is 25 C and the temperature. The ceramic hotplate maximum temperature is 450 C and for the metal (aluminium) hotplate the maximum is 325 d. Turn the heat control knob to the target temperature required, after a few seconds the target temperature will flash twice to confirm it has been set (in this example e.
- Page 40 f. Once the target temperature has been reached the Celsius C turns red g. To turn off the heat function, click on the heat control knob ---C...
-
Page 41: Setting The Stirrer Speed
Setting the Stirrer Speed a. At power up the display screen will be greyed out until activated ---C b. Click down on the stirrer control knob to activate the stirring function, the crescent and hockey stick line will illuminate to blue c. - Page 42 e. The real time speed starts to increase to the target temperature 1200 f. Once the target temperature has been reached the RPM turns blue 1200 1200 g. To turn off the stirring function, click on the stirrer control knob 1200 1200...
-
Page 43: Adding A Hotplate Stirrer Program
Adding a Hotplate Stirrer Programme Accessing the Programming Page a. At power up the display screen will be greyed out ---C b. Click down on the heat control knob for 3 seconds to enter the menu carousel ---C c. Check if the programme icon is displayed centrally inside the circle. If not turn the heat knob until the programme icon is displayed in the circle 1250 1250... - Page 44 d. Click down on the heat control knob to enter programme mode 00:00:00 0 C 0 N/A 1500 e. Click on the heater control knob to add a new programme, a box appears around the + icon option 00:00:00 0 C 0 N/A 1500 f.
-
Page 45: Single Stage Program
Single Stage Program a. . Once in the programme editing screen, click down the heat knob once more to enter function editing 1a 00:00:00 0 C 00:00:00 0 C 0 N/A 1500 b. Scroll the heat control knob to select time. Click once to enter the time selection mode. - Page 46 d. The third option is stirrer speed, the minimum stirrer speed is 50 rpm. 1a 00:32:21 250 C OFF N/A 00:00:00 0 C 0 N/A 1500 e. Scroll the heat knob to the stirrer option and increase the stirrer speed above 50 1a 00:32:21 250 C 500 N/A 00:00:00 0 C 0 N/A...
- Page 47 h. When you have finished programming, hold down the heat control knob for 2 seconds to go back to the program screen 1a 00:32:21 250 C 500 ON 00:00:00 0 C 0 N/A 1500 i. To play the programme, select the play function icon 00:32:21 00:32:21 250 C...
-
Page 48: Multi Stage Program
Multi Stage Programme a. See pages 20 - 27 Run Selective Stages of the Multi-Stage Programme a. See page 23 Editing an Existing Programme Single & Multi Stage Programme Editing a. See page 26 Deleting and Existing Programme Deleting a Single Programme b. -
Page 49: External Ptfe Probe
External PTFE Probe A PTFE probe is supplied for those applications requiring chemically resistant probe. For optimum temperature control, ensure the end of the sensing probe is immersed at least 20mm deep into the medium being controlled The PTFE probe can operate as a precise temperature controller from 20 C to 200 When the probe is connected, the probe... -
Page 50: Product Repair
Error Code Fault Condition Probe Range Error Box Lost Error Hotplate Temperature Error Hotplate Ambient Error Communication Delay Probe Out Error Comms Error Display Not Responding Display Has fatal Error Flags Set Probe Failed Open Circuit Probe Failed Short Circuit Probe Over 200 C Error Comms Delay, HCF Not Responding... -
Page 51: Ceramic Top Plate Cleaning
the product and discontinue use. Contact Cole-Parmer for additional instructions regarding interior spills Ceramic Top Plate Cleaning • The ceramic top is highly resistant to chemical attack • Ensure the top plate is cool and disconnect from the mains electricity •... -
Page 52: Technical Specifications
Warranty Statement Cole-Parmer warrants this equipment to be free from defects in material and workmanship when used under normal laboratory conditions for a period of 3 years. This warranty begins from the date of purchase by the end user In the event of a justified claim, Cole-Parmer will replace any defective component or replace the unit free of charge This warranty does NOT apply if: •... -
Page 53: Glossary Of Icons
Glossary of Icons Heating Target icon - turns white when heating turned on and displays the target temperature will flash twice to show selected. The minimum set-point is 25 Stirrer Target Icon - turns white when stirrer turned on and display stirrer temperature 1200 will flash twice minimum setting 50 rpm Heater Hockey Stick Line - turns red when the heating mode is selected and working... - Page 54 Time Duration Icon - during programming, you can set the time duration of the run Heat Temperature Icon - during programming, you can set the heater temperature of the run Stirrer Speed Icon - during programming, you can set the stirrer speed, the minimum speed is 50 rpm.
- Page 55 Technical Specifications Hotplate Stirrers SP152 & /120 CP152 & /120 Plate material Coated aluminium/ Glass ceramic silicon Plate dimensions, mm 150 x 150 150 x 150 Heated area, mm 150 x 150 120 x 120 Heater control Digital Digital Heater power, W Max.plate temp, Stirrer speed, rpm 50 - 1400...
- Page 56 HS100-061 Version 1.4...
Need help?
Do you have a question about the Stuart SP152B and is the answer not in the manual?
Questions and answers