Advertisement
Quick Links
Quick Installation Guide
TSOL-ESK350/400/800/1600-E
Step 1. Find a suitable location
Open the package and pick up the Easy Solar Kit by the notches around
the base plate. Find a suitable location and put down the Easy Solar Kit
lightly.
Figure Notches around the base plate
Please put the Easy Solar Kit on a flat and
CAUTION
non-shadow location.
Easy Solar Kit has a 2.1m end cable and
CAUTION
should be set near the socket. Or use the
expansion cable as shown in Step 5.
Step 2. Open the solar panel lock
There are two solar panel locks on the base plate. Use a screwdriver to
screw off the solar panel locks.
Figure Solar panel lock
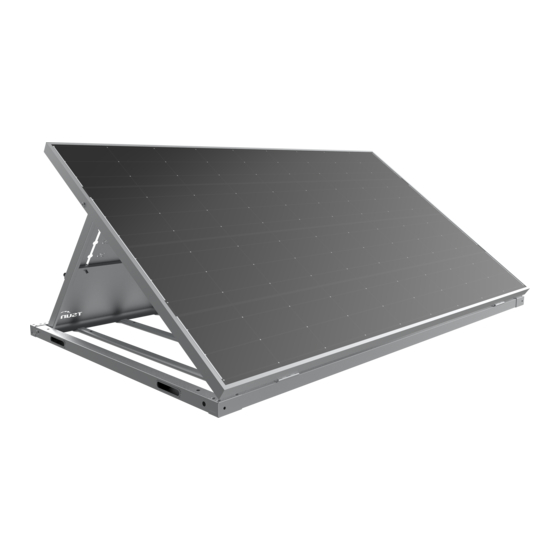
Step 3. Prop up the bracket
Lift up the solar panel and prop up the bracket. Screw on the solar
panel locks to fix the bracket on the base plate.
01
Figure Screw on the solar panel locks
The bracket must be fixed on the base
WARNING
plate, which will promote the wind loading
rating of Easy Solar Kit.
Step 4. Adjust the direction and angle
Pick up the base plate and adjust the direction. Make the solar panel
facing the sun light.
Please adjust the direction at noon to get a
CAUTION
better electric energy production during
the day time.
There are two angle locks on the bracket. Adjust these two angle locks
at the same time.
Figure Angle lock on the bracket
Lift the solar panel by one hand and use another hand to rotate the
angle lock in counterclockwise direction. Slowly put down the solar
panel and make the angle lock slip into the right angle. Rotate the angle
lock in clockwise direction and tighten the angle lock.
02
Figure Adjust the angle lock
Recommended angle parameters can be
CAUTION
found in the appendix table.
Step 5. Install the Expansion Kit
(For ESK800 & ESK1600)
TSOL-ESK800 has one Expansion Kit and TSOL-ESK1600 has three
Expansion Kits. Install the Expansion Kit according to Step 1 to Step 4.
The recommended distribution is shown as below:
Expansion
Kit
Expansion
Expansion
ESK800
Kit
Kit
Figure The recommended distribution
Pay attention to the distance between two
WARNING
ESK products and make sure that there is
no shadow on the panels.
Use DC Extend Cable to connect the Expansion Kit to the ESK800 or
ESK1600.
03
Expansion
Kit
ESK1600
Advertisement

Related Manuals for Tsun TSOL-ESK350-E


Summary of Contents for Tsun TSOL-ESK350-E
- Page 1 Quick Installation Guide TSOL-ESK350/400/800/1600-E Step 1. Find a suitable location Open the package and pick up the Easy Solar Kit by the notches around the base plate. Find a suitable location and put down the Easy Solar Kit lightly. Figure Screw on the solar panel locks Figure Adjust the angle lock The bracket must be fixed on the base WARNING...
- Page 2 TSUNESS Co., Ltd el: +86-512-6618 6028 Figure Connect the extension cable Optional accessories can be used to connect two base plates together. E-mail: sales@tsun-ess.com | www.tsun-ess.com Add: Building E1, No. 555, Chuangye Road, Dayun Town, Jiashan County, Jiaxing City, Zhejiang Province, China...
Need help?
Do you have a question about the TSOL-ESK350-E and is the answer not in the manual?
Questions and answers