
Related Manuals for GPO Display EN Series


Summary of Contents for GPO Display EN Series
- Page 1 EN-Series Video Wall User Guide Before operating the unit, please read this manual thoroughly, and retain it for future reference...
-
Page 2: Table Of Contents
----- 8 Installation Precautions ----- 11 Ventilation Requirements ----- 15 Mechanical Layout ----- 16 GPO Display Video Wall Installation ----- 18 Cabling Setup ----- 19 Configuration of Video Wall Displays ----- 21 10. Remote Control / OSD Menu ----- 23 11. - Page 3 EN-Series Video wall Notice 1. When disconnecting the display from an electrical outlet, the plug must be pulled out from the socket. Do not remove power cord from outlet by pulling from the cord. Pull from the plug head. 2. WARNING – To reduce the risk of fire or electric shock, do not expose this appliance to rain or other forms of moisture.
- Page 4 EN-Series Video wall Important Safety Instructions 1. Read these instructions. 2. Keep these instructions. 3. Heed all warnings. 4. Follow all instructions. 5. Do not use this product near water. 6. Clean only with dry microfiber cloth. 7. Do not block any ventilation openings. Install in accordance with the manufacturer’s instructions. 8.
-
Page 5: Instructions
EN-Series Video wall Instructions Thank You for Purchasing a GPO Display NSV-Series Video Wall This manual describes how to use the product and provides safety guidelines and best practices. Please read the manual carefully before installing or using the product. -
Page 6: Product Description
Product Description Type: LCD Display Screen Surface: Anti-Reflective and Hard Coating Dimension Power BTU's Model Weight (WxHxD, inch) Consumption(W) (BTU/hour) SV(EN)46MSS 40.3x22.8x5.5 58lbs 511.8 SV(EN)46HSS 40.3x22.8x5.5 61lbs 648.3 SV(EN)46MSU 40.2x22.7x4.28 55lbs 511.8 SV(EN)46HSU 40.2x22.7x4.28 55lbs 648.3 SV(EN)55MSS 47.8x27.0x5.6 76lbs 648.3 SV(EN)55HSS 47.8x27.0x5.6 76lbs... - Page 7 Product Description Type GPO Display Wall Mount Model Dimension (WxHxD, inch) Weight SBL46 40.3 x 22.8 x 3.1 15lbs SLB55 47.8 x 27.0 x 3.1 21lbs SLM46 40.2x22.7x2.5 20lbs SLM55 47.8 x 26.94 x 2.36 25lbs ZLM46 40.2x22.7x1.57 23lbs ZLM49 42.4x23.9x1.57...
-
Page 8: Handling Precautions
Handling Precautions To ensure safety, please read this manual carefully before installation and follow the instructions herein. Store this installation guide in a secure place for future reference. • The video wall must be installed on a flat and level surface which is strong enough to bear its weight. - Page 9 Handling Precautions www.gpodisplay.com NSV-series Video wall...
- Page 10 EN-Series Video wall Handling Precautions How to carry the product At least two people are required to carry the display. When carrying the product upright, please hold the handles on the rear as well as the bottom of the display simultaneously for stability.
-
Page 11: Installation Precautions
Installation Precautions • A minor gap between monitors is strongly recommended -High temperatures can cause slight expansion of panels. If there is no space between panels, damage may occur as a result of pressure resulting from the expansion of adjacent panels into one another. - Page 12 Installation Precautions • Top of product: Even partial pressurization of the top bezel can result in light leakage (as shown below). Be careful not to apply pressure to the top of the product during installation and handling. Best practices for maintaining long-term quality 1.
- Page 13 EN-Series Video wall Installation Precautions Mounting on a wall surface Please secure minimum clearance as shown in the picture for adequate ventilation and technical service. Ventilation space in front of NSV-Series displays must be furnished for heat dispersion. If the area in front of NSV-Series displays must be sealed, there must be consideration for the heat dispersion on the rear side of NSV-Series to compensate.
- Page 14 EN-Series Video wall Installation Precautions Please ensure alignment on the Z-axis for a level plane across adjacent panels (as shown in the diagram below). If precautions are not heeded, GPO US will not accept responsibility for any Failure due to such installation errors. ...
-
Page 15: Ventilation Requirements
If for some reason the opening needs to be covered, other means of ventilation will need to be incorporated into the 4” [100mm] design. Contact GPO Display for design review and recommendations. www.gpodisplay.com NSV-series Video wall... -
Page 16: Mechanical Layout
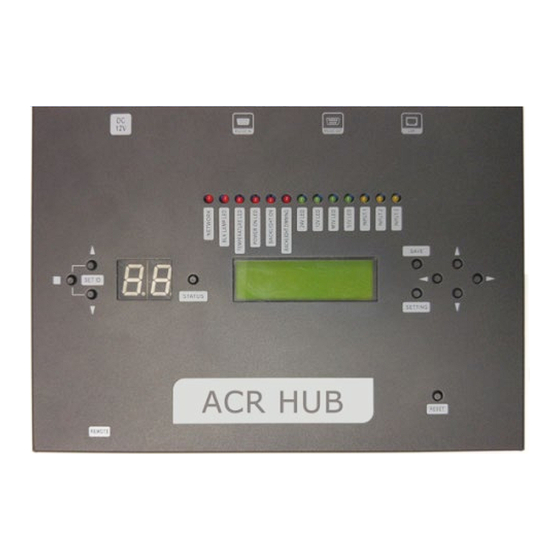
EN-Series Video wall Mechanical Layout 1. AC Power S/W On/Off a. LED(RED) : LAN Connection Display 2. AC Power In (100V ~ 240V) b. LED(RED) : Back light On(Lux) Display. 3. DVI 1 Input c. LED(RED) : Over Temperature Display. 4. - Page 17 EN-Series Video wall 1. IR - Aim the remote control towards this spot on the LCD Display. 2. LED Indicator - LCD Power Status display(On : BLUE / Off : RED) 3. OSD KEY Input(Power / Menu / Source / Left / Right / Up / Down) a) Power : Turns the LCD Display On/ Off.
-
Page 18: Gpo Display Video Wall Installation
If any further information or support is needed from GPO Display, please contact us in advance to ensure ample time for support. We will be glad to help with any recommendations or information. Call 510-659-9855 or e-mail support@gpodisplay.com. - Page 19 EN-Series Video wall Connections Cabling(DVI 1) Cabling (DVI 2) www.gpodisplay.com EN-series Video wall...
-
Page 20: Cabling Setup
EN-Series Video wall Cabling (VGA) Cabling (RS-232) www.gpodisplay.com EN-series Video wall... -
Page 21: Configuration Of Video Wall Displays
3. The Horiz. Set Count is number of rows and Vert. Set Count is number of columns in this configuration, 4. The input image should be rotated clockwise 90°. *GPO Display provides landscape and portrait wall mount system separately. Before order, please be sure which orientation is compatible with your system. - Page 22 Configuration of Video Wall Displays Coniguration of units for video wall display 1. Make sure the main power switch on each display is ON (The main power switch is located on the back of the display where the power cord connects) 2.
-
Page 23: Remote Control / Osd Menu
EN-Series Video wall Remote Control 1. SOURCE : Select Input Source -DVI 1-> DVI 2-> PC 2. POWER : Turns the LCD Display On and Off 3. UP : Control the UP cursor in the menu 4 LEFT : Control the LEFT cursor in the menu 5 RIGHT : Control the RIGHT cursor in the menu 6 ENTER : Control the ENTER cursor in the menu 7 DOWN : Control the DOWN cursor in the menu... - Page 24 EN-Series Video wall Viewing the Menus Press the MENU button. The OSD menu is then displayed on the screen. Left side has five icons: Picture, Sound, Setup and PIP. Changing the Picture Standard 1. Press the MENU button to display the menu. 2.
- Page 25 EN-Series Video wall Customizing the Picture Settings Displays feature several setting options that allow you to control the picture quality. 1. Press the MENU button to display the menu. 2. Press the ENTER button. 3. Press the ▲ or ▼ button to select Custom, then press the ENTER button. 4.
- Page 26 EN-Series Video wall www.gpodisplay.com EN-series Video wall...
- Page 27 EN-Series Video wall www.gpodisplay.com EN-series Video wall...
- Page 28 EN-Series Video wall www.gpodisplay.com EN-series Video wall...
- Page 29 EN-Series Video wall www.gpodisplay.com EN-series Video wall...
- Page 30 EN-Series Video wall www.gpodisplay.com EN-series Video wall...
- Page 31 EN-Series Video wall www.gpodisplay.com EN-series Video wall...
- Page 32 EN-Series Video wall www.gpodisplay.com EN-series Video wall...
- Page 33 EN-Series Video wall www.gpodisplay.com EN-series Video wall...
- Page 34 EN-Series Video wall www.gpodisplay.com EN-series Video wall...
-
Page 35: Sicp Program
EN-Series Video wall SICP (Serial Interface Communication Protocol) This document defines all the command and messages exchanged between the Master (a PC or the other controller) and the Slave (the displays). It also describes the ways to send or read the commands or the messages. 1. - Page 36 EN-Series Video wall How to Install SICP 1. Introduction This manual booklet describes how to manage and utilize the product (Video Wall set) through remote control by RS232 protocol. This will introduce SICP V4.01 (Software that enables you to control the Video Wall) and various applications will be possible with this software.
- Page 37 EN-Series Video wall 3. Running SICP V4.01 and Structure Go to “Start” Menu -> Programs -> SICP V4.01 to run the program. 1. Network IP Setting: Controls IP Setting. 2. Com Mode: Selects the COM Port Mode. 3. Horizontal & Vertical: Select Horizontal & Vertical count of sets in array. 4.
- Page 38 EN-Series Video wall 4. Connect & Disconnect - Users can connect RS-232 input and control from your PC using the RS232 Cable. - Select the Port into which PC is connected (refer to ③ in the image on previous page) and click “connect”...
- Page 39 EN-Series Video wall 2) Virtual Remocon (Remote Control) - Select Remocon Tab - This virtual remote controller controls sets (displays) via RS-232. Note: Functions in Slide Tab will be described in “6. Slide Function” 3) Color Setting - Users may access the “Color Setting” mode only after entering Supervisor Mode.
- Page 40 EN-Series Video wall 4) Edge Setting - Users can access “Edge Setting” only if after entering Supervisor Mode. In order to enter Supervisor mode, go to “Control Mode” in the tool bar (top) and select “Setting Mode” - Hot key: Ctrl+F3. - Press “OK”...
- Page 41 EN-Series Video wall - H-Set Count (Horizontal Set Count): Number of displays in array horizontally (counting left-to-right) E.g. Diagram of array on previous page shows H-Set Count of “3” V-Set Count (Vertical Set Count): ): Number of displays in array vertically (counting top-to-bottom) E.g.
- Page 42 EN-Series Video wall - HDMI Video Input format: Select video format of HDMI input data 0: RGB444 1: YPbPr444 2: YPbPr422 *HDMI Video Input format issues often manifest themselves in the form of a magenta/pink tint on display panels. If this issue arises, check the type of source being used. If, for example, a Blu-Ray player is being used, the HDMI Input Format on the displays must be set to “1”...
- Page 43 EN-Series Video wall 6. Slide Function 1) Edit Example> When users wish to display a 5X5 background from DVI input and display 3X3 (in the center) from VGA input. - Click on Edit box as described in ① on the image above. - Select PC as described in ②...
- Page 44 EN-Series Video wall # Add & Delete in Slide Schedule Slide (Layout) scheduling: Users set intervals/schedules for each “slide”/layout separately. Users cannot change the sequence of play after initial scheduling, so the schedule must be arranged n order prior to Start. Add : Insert the edits (slides) - Remove : Remove slide - Remove All : Remove the entire slide schedule...
-
Page 45: Serial Command Protocol
EN-Series Video wall 5. Transmission Formats This is the format that the computer will send to the display to execute commands . The format for this command transmission is as follows:( total 13 byte ) ex) <STX>001PWRWOFF0<ETX> ( Set ID : 1 , Power Off Send ) 0x0f 0x0d ASCII (capital letter) - Page 46 EN-Series Video wall 8. How to choose display ID number ♦ Read Set ID Number * Attention : Read Set ID Function must be only one connect Monitor (1 pc : 1 monitor) 0x0f 0x0d ASCII (capital letter) - ID1 ~ ID3 : “FFF” ( Set ID ) - DA1 ~ DA3 : “000”...
- Page 47 EN-Series Video wall ♦ Remote Control Lock On/Off (RML) 0x0f 0x0d ASCII (capital letter) -ID1 ~ ID3 : Set ID (“001” ~ “100”) -DA1 ~ DA3 : “-ON” : Lock On / “OFF” : Lock Off Ex) <STX>001RMLW-ON0<ETX> ( Lock On ) Acknowledge =>...
- Page 48 EN-Series Video wall ♦ Virtual Remote Control (RMT) 0x0f 0x0d ASCII (capital letter) -ID1 ~ ID3 : Set ID (“001” ~ “100”) -DA1 ~ DA3 : “MEN” (Menu) “SOU” (Source) “LEF” (Left & Volume-) “RIG” (Right & Volume+) “ENT” (Enter) “-UP”...
- Page 49 EN-Series Video wall ♦ Vertical Set Count (VSC) 0x0f 0x0d ASCII (capital letter) - ID1 ~ ID3 : Set ID (“001” ~ “100”) - DA1 ~ DA3 : “001” ~ “010” Ex) <STX>001VSCW0100<ETX> ( V-Set Count 10 ) Acknowledge => <STX>001VSC#010#<ETX> ♦...
- Page 50 EN-Series Video wall ♦ Vertical Edge Adjust (VEG) 0x0f 0x0d ASCII (capital letter) - ID1 ~ ID3 : Set ID (“001” ~ “100”) - DA1 ~ DA3 : “000” ~ “200” Ex) <STX>001VEGW0400<ETX> ( V-Edge Adjust 40 ) Acknowledge => <STX>001VEG#040#<ETX> ♦...
- Page 51 EN-Series Video wall ♦ Color Adjust VGA(D-SUB) (FCP) 0x0f 0x0d ASCII (capital letter) - ID1 ~ ID3 : Set ID (“001” ~ “100”) - DA1 ~ DA3 : “000” ~ “255” ( Color Value ) - R/W : “W” (Write) “R”...
- Page 52 EN-Series Video wall ♦ Power On/Off Status (PWS) 0x0f 0x0d ASCII (capital letter) - ID1 ~ ID3 : Set ID (“001” ~ “100”) - DA1 ~ DA3 : “-ON” : Power On “OFF” : Power Off Ex) <STX>001PWSR0000<ETX> ( Set ID: 1 Read Power Status ) Acknowledge =>...
-
Page 53: Specifications
EN-Series Video wall Input/Output Port Description Items Specifications H Frequency Range : 20 ~ 80 kHz V Frequency Range : 55 ~ 75 Hz VGA (Analog RGB) Maximum resolution :1920x1080 60Hz Maximum pixel rate : 162 MHz/110MHz Supported Signal H Frequency Range : 20 ~ 80 kHz Connection V Frequency Range : 55 ~ 75 Hz DVI (Digital RGB) - Page 54 EN-Series Video wall Timing Modes Horizontal Vertical Pixel Clock Sync Polarity Display Mode Frequency(KHz) Frequency(Hz) (MHz) (H/V) IBM, 640 x 480 31.469 59.940 25.175 IBM, 720 x 400 31.469 70.087 28.322 VESA, 640 x 480 37.861 72.809 31.500 VESA, 640 x 480 37.500 75.000 31.500...
Need help?
Do you have a question about the EN Series and is the answer not in the manual?
Questions and answers