Advertisement
Quick Links
Advertisement

Related Manuals for Seeed Grove Beginner Kit


Summary of Contents for Seeed Grove Beginner Kit
- Page 1 Grove Beginner Kit For Arduino® User Manual...
-
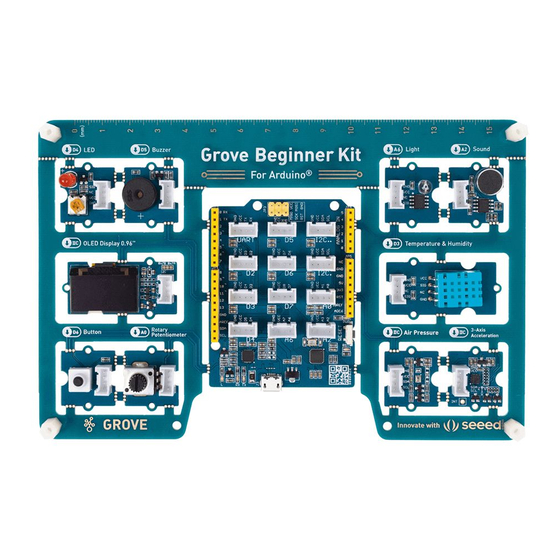
Page 2: Hardware Overview
Grove Beginner Kit For Arduino® Grove Beginner Kit for Arduino is one of the best Arduino Beginner Kit for beginners. It includes one Arduino compatible Board and 10 additional Arduino sensors and all in one-piece of PCB design. All the modules have been connected to the Seeeduino through the PCB stamp holes so no Grove cables are needed to connect. - Page 3 Grove Beginner Kit For Arduino® Index 1 …………….. Harware Overview 4 …………….. Part List 5 …………….. Learning Objectives 6 …………….. How To Get Started With Arduino 10 ...…………. Lesson 1: Blinking with the LED 15 …………… Lesson 2: Pressing Button to Light Up LED 20 ……………...
- Page 4 Grove Beginner Kit For Arduino® Note: By default, Grove modules are connected to Seeeduino via PCB stamp holes. This means you don’t need to use Grove cables to connect if not broken out. The default pins are as follow: Modules...
-
Page 5: Part List
Grove Beginner Kit For Arduino® Part List Modules Quantity Sensors Temperature & Humidity Sensors 3-Axis Accelerometers Air Pressure Light Sensor Sound Sensor Input Modules Rotary Potentiometer Button Output Modules Buzzer Display Module OLED Display Grove Cables Micro USB Cable... -
Page 6: Learning Objectives
Plug and Play Unboxing Demo The Grove Beginner Kit has a plug and plays unboxing demo, where you first plug in the power to the board, you get the chance to experience all the sensors in one go! Use the button and rotary potentiometer to experience each sensor demo! Scroll ->... - Page 7 Grove Beginner Kit For Arduino® How to Get Started With Arduino Install the Arduino IDE Arduino IDE is an integrated development environment for Arduino, which is used for single- chip microcomputer software programming, downloading, testing and so on. Download and Install Arduino IDE for your desired operating system here.
- Page 8 Grove Beginner Kit For Arduino® Start the Arduino IDE 1. Open the Arduino IDE on your PC. 2. Click on -> to select the correct Development Board Model. Select Tools Board Arduino/Genuino Uno as Board. 3. Click -> to select the correct Port (the Serial Port showed in Device Manager...
- Page 9 Grove Beginner Kit For Arduino® 1. Create a new Arduino file and name it , then copy the following code into it: Hello.ino void setup() { Serial.begin(9600); // initializes the serial port with a baud rate of 9600 void loop() { Serial.println("hello,...
- Page 10 Grove Beginner Kit For Arduino® Note: All modules are pre-wired on a single circuit board, so no cables and soldering are needed. However, if you break out the modules and want to connect them with Grove cables, please kindly check the Breakout Guide.
- Page 11 Grove Beginner Kit For Arduino® Lesson Guide Lesson 1: Blinking with the LED We have completed the output “Hello world” program. Now let’s learn how to light the LED module. We know the three basic components of a control system: Input, Control, and Output.
- Page 12 Grove Beginner Kit For Arduino® Hardware connection Module connection Default connection by PCB stamp hole. Connect the Seeeduino to the computer through the USB cable. Software Code Open Arduino IDE. Copy the following code, click Verify to check for syntax errors. Verify that there are no errors, and you can upload the code.
- Page 13 Grove Beginner Kit For Arduino® Code Analysis setup(){ function is called when a sketch starts. Use it to initialize variables, pin modes, setup() start using libraries, etc. The function will only run once, after each powerup or reset of setup() the Arduino board.
- Page 14 Grove Beginner Kit For Arduino® pin: the Arduino pin number to set the mode of. mode: , or INPUT OUTPUT INPUT_PULLUP Setting ledPin to the output mode. digitalWrite(ledPin, HIGH); Description: Write a or a value to a digital pin. HIGH If the pin has been configured as an OUTPUT with pinMode(), its voltage will be set to the...
- Page 15 Grove Beginner Kit For Arduino® Parameters: ms: the number of milliseconds to pause. Allowed data types: unsigned long. Delay the program by 1000ms(1s). Demo Effect and Serial Print Result: The LED module will be 1 second on and 1 second off.
- Page 16 Grove Beginner Kit For Arduino® Lesson 2: Pressing Button to Light Up LED The first thing we need to know is that the input of the button is a digital signal, and there are only two states, 0 or 1, so we can control the output based on those two states.
- Page 17 Grove Beginner Kit For Arduino® Output: LED module Both the sensor and the LED use digital signals, so they should be connected to digital interfaces. Software code: Open Arduino IDE. Copy the following code, click Verify to check for syntax errors. Verify that there are no errors, and you can upload the code.
- Page 18 Grove Beginner Kit For Arduino® Code Analysis pinMode(ledPin, OUTPUT); Define LED as the output unit. pinMode(buttonPin, INPUT); Define button as the input unit.
- Page 19 Grove Beginner Kit For Arduino® buttonState = digitalRead(buttonPin); Description: Reads the value from a specified digital pin, either HIGH Syntax: digitalRead(pin) Parameters: pin: the Arduino number you want to read This function is used to read the states of digital pins, either HIGH or LOW. When the button is pressed, the state is HIGH, otherwise is LOW.
- Page 20 Grove Beginner Kit For Arduino® Syntax: (condition1) { // do Thing A else if (condition2) { // do Thing B else // do Thing C The usage of the statement is: if the logical expression in parentheses is true, execute the statement in curly braces after if, if not, execute the statement in curly braces after the else.
- Page 21 Grove Beginner Kit For Arduino® Lesson 3: Controlling the Speed of the Blink In the last section, we studied that button only has two states, ON/OFF state corresponding 0V and 5V, but in practice, we often counter the need for many states, not just 0V and 5V. Then you need to use Analog Signal! Rotary Potentiometer is a classic example that uses an analog signal.
- Page 22 Grove Beginner Kit For Arduino® Hardware connection Module connection: Default connection by PCB stamp hole. The Seeeduino is then connected to the computer via a USB cable. Hardware analysis: Input: Rotary Potentiometer Control: Seeeduino Lotus Output: LED module The input is an analog signal, so it is connected to the analog signal interface, the LED module is...
- Page 23 Grove Beginner Kit For Arduino® Software Code Open Arduino IDE. Copy the following code, click Verify to check for syntax errors. Verify that there are no errors, and you can upload the code. //Rotary controls LED rotaryPin = A0; // select the input pin for the rotary ledPin = 4;...
- Page 24 Grove Beginner Kit For Arduino® Code Analysis rotaryValue = analogRead(rotaryPin); Description: Reads the value from the specified analog pin. Arduino boards contain a multichannel, 10-bit analog to digital converter. This means that it will map input voltages between 0 and the operating voltage(5V or 3.3V) into integer values between 0 and 1023.
- Page 25 Grove Beginner Kit For Arduino® Lesson 4: Making the Buzzer go BEEP Just like the LED module, Buzzer is also an output module, instead of lighting up it produces a beep sound. This can be used for many situations for indication purposes. We studied the use of...
- Page 26 Grove Beginner Kit For Arduino® Components Involved 1. Seeeduino Lotus 2. Grove Buzzer 3. Grove Cable(If Broken out) Hardware connection Module connection Default connection by PCB stamp hole. Connect the Seeeduino to the computer through the USB cable.
- Page 27 Grove Beginner Kit For Arduino® Software Code Open Arduino IDE. Copy the following code, click Verify to check for syntax errors. Verify that there are no errors, and you can upload the code. BuzzerPin = 5; Potentiometer = A0; void setup() { pinMode(BuzzerPin, OUTPUT);...
- Page 28 Grove Beginner Kit For Arduino® Code Analysis analogWrite(BuzzerPin, Value); Description: Writes an analog value (PWM wave) to a pin. Can be used to light a LED at varying brightnesses or drive a motor at various speeds. After a call to analogWrite(), the pin will generate a steady rectangular wave of the specified duty cycle until the next call to analogWrite() (or a call to...
- Page 29 Grove Beginner Kit For Arduino® Lesson 5: Making an Light Induct LED The light sensor contains a photosensitive resistor to measure the intensity of light. The resistance of the photosensitive resistor decreases with the increase of light intensity. The output signal is the analog value, the brighter the light source, the larger the analog value.
- Page 30 Grove Beginner Kit For Arduino® Exercise: As the environment slowly brightens, the LED lights will lighten. As the light slowly dimmed, the LED dimmed. The LED will go from dark to light or from light to dark. To achieve this, we will use pulse width modulation(PWM).
- Page 31 Grove Beginner Kit For Arduino® Hardware connection Module connection: Default connection by PCB stamp hole. The Seeeduino is then connected to the computer via a USB cable. Hardware analysis: Input: Light Sensor Control: Seeeduino Lotus Output: LED module...
- Page 32 Grove Beginner Kit For Arduino® Software Code Open Arduino IDE. Copy the following code, click Verify to check for syntax errors. Verify that there are no errors, and you can upload the code. // Light Switch sensorpin = A6; // Analog input pin that the sensor is attached to ledPin = 4;...
- Page 33 Grove Beginner Kit For Arduino® Code Analysis Serial.begin(9600); Description: Sets the data rate in bits per second (baud) for serial data transmission. For communicating with Serial Monitor, make sure to use one of the baud rates listed in the menu at the bottom right corner of its screen.
- Page 34 Grove Beginner Kit For Arduino® outputValue = map(sensorValue, 0, 1023, 0, 255); Description: Re-maps a number from one range to another. That is, a value of fromLow would get mapped to toLow, a value of fromHigh to toHigh, values in-between to values in-between, etc.
- Page 35 Grove Beginner Kit For Arduino® The function is used to write an analog value between 0 - 255 a PWM pin. analogWrite() can only be used for PWM pins. The new mapping data in the previous statement can be output to ledPin to lighten/dim the LED.
- Page 36 Grove Beginner Kit For Arduino® Lesson 6: Sound Sensitive LED Light The sound sensor can detect the sound intensity of the environment, and its output is also simulated. I’m sure you’ve all been exposed to the sound control lights, but now we can do one ourselves, and with the basics, this experiment will be easy for you.
- Page 37 Grove Beginner Kit For Arduino® Practice: The LED lights light up when the sound is made. When there is no sound and it is very quiet, the LED lights go off. Components Involved 1. Seeeduino Lotus 2. Grove LED 3. Grove Sound Sensor...
- Page 38 Grove Beginner Kit For Arduino® Hardware connection Module connection: Default connection by PCB stamp hole. The Seeeduino is then connected to the computer via a USB cable.
- Page 39 Grove Beginner Kit For Arduino® Software Code Open Arduino IDE. Copy the following code, click Verify to check for syntax errors. Verify that there are no errors, and you can upload the code. //Sound Control Light soundPin = A2; // Analog sound sensor is to be attached to analog ledPin = 4;...
- Page 40 Grove Beginner Kit For Arduino® Code Analysis Serial.begin(9600); The software running on the computer communicates with the development board, and the baud rate is 9600. Serial.print(" "); This function is used to output data from the serial port, the output is what is contained in the double quotation marks.
- Page 41 Grove Beginner Kit For Arduino® Serial.println(soundState); Serial port print the sound sensor’s value. So you open the serial monitor on the IED interface, and you see the value of the output sensor. Demo Effect and Serial Print Result: The LED module will light up if the surrounding is loud enough.
- Page 42 Grove Beginner Kit For Arduino® Lesson 7: Displaying Data on OLED OLED Display can be used for many situations, where you could use it to visualize sensor readings! Background Information: What is Arduino Libraries The Arduino environment can be extended through the use of libraries, just like most other programming platforms.
- Page 43 Grove Beginner Kit For Arduino® Hardware connection Module connection: Default connection by PCB stamp hole. The Seeeduino is then connected to the computer via a USB cable.
- Page 44 Grove Beginner Kit For Arduino® Software Code Open Arduino IDE. Install the U8g2 library: Navigate to Sketch -> Include Library -> Manage Libraries… and Search for the keyword “U8g2” in the Library Manager, then install. Copy the following code, click Verify to check for syntax errors. Verify that there are no errors, and you can upload the code.
- Page 45 Grove Beginner Kit For Arduino® Code analysis #include <> Description: is used to include outside libraries in your sketch. This gives the programmer access #include to a large group of standard C libraries (groups of pre-made functions), and also libraries written especially for Arduino.
- Page 46 Grove Beginner Kit For Arduino® Description: Some displays support a 180-degree rotation of the internal frame buffer. This hardware feature can be controlled with this procedure. Important: Redraw the complete display after changing the flip mode. Best is to clear the display first, then change the flip mode and finally redraw the content.
- Page 47 Grove Beginner Kit For Arduino® Prints Hello World onto the OLED Display. Breakout Guide Use Grove cable to connect the OLED to Seeeduino Lotus’s I2C interface (Note: I2C’s default address is 0x78).
- Page 48 Grove Beginner Kit For Arduino® Lesson 8: Detecting Surrounding Temperature & Humidity Have you ever wondered about the temperature and humidity of your surroundings? Want to know the exact number? Want to wear a skirt or coat today depending on the temperature? Let’s...
- Page 49 Grove Beginner Kit For Arduino® Hardware connection Module connection: Default connection by PCB stamp hole. The Seeeduino is then connected to the computer via a USB cable.
- Page 50 Grove Beginner Kit For Arduino® Software Code Open Arduino IDE. Install the Grove Temperature and Humidity Sensor(DHT11) library: Navigate to Sketch -> Include Library -> Manage Libraries… and Search for the keyword “Grove Temperature and Humidity Sensor(DHT11)” in the Library Manager, then install.
- Page 51 Grove Beginner Kit For Arduino® Code Analysis float temp, humi; Defines variables to store readings. temp = dht.readTemperature(); humi = dht.readHumidity(); Description: Functions to be used to read temperature and humidity values from the sensor. Syntax: dht.readTemperature() and dht.readHumidity(). Return type: float.
- Page 52 Grove Beginner Kit For Arduino® Lesson 9: Measuring Surrounding Air Pressure Grove Air Pressure Sensor(BMP280) is a breakout board for Bosch BMP280 high-precision and low-power digital barometer. This module can be used to measure temperature and atmospheric pressure accurately. As the atmospheric pressure changes with altitude, it can also measure the approximate altitude of a place.
- Page 53 Grove Beginner Kit For Arduino® Software Code Open Arduino IDE. Install the Grove Barometer Sensor library: Navigate to Sketch -> Include Library -> Manage Libraries… and Search for the keyword “Grove BMP280” in the Library Manager, then install. Copy the following code, click Verify to check for syntax errors. Verify that there are no errors, and you can upload the code.
- Page 54 Grove Beginner Kit For Arduino® Code Analysis #include <Wire.h> #include is an instruction that introduces a header file. Here we use the <Wire.h> library, this library is included in Arduino IDE. #include "Seeed_BMP280.h" Represents the Seeed_BMP280.h header file that introduces the current path.
- Page 55 Grove Beginner Kit For Arduino® Prints the current air pressure. Serial.print(bmp280.calcAltitude(pressure)); Description: Takes the pressure value can convert to altitude. Syntax: bmp280.calcAltitude(float). Return type: float Parameter: float: Pressure value. Prints the amplitude. Demo Effect and Serial Print Result: The Air pressure readings are display on the Serial Monitor.
- Page 56 Grove Beginner Kit For Arduino® Lesson 10: Sensing Movement This is the last sensor, the triaxial accelerometer, and with this module, you can easily add motion monitoring to your design. So we can do a lot of interesting little experiments on the basis of the motion.
- Page 57 Grove Beginner Kit For Arduino® Software Code Open Arduino IDE. Download the 3-Axis Digital Accelerometer( ±2g to 16g) from Github. Click on Sketch > Include library > Add .ZIP library, import the library into the IED. Copy the following code, click Verify to check for syntax errors. Verify that there are no errors, and you can upload the code.
- Page 58 Grove Beginner Kit For Arduino® Code Analysis #include "LIS3DHTR.h" #ifdef SOFTWAREWIRE #include <SoftwareWire.h> SoftwareWire myWire(3, 2); LIS3DHTR<SoftwareWire> LIS(I2C_MODE);//IIC #define WIRE myWire #else #include <Wire.h> LIS3DHTR<TwoWire> LIS(I2C_MODE);//IIC #define WIRE Wire #endif Initializing the module using software I2C or hardware I2C. while (!Serial) {};...
- Page 59 Grove Beginner Kit For Arduino® Description: Functions to be used to read Y-axis value from the sensor. Syntax: LIS.getAccelerationY(). Return type: float. Description: Functions to be used to read Z-axis value from the sensor. Syntax: LIS.getAccelerationZ(). Return type: float. Prints the 3 axis data to the serial monitor.
- Page 60 Grove Beginner Kit For Arduino® Bonus Projects Project 1: Music dynamic rhythm lamp Project description: In this experiment, we will make the buzzer play pleasant music and the led lights flash according to the music frequency and beat. Components Involved 1.
- Page 61 Grove Beginner Kit For Arduino® Software Code Open Arduino IDE. Copy the following code, click Verify to check for syntax errors. Verify that there are no errors, and you can upload the code. //Music Dynamic Rhythm Lamp #define NTD0 -1...
- Page 62 Grove Beginner Kit For Arduino® NTD1,NTD2,NTDL5,NTD0, NTD3,NTD3,NTD4,NTD5, NTD5,NTD4,NTD3,NTD4,NTD2, NTD1,NTD1,NTD2,NTD3, NTD2,NTD1,NTD1 float durt[]= 1,1,1,1, 1,1,1,1, 1,1,1,1, 1+0.5,0.5,1+1, 1,1,1,1, 1,1,1,1, 1,1,1,1, 1+0.5,0.5,1+1, 1,1,1,1, 1,0.5,0.5,1,1, 1,0.5,0.5,1,1, 1,1,1,1, 1,1,1,1, 1,1,1,0.5,0.5, 1,1,1,1, 1+0.5,0.5,1+1, length; tonepin=5; ledp=4; void setup() pinMode(tonepin,OUTPUT); pinMode(ledp,OUTPUT); length=sizeof(tune)/sizeof(tune[0]); void loop() for(int x=0;x<length;x++) tone(tonepin,tune[x]);...
- Page 63 Grove Beginner Kit For Arduino®...
- Page 64 Grove Beginner Kit For Arduino® Code Analysis #define NTD Here is the definition of the frequency of the D key, which is divided into bass, alto, and treble. #define WHOLE 1 #define HALF 0.5 #define QUARTER 0.25 #define EIGHTH 0.25 #define SIXTEENTH 0.625...
- Page 65 Grove Beginner Kit For Arduino® Project 2: Make an intelligent sound-light induction desk lamp Project description: as the name implies, this project is to make a small lamp controlled by Sound and Light. We need to use the LED module. Of course, Light Sensor and Sound Sensor are also indispensable.
- Page 66 Grove Beginner Kit For Arduino® Software Code Open Arduino IDE. Copy the following code, click Verify to check for syntax errors. Verify that there are no errors, and you can upload the code. //light Induction Desk Lamp soundPin = A2;...
- Page 67 Grove Beginner Kit For Arduino® Breakout Guide Connect the Grove LED to Seeeduino Lotus’s digital signal interface D4, Connect the Light Sensor to Seeeduino Lotus’s analog signal interface A1. Connect the Sound Sensor to Seeeduino Lotus’s analog signal interface A2 using a Grove cable.
- Page 68 EE to design your own module. Geppetto is drag & drop simple… anyone can create professional IoT devices. To make it more convenient for you, Geppeto has a library for Seeed, so you can design your own Grove modules with ease! PCB Services After you’re done with your design, check out the...
- Page 69 Seeed Fusion PCBA Service. To speed up the process of PCB design, Seeed is building the component libraries for KiCad and Eagle. When all components are sourced from Seeed’s PCBA OPL and used with the...
- Page 70 Grove Beginner Kit For Arduino® Resources Grove Beginner Kit for Arduino Wiki [PDF] Grove Beginner Kit for Arduino Schematic Design Files 3. Modules Libraries on Github: OLED Display Temperature & Humidity Sensor Air Pressure Sensor 3-Axis Accelerator Sensor Datasheet Initial Arduino Firmware Demo...
-
Page 71: Tech Support
Grove Beginner Kit For Arduino® More Learning LSTM for live IoT data prediction Tech Support Please submit any technical issue into our forum...
Need help?
Do you have a question about the Grove Beginner Kit and is the answer not in the manual?
Questions and answers