Advertisement
Quick Links
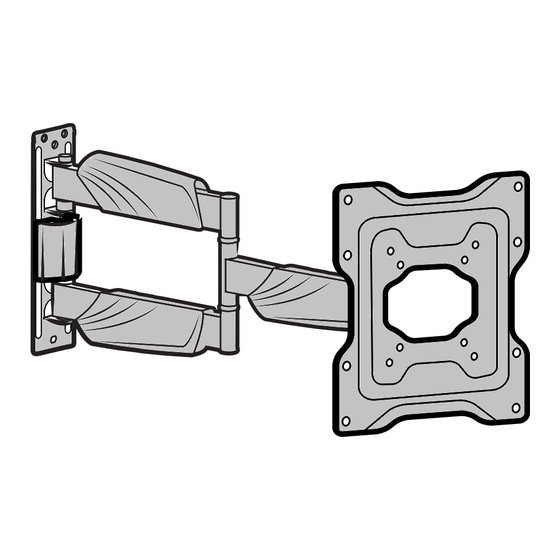
Wall Mount for 23" - 55" TVs
Model 101-4002
www.humancentric.com/patents
Fits 23''-55'' TVs up to 35 kg (77 lbs)
PARTS INCLUDED
Note: Not all parts will be used in the installation. Multiple configuration options are provided to fit di erent TVs, and
di erent parts are used for di erent configurations.
MOUNTING ARM
A Mounting Arm and Plate with Center Cover (1)
B Wall Plate Top / Bottom Covers (2)
WALL MOUNTING HARDWARE
W-A Wall Mounting Screws (4)
TV MOUNTING HARDWARE
M-A M5 x 14mm (4)
M-B M6 x 14mm (4)
ADDITIONAL TOOLS REQUIRED
Phillips Head Screwdriver
Power drill with ⅜" bit (solid concrete or concrete block) or 3/16" bit (wood stud)
Level
Marking Pencil
Edge-finding stud locator (for stud wall mounting)
Masking tape (to plan mounting location)
COMPATIBLE WITH MODELS
Fits TVs with VESA patterns from 75mm x 75mm to 400mm x 400mm.
© 2017 HumanCentric Ventures LLC
Warning: Not for use with drywall!
W-B Concrete Wall Anchors (4)
M-C M6 x 30mm (4)
M-D M8 x 30mm (4)
VESA EXTENSION ARMS
Needed for displays with VESA patterns above 200 x 200
C Extension Arms (4)
TOOLS
F M4 Allen Wrench (1)
M-E M8 x 50mm (4)
M-F D5 (4)
M-G D8 (4)
D Extension Arm Screws (4)
E Extension Arm Nuts (4)
G Wrench
W-C Wall Mounting Washers (4)
M-H Small Spacer (8)
M-I Large Spacer (8)
www.humancentric.com
1
Advertisement

Subscribe to Our Youtube Channel
Related Manuals for HumanCentric 101-4002


Summary of Contents for HumanCentric 101-4002
- Page 1 Power drill with ⅜” bit (solid concrete or concrete block) or 3/16” bit (wood stud) Level Marking Pencil Edge-finding stud locator (for stud wall mounting) Masking tape (to plan mounting location) COMPATIBLE WITH MODELS Fits TVs with VESA patterns from 75mm x 75mm to 400mm x 400mm. © 2017 HumanCentric Ventures LLC www.humancentric.com...
- Page 2 Read the entire instruction manual, including the warnings at the end of the manual, before you start installation and assembly. If you have any questions regarding any of the instructions or warnings, please contact the HumanCentric support team for assistance at support@humancentric.com...
- Page 3 Ensure that you choose an appropriate length screw and spacer combination that is not too long or too short: Will damage TV Will not hold TV Next, lay the mounting bracket on the back of the TV. © 2017 HumanCentric Ventures LLC www.humancentric.com...
- Page 4 Mark the three mounting holes with a pencil. 55mm Use a 3/16” (4.5mm) drill bit to make three 2.2” (55mm) deep holes in the wall. © 2017 HumanCentric Ventures LLC www.humancentric.com...
- Page 5 Use four wall mounting screws (W-A), wall anchors (W-B), and washers (W-C) to secure the arm to the wall. Ensure that the mounting arm is securely fastened to the wall before continuing on to the next step! © 2017 HumanCentric Ventures LLC www.humancentric.com...
- Page 6 TV +/- 3° to the right or left. When the TV is correctly positioned, tighten the three nuts on the back of the mounting plate. © 2017 HumanCentric Ventures LLC www.humancentric.com...
-
Page 7: Route Cables
Use the allen wrench to loosen the adjustment screw on the tilt mechanism. Tilt the TV to the desired angle and re-tighten the adjustment screw. 7. ENJOY! Enjoy your new mounted TV:) If you need anything, please let us know! Any questions? Contact us at support@humancentric.com , and we’re happy to help! © 2017 HumanCentric Ventures LLC www.humancentric.com... - Page 8 Check that the mount is secure and safe to use at regular intervals (at least every three months). HumanCentric intends to make this manual accurate and complete. However, HumanCentric makes no claim that the information contained herein covers all details, conditions, or variations. Nor does it provide for every possible contingency in connection with the installation or use of this product.
Need help?
Do you have a question about the 101-4002 and is the answer not in the manual?
Questions and answers