Advertisement
Available languages
Available languages
Quick Links
PowPak | Installation
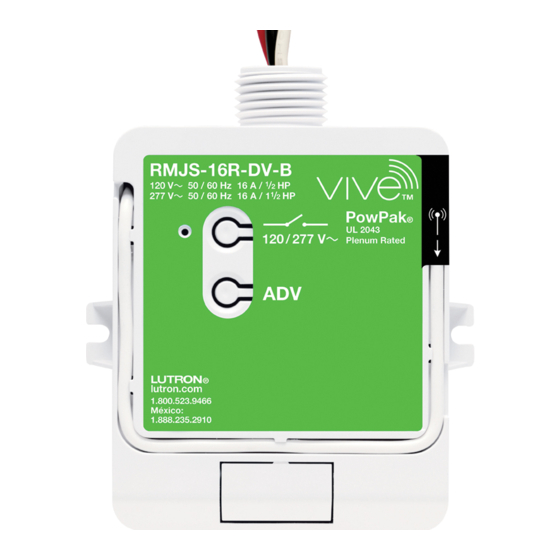
Relay Module
Part of the Vive Family
120 / 277 V~ 50 / 60 Hz 16 A
RMJS-16R-DV-B | URMJS-16R-DVB |
RMJS-16R-DV-B-EM
1/2 HP at 120 V~ 1
1
⁄
HP at 277 V~
2
With Softswitch
RMJS-16RCCO1DV-B | URMJS-16RCCO1DVB
With Softswitch and Occupancy-Status CCO
120 / 277 V~ 50 / 60 Hz 5 A
RMJS-5R-DV-B
1/6 HP at 120 V~ 1/3 HP at 277 V~
RMJS-5RCCO1-DV-B
With Occupancy-Status CCO
PowPak Relay Module
UL 2043 Plenum Rated
UL 924 Listed (RMJS-16R-DV-B-EM)
Note for Replacement:
RMJS and URMJS - the "S" model can replace the non-"S" model
Important Notes: Please read before installing.
• For installation by a qualified electrician in accordance with all local and national
electrical codes (including periodic testing and maintenance of emergency
systems).
• Note: Use copper conductors only.
• Check to see that the device type and rating is suitable for the application.
• DO NOT install if product has any visible damage.
• If moisture or condensation is evident, allow the product to dry completely
before installation.
• Operate between 32 °F (0 °C) and 131 °F (55 °C).
• 0% to 90% humidity, non-condensing.
• For indoor use only.
WARNING
Shock Hazard. May result in serious injury or death.
Turn off power at circuit breaker before installing the unit.
PowPak
Relay Module
Install in center of room to
maximize RF coverage.
Radio Powr Savr
Occupancy
Sensor
30 ft (9 m)
Maximum
Pico
Remote
Control
40 ft (12 m)
All Wireless Transmitters must be installed within
30 ft (9 m) of the PowPak Relay Module.
IMPORTANT SAFEGUARDS
When using electrical equipment, basic safety precautions should always be
followed including the following:
READ AND FOLLOW ALL SAFETY
INSTRUCTIONS.
• Do not use outdoors.
• Do not mount near gas or electric heaters.
• Equipment should be mounted in locations and at heights where it will not be
subjected to tampering by unauthorized personnel.
• The use of accessory equipment not recommended by the manufacturer may cause
an unsafe condition.
• Do not use this equipment for other than its intended use.
SAVE THESE INSTRUCTIONS
Limited Warranty:
www.lutron.com/TechnicalDocumentLibrary/369-119_Wallbox_Warranty.pdf
For FCC/IC information: Please visit: www.lutron.com/fcc-ic
Lutron Electronics Co., Inc. | 7200 Suter Road
Coopersburg, PA 18036-1299, U.S.A.
Required Components
For each system ensure you have:
At least one PowPak Relay Module
At least one Wireless Transmitter
041647
(Occupancy-Status CCO Option Shown)
Rev. A
03/2018
Load
Status
LED
Relay Toggle
+
Advanced
Operations
Contact
Closure
Relay Module
without
Output
occupancy-status
(CCO)
CCO also
(Class 2)
available.
PowPak Relay Module
Radio Powr Savr Occupancy
Sensor (10 maximum)
Start Here
1
Install PowPak Relay Module
Suggested Installation Location: Center of
room to ensure proper RF coverage of area.
A
PowPak Relay Module can be installed in a junction
box or marshalling box using the conduit nut
(provided) or with mounting screws (not provided).
Please consult local and national electric codes for
proper installation.
If installing unit inside a junction box, please see
Application Note #423 (P/N 048423) at
www.lutron.com
B
Once installed, energize the PowPak Relay Module.
C
Use the Relay Toggle button to toggle between high-
end and OFF to verify wiring.
2
Programming with a Vive Hub
B
A
Use an iOS
or Android
Download the Lutron
®
®
compatible device.
Vive app.
Vive
PowPak
|
Programming without a Vive Hub
1
Associate Wireless Transmitters to PowPak Relay Module
Before beginning this step, make sure that there are no other PowPak modules being set up within the same building. It is possible that Wireless
Transmitters from other systems can be incorrectly associated to this system.
A
Hold the Relay
Toggle button on
Relay
the PowPak Relay
Toggle
Module for 6 seconds
to enter association
mode.
Advanced
Operations
Note: The load
will flash once
after each step to
confirm successful
completion.
Lutron, Pico, PowPak, Softswitch, and Vive are trademarks of Lutron Electronics Co., Inc., registered in the U.S. and other countries. Radio Powr Savr is a trademark of Lutron Electronics Co., Inc. Safari is a trademark of Apple Inc., registered in the U.S. and other countries. iOS is a registered trademark of Cisco in
the U.S. and other countries and is used under license. Google is a registered trademark and Android and Chrome are trademarks of Google Inc.NEC is a registered trademark of the National Fire Protection Association, Quincy, Massachusetts. ©2013 – 2018 Lutron Electronics Co., Inc.
Pico
Remote Control
(10 maximum)
Radio Powr Savr
Daylight Sensor
Link
Cal.
Test
(1 maximum)
Junction Box
Line/Hot
Switched
(Black)
Line/Hot (Red)
To Normal Load
Neutral (White)
Neutral
1/2 in (21 mm) Knockout Opening
Conduit Nut
COM
(Common)
NO
(Normally Open)
NC
(Normally Closed)
CCO operation affected only by
associated occupancy or vacancy sensors.
Room Occupied:
NO = Close NC = Open
Room Unoccupied:
NO = Open NC = Close
To 3rd Party Equipment
Note: When wiring a CCO model to
3rd-party systems, use
20 AWG to 16 AWG (0.5 mm
2
to
1.5 mm
2
) solid or stranded wire.
C
Note: For further information on set up,
Open the app and follow the
programming, and troubleshooting with a
instructions.
Vive system, please refer to the installation
instructions included with the Vive hub or
visit www.lutron.com/vive
vive.lutron.com
Note: For programming the PowPak Relay
Module without a Vive hub see below.
B
Hold the indicated button
on a Wireless Transmitter
for 6 seconds to
associate the device.*
Repeat for any additional
Wireless Transmitters.
* If no g button, hold
"Lights Off" button.
Link
Customer Assistance
CCO Information
• Some PowPak Relay Modules include a dry contact closure
output that provides occupancy status to 3rd-party equipment
such as building management systems, HVAC, and VAV
controllers.
• CCO provides both normally open (NO) and normally closed (NC)
maintained-type outputs.
• CCO rated to switch resistive loads at
Switching
Resistive
Voltage
Load
voltages up to 24 V only. To properly
R
control inductive load types such as
0-24 V-
1.0 A
0-24 V~
0.5 A
relays, solenoids, or motors, refer to
Application Note #434.
Customer Assistance | 1.844.LUTRON1 U.S.A., Canada, and the Caribbean | +44.(0)20.7680.4481 Europe | +1.610.282.3800 Others | www.lutron.com/support
RMJS-16R-DV-B-EM only
120 / 277 V~ Normal Feed
Neutral
Regular
Automatic
Transfer
Utility Power
120 / 277 V~ Emergency Feed
Switch
Neutral
Note: For periodic testing and maintanance of
emergency systems, use the toggle button
of the RMJS-16R-DV-B-EM to ensure proper
operation. Make sure PowPak buttons remain
accessible.
Note: Momentary power outages can envoke
Emergency
Backup Generator
emergency mode on the relay module.
See Troubleshooting section for details.
Troubleshooting
Load does not respond to
Wireless Transmitter(s)
Wireless Transmitter(s)
cannot be associated to
PowPak Relay Module
PowPak is in emergency
mode
(RMJS-16R-DV-B-EM only)
PowPak will not go into
emergency mode
(RMJS-16R-DV-B-EM only)
2
Calibrate the Radio Powr Savr
Daylight Sensor
Daylight Sensor will control all wired fixtures equally.
C
Hold the Relay Toggle button on
the PowPak Relay Module for 6
A
Press and release the "Cal." button on the
seconds to save association(s).
Daylight Sensor.
B
Turn lights in room on using the Relay Toggle
button on the PowPak Relay Module or an
D
Permanently install wireless
associated Pico.
transmitters (consult individual
component installation guides for
C
Press and hold the "Cal." button for 6 seconds.
information).
D
Exit room for 5 minutes to allow calibration to be completed.
Note: When calibration has completed, all lights will flash and
Test
begin to respond to daylight.
www.lutron.com/support
Reset Factory Defaults
Note: In some instances it may be necessary to reset the
PowPak Relay Module back to factory default settings.
A Triple-tap the Advanced Operations ("ADV") button on the
Relay Module and hold until the LED begins to flash slowly.
B Within 3 seconds of flashing, release and triple-tap the button
again and the LED will flash rapidly indicating that the unit has
been reset to factory defaults.
Note: Any associations or programming previously set up with
the unit will be lost and will need to be re-programmed.
Junction Box
Line/Hot
Switched
(Black)
Line/Hot (Red)
To Emergency
Neutral
Neutral (White)
Loads
1/2 in (21 mm)
Knockout Opening
Conduit Nut
www.lutron.com/support
• Ensure breaker to the PowPak Relay Module is on.
• Ensure the load has been properly wired to the PowPak Relay Module.
• Ensure Wireless Transmitter is properly associated to PowPak Relay
Module.
• Ensure Wireless Transmitter's battery is installed correctly.
• The maximum number of Wireless Transmitters have been
associated to the PowPak Relay Module. To remove a previously
set up Wireless Transmitter, tap the button used for association on
the Wireless Transmitter three times, on the third tap hold for three
seconds and then tap three more times.
• In systems with a Vive hub: Contact Lutron Customer
Assistance for further details.
• In systems without a Vive hub: Wait 90 minutes for the PowPak
to return to normal operation.
• Contact Lutron Customer Assistance for further details.
Link
Cal.
Test
Advertisement

Related Manuals for Lutron Electronics PowPak RMJS-16R-DV-B


Summary of Contents for Lutron Electronics PowPak RMJS-16R-DV-B
- Page 1 U.S. and other countries and is used under license. Google is a registered trademark and Android and Chrome are trademarks of Google Inc.NEC is a registered trademark of the National Fire Protection Association, Quincy, Massachusetts. ©2013 – 2018 Lutron Electronics Co.,...
- Page 2 Cisco aux États-Unis et dans d’autres pays, utilisée sous licence. Google est une marque déposée et Android et Chrome sont des marques de Google Inc. NEC est une marque déposée de le National Fire Protection Association, Quincy, Massachusetts.
- Page 3 Cisco en E.U.A. y en otros países y se utiliza bajo licencia. Google es una marca comercial registrada y Android y Chrome son marcas comerciales de Google Inc. NEC es una marca comercial de el National Fire Protection Association, Quincy, Massachusetts.
- Page 4 Cisco nos EUA e em outros países, sendo usado sob licença. Google é uma marca comercial registrada, e Android e Chrome são marcas comerciais da Google Inc. NEC é uma marca comercial do National Fire Protection Association, Quincy, Massachusetts.