Table of Contents
Advertisement
Quick Links
Primo 60
Open Empire
collapsible bird home
Assembly Instructions for the Primo 60 Open Empire
Richtlijnen voor de montage van de Primo 60 Open Empire
Instructions pour le montage de la Primo 60 Open Empire
Aufbau-Anleitung des Primo 60 Open Empire
Instrucciones de montaje de la Primo 60 Open Empire
инструкция по сборке Primo 60 Open Empire
www.savic.be
Ringlaan 10 • B-8501 Heule • Belgium
Tel. +32 56 35 33 45 • Fax +32 56 35 77 30
info@savic.be
Doc.nr.: 931887
Advertisement
Table of Contents

Related Manuals for Savic Primo 60 Open Empire


Summary of Contents for Savic Primo 60 Open Empire
- Page 1 Open Empire collapsible bird home Assembly instructions for the Primo 60 Open Empire Richtlijnen voor de montage van de Primo 60 Open Empire Instructions pour le montage de la Primo 60 Open Empire Aufbau-Anleitung des Primo 60 Open Empire Instrucciones de montaje de la Primo 60 Open Empire инструкция...
- Page 2 Savic would like to thank you for your purchase and Check that you have all the contents as per the list confidence in our Primo 60 Open Empire cage. We on the following page. If any component parts are can assure you that you have acquired a high quality missing or damaged do not use your cage.
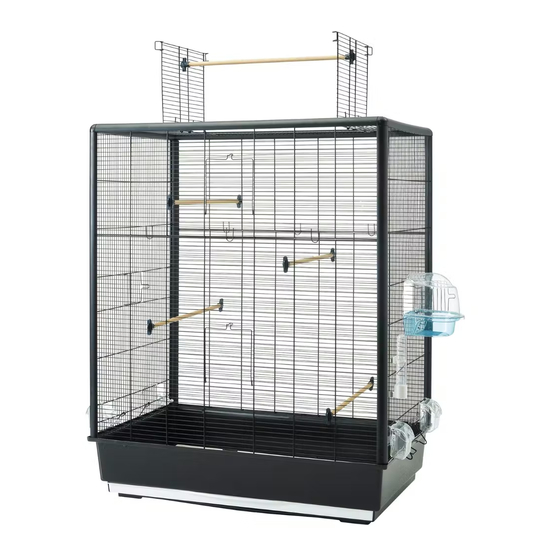
- Page 3 The Primo 60 Open Empire box contains: • 4 feeding bowls + lids (g) • 1 plastic bottom part (a) • 1 drinking fountain (h) • 1 roof panel (b) • 2 side panels with door (i) • 4 side profiles (c) •...
- Page 4 Attach on one side of each of the 4 profiles (c) the 4 corner pieces (e). Slide the 2 side panels with door (i) in the vertical profiles (c). Make sure that the closures are facing outwards and the panels are well placed in the corner pieces (e).
- Page 5 Slide the lower back panel without door (j) in the profiles. Make sure that the vertical wires are facing outwards. Slide upper back panel without door (l) into the profiles. Make sure the vertical wires are facing outwards and the panels are assembled as shown.
- Page 6 Slide the upper front panel with door (m) into the profiles. Make sure the door is facing upwards and the vertical wires of the panel are facing outwards. Assemble 4 of the 5 wooden perches (d)
- Page 7 Place the roof panel (b) on top. Make sure that the thick horizontal wires of the front, back and side panels are well assembled in the roof panel. (see detail). Open the doors of the roof panel and install the 5th wooden perch. Put the cage on the tray.
- Page 8 Finally, install the feeding bowls and lid (g+h) on both side panels, the bird bath (f ) and drinking fountain (n) and your cage is now ready for use.
Need help?
Do you have a question about the Primo 60 Open Empire and is the answer not in the manual?
Questions and answers