Table of Contents
Advertisement
Available languages
Available languages
Advertisement
Chapters
Table of Contents

Related Manuals for Praher Plastics AQUASTAR mp6 plc


Summary of Contents for Praher Plastics AQUASTAR mp6 plc
- Page 1 Zertifiziert nach certified acc. to EN ISO 9001:2008...
-
Page 2: Table Of Contents
Restrisiken Gefährdung durch Strom Gefährdung durch menschliches Fehlverhalten Gefährdung durch Strom bei Reinigungsarbeiten Allgemein Bestimmungsgemäße Verwendung Montage Funktions- für Praher Plastics Austria 6-Wege Ventile Elektrischer Anschluss 10.1 Anschluss der Versorgungsspannung 10.2 Anschluss der Relais-Ausgänge für die SPS 10.3 Anschlüsse der Eingänge für die SPS 10.4... - Page 3 Montage Demontage Zubehör Fehlerbehebung www.praherplastics.com...
-
Page 4: Urheberrecht
Urheberrecht Die Bedienungsanleitung enthält urheberrechtlich geschützte Informationen. Alle Rechte unter Vorbehalt der Praher Plastics Austria GmbH. Die Bedienungsanleitung ist für die Bedienperson bestimmt. Die Vervielfältigung, Reproduktion oder Übersetzung dieser Dokumente in andere Sprachen, ganz oder teilweise, bedarf der ausdrücklichen Genehmigung durch die Praher Plastics Austria GmbH. -
Page 5: Gewährleistungs- Und Haftungsansprüche
Gewährleistungs- und Haftungsansprüche Gewährleistungs- und Haftungsansprüche bei Personen- und Sachbeschädigung sind ausgeschlossen, wenn sie auf einen oder mehrere der folgenden Ursachen zurückzuführen sind. Nicht bestimmungsgemäße Verwendung des Aquastar Unsachgemäßes Montieren, in Betrieb nehmen, Bedienen und Warten des Aquastar ... - Page 6 Um diesen Zustand zu erhalten und einen gefahrlosen Betrieb sicherzustellen, muss der Anwender die Sicherheitshinweise beachten, die in dieser Bedienungsanleitung enthalten sind. Die Installationsarbeiten dürfen nur von einem befugten und konzessionierten Elektroinstallateur oder Elektrounternehmen durchgeführt werden. Dieses Gerät ist nicht dafür bestimmt, durch Personen (einschließlich Kinder) mit eingeschränkten physischen, sensorischen oder geistigen Fähigkeiten oder mangels Erfahrungen und/oder mangels Wissen benutzt werden, es sein denn, sie werden durch einen für ihre Sicherheit zuständigen Person beaufsichtigt oder erhielten von ihr...
-
Page 7: Restrisiken
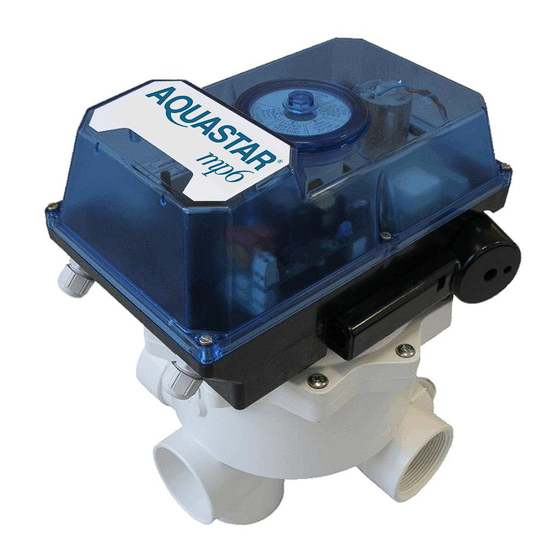
Position “Filtern“ gestellt werden Bestimmungsgemäße Verwendung Es handelt sich hierbei um eine Steuereinheit für ein Praher Plastics Austria 6 Wege- Ventil die mit einer SPS betrieben wird. Jede von der SPS ausgewählte Position wird vom Aquastar automatisch angesteuert. -
Page 8: Montage
WICHTIG! Während dem Ablauf eines Zyklus muss sichergestellt sein, dass die Filterpumpe ausgeschaltet ist! Der Praher Aquastar ist für die 6-Wegen Ventile von Praher Plastics Austria zugelassen. Bei allen anderen Ventiltypen können Fehlfunktionen auftreten da nicht garantiert werden kann, dass diese mit Abmaßen der Praher 6 Wege Ventile übereistimmen. -
Page 9: Elektrischer Anschluss
Elektrischer Anschluss 10.1 Anschluss der Versorgungsspannung Mit Aquastar 230V Netzteil (Siehe 13.2): 100 – 240 V AC 50/60 Hz 20/30VA Mit separatem Netzteil: 12 – 24 V DC/AC 50/60 Hz 20/30VA Mit SPS-Netzteil: 12 – 24 V DC 20/30VA Außerdem müssen die Jumper ST13 und ST16 gesetzt werden 10.2 Anschluss der Relais-Ausgänge für die SPS Position Relais: Ist der Aquastar auf Position sind die Klemmen [13 →... -
Page 10: Betrieb Mit Safetypack
Wenn an einem Eingang des Aquastars für eine Zeit von mindestens 2 Sekunden eine Spannung anliegt wird die entsprechende Position angefahren. Wird an mehrere Eingänge gleichzeitig eine Spannung angelegt wird ein entsprechender Fehler signalisiert und die Position Filtern angesteuert. Dieser Fehler kann quittiert werden indem alle Eingänge rückgesetzt werden. Ist der Aquastar im Errorstate kann dieser durch Anlegen einer Spannung an ERR oder an FI, BW und RI gleichzeitig für mindestens 5 Sekunden rückgesetzt werden. -
Page 11: Anschlussplan
Anschlussplan 11.1 Anschluss Versorgungsspannung 11.1.1 Mit Aquastar 230V Netzteil (Siehe 13.2) Spannungsbereich: 100-230 VAC 11.1.2 Ohne 230VAC –Netzteil Spannungsbereich: 12-24 VAC/DC 11.1.3 Mit SPS Netzteil: Wird an den Klemmen bei den SPS-Eingängen eine Spannung von 12-24VDC angelegt und die Jumper ST13 und ST16 gesetzt kann der Aquastar auch über das SPS-Netzteil versorgt werden. -
Page 12: Anschlussplan Der Relais-Ausgänge
11.2 Anschlussplan der Relais-Ausgänge Betriebsspannung der Relais: max. 250VAC oder max. 24VDC Betriebsstrom: (Goldkontakte) 3-100mA oder 100-2000mA bei cos(φ)=1 END_POS SWITCH muss mit dem Endschalter aus dem Aquastar verbunden bleiben und darf nicht verändert werden. 11.3 Anschlüsse SPS-Eingänge Spannungsbereich Eingänge ist 8-24VDC und der Versorgung 12- 24VDC Versorgung der Eingänge... -
Page 13: Inbetriebnahme
Inbetriebnahme Zur Inbetriebnahme muss sowohl die Versorgungsspannung als auch die Spannung für die SPS Eingangsleiste angeschlossen werden. (wie im vorherigen Kapitel beschrieben) Startsequenz: Wird die Spannung eingeschaltet fährt der Aquastar die zuletzt ausgewählte bzw. beim allerersten einschalten die voreingestellte Position an. Ist der Aquastar auf Position wird das Pos Relais eingeschalten. -
Page 14: Errorstates
12.1 Errorstates Fehler Grund Aktion Signal Rücksetzen Mögliche Ursachen Stromausfall Ist der Versorgungspannun Stromausfall Versorgungsspannu Aquastar auf g wieder verbinden Kabelbruch ng wurde einer Das Pos Relais unterbrochen unsicheren zieht dann wieder Position wird an und die SPS eine sichere muss den Eingang angefahren... -
Page 15: Platinen
Platinen 13.1 Mainboard 13.2 Aquastar 230V Netzteil www.praherplastics.com... -
Page 16: Abmessungen
Abmessungen 1 ½” SM 1 ½” TM 2” SM 3” SM 99,5 29,5 31,5 85,5 61,5 59,5 163,5 42,5 87,5 18,5 18,5 62,5 Dimensionen in mm www.praherplastics.com... -
Page 17: Explosionszeichnung Des Aquastar
Explosionszeichnung des Aquastar www.praherplastics.com... - Page 18 Montage Achtung: Bei der Montage des Aquastar ist die Mittelschraube (Bild 6) mit minimal 10Nm anziehen damit keine Fehlfunktion auftreten kann und das Schauglas (Bild 8) handfest anziehen um die Dichtheit des Aquastar MP6 zu gewährleisten! www.praherplastics.com...
- Page 19 Demontage www.praherplastics.com...
- Page 20 Zubehör Fehlerbehebung Wie im Kapitel Inbetriebnahme beschrieben kann das Gerät einige Fehler selbständig erkennen und entsprechende Aktion durchführen. Tritt jedoch ein anderer Fehler auf ist wie folgt vorzugehen: Antrieb dreht in die falsche Richtung Überprüfen sie die ob der Motor Richtig angeschlossen wurde (Rotes Kabel bei rt, blaues bei bl) ...
- Page 21 Notes Notizen www.praherplastics.com...
- Page 22 Hazard generated by human error Hazard generated by current during cleaning work General Directions for use Assembly Functiondiagram for Praher Plastics Austria V6 valves Electrical connection 10.1 Connection of the power supply 10.2 Connection of the relays outputs for the PLC 10.3...
- Page 23 Installation Dismantling Accessories Trouble shooting www.praherplastics.com...
-
Page 24: Copyrights
This operation manual is designed for use by operating personnel only. Copying, reproduction or translation of the present document into other languages in whole or in part is subject to express written permission by Praher Plastics Austria GmbH. © 2015 Praher Plastics Austria GmbH Knowledge of the instructions contained in this operation manual is indispensable for preventing failure and ensuring faultless operation of the Aquastar. -
Page 25: Warranty And Liability
Warranty and liability Warranty and liability claims in the context of damage to person or property shall be excluded where such damage results from one or several of the causes listed below: Improper use of the Aquastar Improper installation, putting into operation, operation and maintenance of the Aquastar ... - Page 26 This equipment is not intended for it by persons (including children) with reduced physical, sensory or mental abilities or for lack of experience and/or for lack of knowledge to be used it is, it by a person responsible for their security is supervised or received from it instructions, how the equipment is to be used.
-
Page 27: Residual Risk
“Filter”! Directions for use This is a control unit for a Praher Plastics Austria multiport valve with 6 positions which is operated by a PLC. Operation of the Aquastar without corresponding valve can cause damage to the electronics. -
Page 28: Assembly
Important! During a cycle the filter pump motor must be shut off! The Praher Aquastar Comfort is approved for 6-way valves by Praher Plastics Austria. Malfunctions can occur with any other valve type as we are unable to guarantee that these valves match the dimensions of the Praher 6-way valves. -
Page 29: Electrical Connection
Electrical connection 10.1 Connection of the power supply With Aquastar 230V power supply (look at 13.2): 100 – 240 VAC 50/60 Hz 20/30VA With separate power supply: 12 – 24 VDC/AC 50/60 Hz 20/30VA With PLC power supply: 12 – 24 VDC 20/30VA In addition the jumpers ST13 and ST16 have to be set 10.2 Connection of the relays outputs for the PLC Position Relays:... -
Page 30: Operation With Safetypack
If a voltage is applied to an input of the Aquastar for a minimal time of 2 seconds the corresponding position is approached. If however a voltage is applied to more than 1 input a corresponding error is signalled and the Aquastar approaches the position filter. -
Page 31: Wiring Diagram
Wiring diagram 11.1 Connection of the power supply 11.1.1 With 230VAC power supply (look at 13.2) Voltage range: 100-230 VAC 11.1.2 Without 230VAC power supply: Voltage range: 12-24 VAC/DC With PLC power supply 11.1.3 If a voltage of 12-24VDC is applied to the clamps near the SPS inputs and the Jumpers ST13 and ST16 are set the Aquastar can be driven... -
Page 32: Wiring Diagram Of The Relay Outputs
11.2 Wiring diagram of the Relay outputs Maximum Operating voltage of the relays: 250VAC Or 24VDC Operating current: (Au-plated) 3-100mA or 100-2000mA with cos(φ)=1 END_POS SWITCH must be connected with the END_POS SWITCH of 11.3 Wiring diagram of the PLC inputs the Aquastar and must not be changed! Voltage range:... -
Page 33: Commissioning
Commissioning To begin using the Aquastar the power supply has to be connected and turned on for both the device and the inputs. (as explained in the previous chapter) Starting sequence: If voltage is applied to the Aquastar it approaches either the last saved position or in the case of very first use the preset position. -
Page 34: Errorstates
12.1 Errorstates Error Cause Action Signal Reset Possible reasons Power loss The power supply When the Connect power. Power loss has been interrupted Aquastar is at The pos relay is Cable break an unsafe then turned on and position it the PLC must set approaches... -
Page 35: Circuit Board
Circuit board 13.1 Mainboard 13.2 Aquastar 230V Power supply Dimensions www.praherplastics.com... - Page 36 1 ½” SM 1 ½” TM 2” SM 3” SM 99,5 29,5 31,5 85,5 61,5 59,5 163,5 42,5 87,5 18,5 18,5 62,5 Dimensions in mm www.praherplastics.com...
-
Page 37: Exploded View Drawing Of The Aquastar
Exploded view drawing of the Aquastar www.praherplastics.com... - Page 38 Installation Attention: During installation screw tight the centre screw with a minimum torque of 10 Nm (pict 6) to secure the functionality and screw the sight glass hand-tight in the lid (pict. 8) in order to secure tightness of the Aquastar mp6 www.praherplastics.com...
- Page 39 Dismantling www.praherplastics.com...
- Page 40 Accessories Aquastar Emergency handle SafetyPack Item number 101862 Trouble shooting As described above in the chapter commissioning the device can detect and handle some errors on its own. If however another error occurs proceed as follows: Motor turns in the wrong direction ...
- Page 41 Notes Notizen www.praherplastics.com...
- Page 42 Notes Notizen www.praherplastics.com...
- Page 43 Notes Notizen www.praherplastics.com...
Need help?
Do you have a question about the AQUASTAR mp6 plc and is the answer not in the manual?
Questions and answers