
Related Manuals for Power Fist 8536625


Summary of Contents for Power Fist 8536625
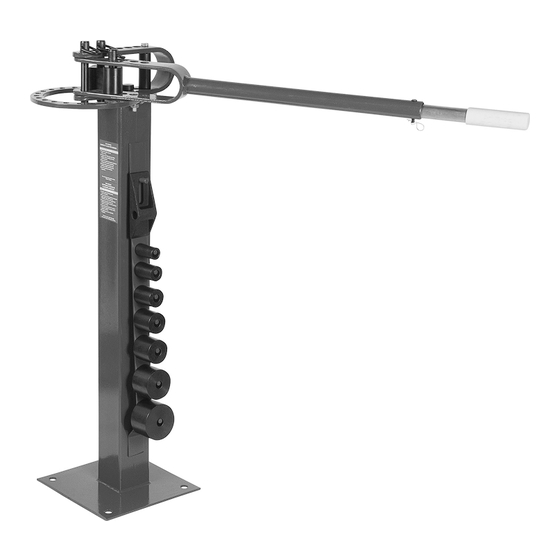
- Page 1 V4.0 8536625 Compact Floor Metal Bender User Manual Please read and understand all instructions before use. Retain this manual for future reference.
-
Page 2: Specifications
8536625 Compact Floor Metal Bender V4.0 Compact Floor Metal Bender SPECIFICATIONS Dies 1, 1-1/4, 1-1/2 (2), 1-3/4, 2, 2-1/2, 3 in. Max. Stock Thickness 5/16 in. Mild Steel Capacity (Thickness x Width) 5/16 x 1-1/4 or 1/4 x 2 Round or Square Solid Rod Capacity 5/8 in. -
Page 3: Work Area
V4.0 Compact Floor Metal Bender 8536625 DANGER! This notice indicates an immediate and specific hazard that will result in severe personal injury or death if the proper precautions are not taken. WARNING! This notice indicates a specific hazard or unsafe practice that could result in severe personal injury or death if the proper precautions are not taken. -
Page 4: Specific Safety Precautions
8536625 Compact Floor Metal Bender V4.0 Wear steel toe footwear or steel toe caps to prevent a foot injury from falling objects. PERSONAL PRECAUTIONS Control the tool, personal movement and the work environment to avoid personal injury or damage to tool. -
Page 5: Assembly And Installation
V4.0 Compact Floor Metal Bender 8536625 ASSEMBLY & INSTALLATION Numbered references in parenthesis (#1) refer to the included Parts List. The compact metal bender requires assembly prior to operation. Refer to the parts breakdown and accompanying images during assembly. Make sure there is ample space to operate the metal bender. -
Page 6: Operation
8536625 Compact Floor Metal Bender V4.0 12. Drop the long hitch pin (#1) into the holes at the end of each set of tines so both are connected at the center of the assembly ring. OPERATION WARNING! Keep fingers and hands away from moving parts at all times to avoid a pinch or crushing injury. - Page 7 V4.0 Compact Floor Metal Bender 8536625 Lift the stop block and drop the support pin (#5) into the next hole on the bottom die receiver assembly tine. Lower the block onto the support pin. This raises the block so it doesn’t interfere with the handle movement.
-
Page 8: Care And Maintenance
8536625 Compact Floor Metal Bender V4.0 Mark the workpiece where you wish to add an angle bend. Insert metal workpiece between the right angle die and the center die. Align the mark with the edge of the right angle die. The bending pressure will apply to the workpiece sticking out on the left-hand side. -
Page 9: Troubleshooting
V4.0 Compact Floor Metal Bender 8536625 Inspect the tool components periodically. Repair or replace damaged or worn components. Only use identical replacement parts when servicing. Follow instructions for lubricating and changing accessories. Only use accessories intended for use with this tool. -
Page 10: Parts Breakdown
8536625 Compact Floor Metal Bender V4.0 PARTS BREAKDOWN PARTS LIST DESCRIPTION Mounting Bolt M10x120 Long Hitch Pin Mounting Bolt M10x30 Short Hitch Pin 1 in. Die Square Stop Block 1-1/4 in. Die Stop 1-1/2 in. Die Support Pin 1-3/4 in. Die Ring Assembly Spacer 2 in. - Page 11 V4.0 Compact Floor Metal Bender 8536625 Visit www.princessauto.com for more information...
- Page 12 8536625 Compact Floor Metal Bender V4.0 For technical questions call 1-800-665-8685...
- Page 13 V 4,0 8536625 Compact de métal de plancher Manuel d'utilisateur Vous devez lire et comprendre toutes les instructions avant d'utiliser l'appareil. Conservez ce manuel afin de pouvoir le consulter plus tard.
-
Page 14: Spécifications
8536625 Compact de métal de plancher V 4,0 Compact de métal de plancher SPÉCIFICATIONS Matrices 1, 1 1/4, 1 1/2(2), 1 3/4, 2, 2 1/2, 3 po Épaisseur max. de la matière 5/16 po Capacité pour l'acier doux 5/16 x 1 1/4 ou 1/4 x 2 (épaisseur x largeur) -
Page 15: Aire De Travail
V 4,0 Compact de métal de plancher 8536625 DÉFINITIONS DE DANGER Veuillez-vous familiariser avec les avis de danger qui sont présentés dans ce manuel. Un avis est une alerte indiquant qu'il existe un risque de dommage à la propriété, de blessure ou de décès si on ne respecte pas certaines instructions. -
Page 16: Consignes De Sécurité Spécifiques
8536625 Compact de métal de plancher V 4,0 devrait être conforme à la norme CSA Z94.3-07 ou ANSI Z87.1 fonction du type de travail effectué. Portez un écran facial panoramique de type approprié avec les lunettes de sécurité puisque cette tâche peut créer des copeaux, des matières abrasives ou des particules. -
Page 17: Assemblage Et Installation
V 4,0 Compact de métal de plancher 8536625 Utilisez le bon outil pour la tâche à effectuer. Cet outil a été conçu pour une utilisation spécifique. Évitez de modifier ou d'altérer cet outil ou de l'utiliser à une fin autre que celle pour laquelle il a été conçu. - Page 18 8536625 Compact de métal de plancher V 4,0 Glissez la troisième entretoise de montage en place sous le récepteur de matrice et sur le dernier trou de boulon. Glissez l’entretoise (n 6) de l’ensemble d’anneau dans les trous de boulon du récepteur de matrice.
- Page 19 V 4,0 Compact de métal de plancher 8536625 La pièce à travailler est insérée, puis la poignée du récepteur de matrice est tiré dans le sens horaire. La pièce à travailler est maintenue en place par le bloc ou la matrice à angle droit dans l’ensemble d’anneau du récepteur de matrice. La pièce qui ressort est courbée par la poignée.
- Page 20 8536625 Compact de métal de plancher V 4,0 Insérez une autre matrice dans la poignée du récepteur de matrice et insérez la goupille courte (n 2) dans les dents pour la fixer en place. Ceci déroulera le métal lors du cintrage.
- Page 21 V 4,0 Compact de métal de plancher 8536625 Marquez la pièce à travailler à l’endroit où vous désirez ajouter un cintrage en angle. Insérez la pièce à travailler en métal entre la matrice à angle droit et la matrice du centre. Alignez la marque avec le rebord de la matrice à angle droit.
-
Page 22: Soin Et Entretien
8536625 Compact de métal de plancher V 4,0 Serrez le boulon pour fixer la boucle de butée. Continuez les tâches de cintrage. SOIN ET ENTRETIEN Entretenez l'outil avec soin. Un outil en bon état sera efficace, plus facile à contrôler et préviendra les problèmes de fonctionnement. -
Page 23: Dépannage
V 4,0 Compact de métal de plancher 8536625 DÉPANNAGE Si l'outil ne fonctionne pas correctement ou si des pièces sont manquantes, visitez un magasin Princess Auto Ltd. afin de trouver une solution. Si ce n'est pas possible, demandez à un technicien qualifié de réparer l'outil. -
Page 24: Liste Des Pièces
8536625 Compact de métal de plancher V 4,0 LISTE DES PIÈCES DESCRIPTION QTÉ Écrou M10 Boulon de montage M10x120 1 Goupille d'attelage longue Boulon de montage M10x30 Goupille d'attelage courte Matrice de 1 po Bloc d’arrêt carré Matrice de 1 1/4 po Butée...
Need help?
Do you have a question about the 8536625 and is the answer not in the manual?
Questions and answers