
Related Manuals for Ametek Solatron Analytical EnergyLab XM


Summary of Contents for Ametek Solatron Analytical EnergyLab XM
- Page 1 Getting Started Getting Started – Basic system setup to run first experiments Installation Guide - More advanced communications and system configurations User Guide – Detailed explanation of menus and facilities...
-
Page 2: Install Software
1. Install Software EnergyLab XM uses XM-studio software that is supplied on Memory Stick and CD, and is installed as follows: Start up the PC and log in as a user with Administrator privileges. If the PC is started up already, close down all programs that are running. -
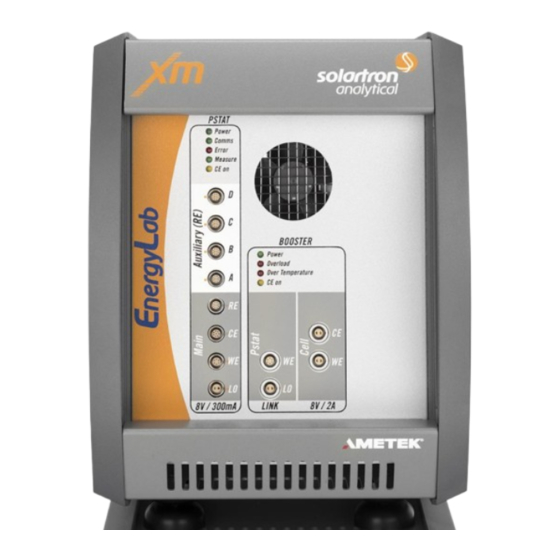
Page 3: Connect Equipment
2. Connect Equipment Choose a location with a firm solid surface and easy access to EnergyLab XM (front and rear panels) and PC. Ensure that there are no obstructions that prevent airflow under and around the instrument, especially from the fans on the rear of the unit, then proceed as follows: 1. -
Page 4: Start The Software
3. Start the Software On the PC, run the software by double-clicking the XM-studio ECS icon on the Windows desktop. A “splash screen” is briefly displayed then the welcome screen opens with two tabs at the bottom of the left-hand navigation panel: ... -
Page 5: Test Communications
4. Test Communications Make sure that the Project tab is selected, and check that the project name at the top of the navigation panel is the default project Getting Started that opens automatically when XM-studio software is first installed and run. Click on the System tab at the bottom of... - Page 6 If automatic Search does not work, select the EnergyLab XM unit manually – right-click on Equipment Library and select Add New then EnergyLab The following setup should then appear Click Test and the screen at the top of this page should appear (the same as for the search key) confirming that the equipment is communicating correctly.
- Page 7 5. Potentiostat Test Make sure the Project tab is selected at the bottom of the left-hand navigation panel, and if necessary, click on the plus (+) symbol alongside the Getting Started project to expand it, then expand the sub-elements to reveal the structure as follows (the icons identify the types of elements): Project Experiment / Run Menu...
- Page 8 Connect the ModuLab Test Cell as shown in the connection diagram using CE, RE and WE connections from EnergyLab XM’s potentiostat to the labelled test module connections. There is no need to connect the auxiliary channels for this test. The experiment settings can be viewed and modified if required by clicking the Hardware / Cell Setup and Step Sequence Menu entries in the project tree.
- Page 9 anywhere in the graph area, or by clicking the refresh key in the Axes setup menu. By the way, you can compare data very easily by clicking one of the green data icons to display experiment data, and then dragging and dropping additional data icons from the project tree into the graph area –...
- Page 10 6. FRA Test EnergyLab XM includes a Frequency Response Analyzer that enables impedance measurements. The FRA can be tested without changing cables by opening the Additional Tests folder by clicking on the (+) and selecting FRA Test. This displays the Experiment / Run Menu for the default FRA test. As before the Hardware / Cell Setup and Step Sequence Menus associated with the FRA test can be examined and changed if required.
- Page 11 7. Booster Test EnergyLab XM includes a 2 Amp Booster that can be used for DC and impedance measurements. Click on the (+) next to Additional Tests open the folder, and select the Booster Module Test. The actual test setup can be examined and changed if needed by expanding and clicking that part of the project tree.
- Page 12 EnergyLab XM system. www.solartronanalytical.com Email: PARSOLSR.support@ametek.com Please see our website for a complete list of our global offices and authorized agents ©Copyright 2015 AMETEK, Inc. All Rights Reserved Rev.02/16AT...
Need help?
Do you have a question about the Solatron Analytical EnergyLab XM and is the answer not in the manual?
Questions and answers