Zodiac TornaX Genius Installation And User Manual
Electric cleaner
Hide thumbs
Also See for TornaX Genius:
- Installation and user manual (164 pages) ,
- Installation and user manual (381 pages)

Related Manuals for Zodiac TornaX Genius


Summary of Contents for Zodiac TornaX Genius
- Page 1 TornaX Installation and user manual - English Electric cleaner Translation of the original instructions in French Genius More documents on: www.zodiac.com H0575900_REVC - 2019/12 - EP11 --...
- Page 3 WARNINGS GENERAL WARNINGS • Failure to respect the warnings may cause serious damage to the pool equipment or cause serious injury, even death. • Only a person qualified in the technical fields concerned (electricity, hydraulics or refrigeration) is authorised to perform any servicing or repairs to the appliance. The qualified technician working on the appliance must use/wear personal protective equipment (such as safety goggles and protective gloves, etc.) in order to reduce the risk of injury occurring when working on the appliance.
- Page 4 WARNINGS ASSOCIATED WITH ELECTRICAL APPLIANCES • The power supply to the appliance must be protected by a dedicated 30 mA residual current device, complying with the standards and regulations in force in the country in which it is installed. • Do not use any extension lead when connecting the appliance; connect the appliance directly to a suitable power supply.
-
Page 5: Table Of Contents
• The distribution or modification of this document in any way is prohibited, without prior authorisation from Zodiac®. • Zodiac® is constantly developing its products to improve their quality. The information contained herein may therefore be modified without notice. CONTENTS ❶... -
Page 6: ❶ Specifications
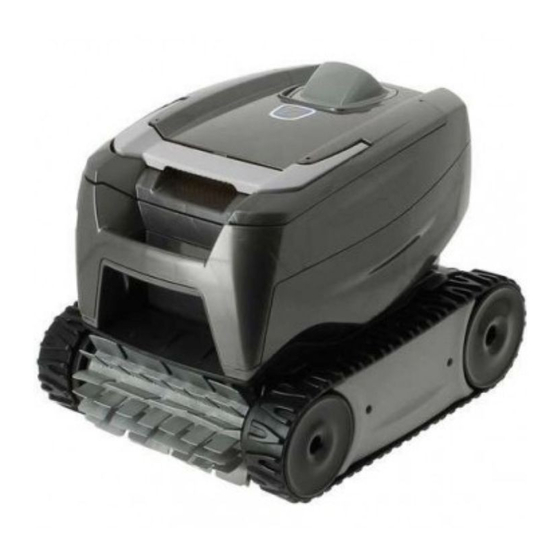
❶ Specifications 1.1 I Description Cleaner + floating cable Control box Base for control box 100µ fine debris filter 200µ large debris filter 60µ very fine debris filter Standard flap brush/ Tile brush (depending on the model) Tile brush Caddy kit : Supplied : Available as an option Symbol... -
Page 7: I Technical Specifications And Parts List
1.2 I Technical specifications and parts list 1.2.1 Technical specifications Control box power supply voltage 100-240 VAC, 50/60 Hz Cleaner power supply voltage 30 VDC Maximum power input 100 W Cable length 14 m or 16.5 m (depending on the model) Cleaner size (L x W x h) 37 x 29 x 30 cm Package size (L x W x H) -
Page 8: ❷ Installation
❷ Installation 2.1 I Set-up 3.5 meters : Control box Minimum : Base : Cleaner : Floating cable : Plug : Power cord 2.2 I Attachment to the base... -
Page 9: ❸ Use
❸ Use 3.1 I Operating principle The cleaner is separate from the filtration system and can function independently. It simply needs connecting to the mains. It finds the best route to move around and clean the areas of the pool for which it has been designed (depending on the model: floor only, floor and walls). -
Page 10: I Electricity Supply Connections
3.4 I Electricity supply connections To prevent all risks of electrocution, fire or serious injury, please comply with the following instructions: • Use of an electrical extension is prohibited when connecting the control box. • Make sure that the socket can be easily accessed at all times and is protected from rain or splashes. -
Page 11: I Starting The Cleaning Cycle
3.5 I Starting the cleaning cycle To prevent all risks of injury or equipment damage, comply with the following directives: • Bathing is prohibited when the appliance is in the pool. • Do not use the appliance during shock chlorination. •... -
Page 12: I Ending The Cleaning Cycle
3.6 I Ending the cleaning cycle • To prevent damage to the equipment: Do not pull on the cable to remove the appliance from the pool. Use the handle. - Do not leave the appliance to dry out in sunlight after use. - Store all the elements away from sunlight, humidity and bad weather. -
Page 13: ❹ Maintenance
❹ Maintenance To avoid serious injury: • Disconnect the cleaner from the power supply. 4.1 I Cleaning the cleaner • The appliance must be cleaned regularly using clean or slightly soapy water. Do not use solvents. • Rinse the appliance thoroughly with clean water. •... -
Page 14: I Cleaning The Propeller
4.3 I Cleaning the propeller To avoid serious injury: • Disconnect the cleaner from the power supply. • Wear gloves when handling the propeller • Remove the filter using the handle (see figure • Remove the external flow guide by lifting it so as to clear the clips (see figure •... -
Page 15: I Replacing The Brush
4.4 I Replacing the brush • The brush is equipped with wear indicators; the distance between the indicators and the end of the brush indicates whether the brush is in good condition (see figure • The brush is worn and should be replaced when the wear indicators appear as shown in figure •... -
Page 16: I Replacing The Tracks
4.5 I Replacing the tracks • Place the cleaner on its side (see figure • Starting with one of the wheels, pull the inside of the track to separate it from the wheel (see figure ). Then remove the track from the cleaner. •... -
Page 17: ❺ Troubleshooting
❺ Troubleshooting • If a problem occurs, before you contact your retailer, please carry out these few simple checks using the following tables. • If the problem persists, contact your retailer. • : Actions to be performed by a qualified technician only 5.1 I Appliance behaviour When the cleaner moves forward in •... -
Page 18: I User Alerts
5.2 I User alerts Solutions Flashing LED: • Check that the cleaner is correctly connected to the control box. If necessary, unplug it and reconnect it following the appropriate procedure. • Check that there is nothing preventing the brush and support from turning. - Page 19 Your retailer Modèle appareil Appliance model Numéro de série Serial number Pour plus d’informations, enregistrement produit et support client : For more information, product registration and customer support: www.zodiac.com ZODIAC® is a registered trademark of Zodiac International, S.A.S.U., used under license.
Need help?
Do you have a question about the TornaX Genius and is the answer not in the manual?
Questions and answers