Advertisement
Table of Contents
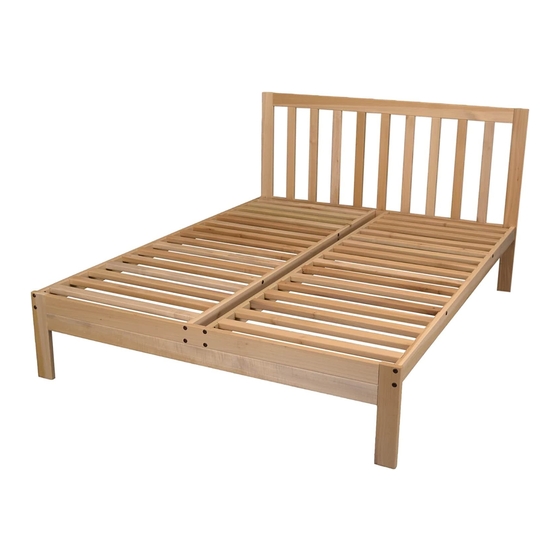
CHARLESTON PLUS PLATFORM BED
All wood is from the Tulip Poplar tree which can have dark streaks in the heartwood.
We try to use this wood for parts that don't show in the final assembly. For a video
on how to assemble this frames, please visit kdframes.com.
P A R T S
L I S T
A-33-F FOOTBOARD (1) - 33"
A-33-HT HEADBOARD TOP (1) - 33"
A-33-HB HEADBOARD BOTTOM (1) - 33"
A-22 HEADBOARD PICKET (6) 22"
This bed frame is made with Tulip Poplar. Any green tint in the wood will change to light brown in a few
weeks. This will happen in 20 to 30 minutes if placed in direct sunlight. Tulip Poplar can be left un nished,
clear nished, stained, or painted. Satin polyurethane (oil or water based) works well.
Painting: It is best to start with an interior primer and lightly sand before painting.
Staining: Light sand before staining. Wipe stain on with a rag until you get the desired color. If you are going
to use a top coat (such as polyurethane), do not sand again until after the rst coat, and then be careful not
to sand away the stain.
Finishing: All nishes work well with Tulip Poplar. A simple was nish over stain (Minwax for example) is easy.
An oil nish such as Danish oil can be used. Or a clear coat such as polyurethane works well to seal the wood.
With polyurethanes, the rst coat acts as a sanding sealer. You should lightly sand (180-220 grit sandpaper)
after the rst coat, wipe the wood clean, and then build up coats for the desired e ect.
Knockdown Frameworks, Inc. warrants all of its products for ve years against any defects that are due to faulty materials or workmanship. We will
promptly correct such defects by replacement without charge. This warranty covers porduct defects only and will expire ve years after date of
purchase by the original consumer purchaser, with proof of purchase required. This warranty does not apply to damage caused by and resulting
from misuse, neglect, accident, or improper operation, maintenance, storage, transportation, or handling of the product. This warranty is for the
original consumer purchaser for residential use only and does not apply if the product is used in any commercial application (such as rental
property). This warranty does not cover any incidental or consequental damages. If you feel that you have a claim under this warranty, please
contact us at customerservice@kdframes.com.
Instructions for the
XL-TWIN
SKU# 3994-CP-XT
#2 PHILLIPS HEAD SCREWDRIVER REQUIRED
A-15R FOOTBOARD
RIGHT LEG (1) 15"
A-37 REGULAR SLAT (14) - 37"
A-37-C CONNECTOR SLAT (2) - 37"
Manufactured by
394 Dairy Pak Rd. • Athens, GA 30607
kdframes.com • customerservice@kdframes.com
H A R D W A R E
H-21 2 - 1/2" BOLT
H-3 CROSS DOWEL
H-10 HEX WRENCH
H-20 1 - 1/2" WOOD SCREW
A-80-P BED RAIL (2) - 80"
A-15L FOOTBOARD
LEFT LEG (1) 15"
A-40L HEADBOARD
LEFT LEG (1) 40"
L I S T
12
12
1
10
A-40R HEADBOARD
RIGHT LEG (1) 40"
Advertisement
Table of Contents

Related Manuals for kd frames Charleston Plus Platform Bed XL-TWIN


Summary of Contents for kd frames Charleston Plus Platform Bed XL-TWIN
- Page 1 Instructions for the Manufactured by CHARLESTON PLUS PLATFORM BED XL-TWIN 394 Dairy Pak Rd. • Athens, GA 30607 kdframes.com • customerservice@kdframes.com SKU# 3994-CP-XT H A R D W A R E L I S T All wood is from the Tulip Poplar tree which can have dark streaks in the heartwood. H-21 2 - 1/2”...
- Page 2 HEADBOARD ASSEMBLY BACK VIEW FRONT VIEW Assemble the headboard by pushing the (7) Headboard Pickets into holes on the Headboard Bottom (A-33-HB) . Then push the Headboard Top (A-33-HT) down onto the pickets Attach the Headboard Legs (A-40-L and A-40-R) to the Headboard by pushing them onto the dowels.
- Page 3 FOOTBOARD ASSEMBLY Align the Left Footboard Leg (A-15L) and A-15L Right Footboard Leg (A-15R) so that the rail pockets are on the front. Turn the Footboard (A-33-F) so that the pocket holes are facing the front. RAIL POCKETS MUST Then push the dowels into the holes on the legs. ALL BE ON THE A-15R SAME SIDE...
- Page 4 H-21 Insert Connector Slats (A-37-C) into the pockets that have holes. Secure using 2 - 1/2” Bolts (H-21) and Cross Dowels (H-3). Leave these loose at this time. Next insert all Regular Slats (A-37), then tighten the 2 - 1/2” Bolts (H-21). PLEASE RETIGHTEN BOLTS AFTER 30 DAYS...
Need help?
Do you have a question about the Charleston Plus Platform Bed XL-TWIN and is the answer not in the manual?
Questions and answers