Advertisement
Quick Links
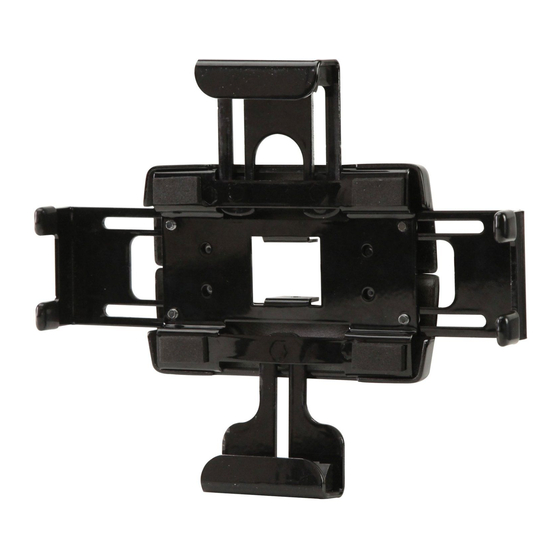
Installation and Assembly:
Universal Tablet Mount
Max Load Capacity:
Models: PTM200, PTM200-S
5 lbs (2.2 kg)
Features:
• Adjustable height and width allows mount to fi t virtually any tablet
• Quick and easy installation onto any 75 x 75 mm VESA
®
Mount
• Theft resistant security kit available
• Sleek hardware covers for a fi nished look
• Holds virtually any 7.68" - 13.75" tablet
2300 White Oak Circle • Aurora, Il 60502 • (800) 865-2112 • Fax: (800) 359-6500 • www.peerless-av.com
ISSUED: 11-01-11 SHEET #: 021-9012-3 01-15-13
Advertisement

Related Manuals for peerless-AV PTM200


Summary of Contents for peerless-AV PTM200
- Page 1 • Sleek hardware covers for a fi nished look • Holds virtually any 7.68" - 13.75" tablet 2300 White Oak Circle • Aurora, Il 60502 • (800) 865-2112 • Fax: (800) 359-6500 • www.peerless-av.com ISSUED: 11-01-11 SHEET #: 021-9012-3 01-15-13...
-
Page 2: Tools Needed For Assembly
NOTE: Read entire instruction sheet before you start installation and assembly. WARNING • Do not begin to install your Peerless product until you have read and understood the instructions and warnings contained in this Installation Sheet. If you have any questions regarding any of the instructions or warnings, for US customers please call Peerless customer care at 1-800-865-2112, for all international customers, please contact your local distributor. -
Page 3: Parts List
Before you begin, make sure all parts shown are included with your product. Parts List Black Silver Description Qty. Part # Part # A main plate 021-P1045 021-4045 B side clamp 021-P1052 021-4052 C top clamp 021-P1054 021-4054 D bottom clamp 021-P1069 021-4069 E plastic cover... - Page 4 fi g. 1.1 Fit top clamp (C) and bottom clamp (D) into main plate (A) and over pins as shown in fi gures 1.1 and 1.2. PINS fi g. 1.2 Secure with three 1/4" spacers (H), three M5 washers (F), and three M5 x 8 mm screws (G). Do not tighten screws.
- Page 5 Secure two side clamps (B) to back of main plate (A) with four M5 washers (F) and four M5 x 8 mm self tapping phillips screws (G). Do not tighten screws. Apply four adhesive foam pads (J) to front of main plate (A) as shown.
- Page 6 ISSUED: 11-01-11 SHEET #: 021-9012-3 01-15-13 Peerless Industries, Inc. © 2012, Peerless Industries, Inc. All rights reserved. 2300 White Oak Circle All other brand and product names are trademarks or registered Aurora, Il 60502 trademarks of their respective owners. www.peerless-av.com...
- Page 7 THIS PAGE INTENTIONALLY LEFT BLANK 7 of 8 ISSUED: 11-01-11 SHEET #: 021-9012-3 01-15-13...
-
Page 8: Limited Five-Year Warranty
Limited Warranty or impose any obligation on Peerless in connection with the sale of any Peerless® product. This warranty gives specifi c legal rights, and you may also have other rights which vary from state to state. www.peerless-av.com © 2012 Peerless Industries, Inc.
Need help?
Do you have a question about the PTM200 and is the answer not in the manual?
Questions and answers