Advertisement
Quick Links
Installation and Assembly:
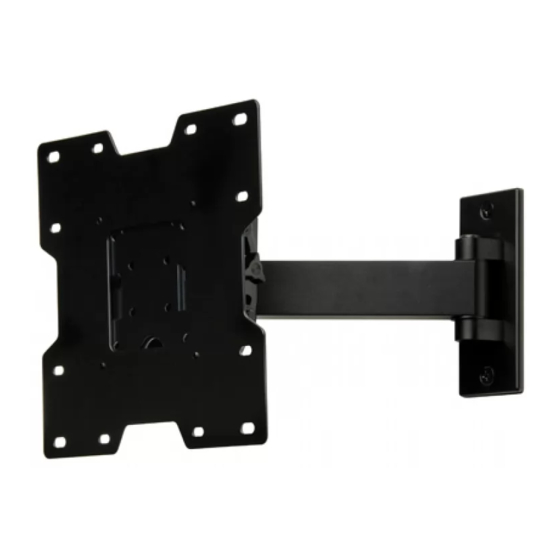
SmartMount™ Pivot Wall Arm for LCD Screens
Models: SP740P, SP740P-S
Features:
• Fits 22" - 40" LCD screens
• Two tensionable pivot points for extensive adjustment of viewing angle
®
• VESA
75/100/200 x 100/200 x 200 compatible
R
• Frees up space by folding flat against the wall
Max UL Load Capacity: 80 lb (36.3 kg)
3215 W. North Ave. • Melrose Park, IL 60160 • (800) 729-0307 or (708) 865-8870 • Fax: (708) 865-2941 • www.peerlessmounts.com
ISSUED: 05-18-05 SHEET #: 095-9235-7 02-22-07
Advertisement

Related Manuals for PEERLESS SmartMount SP740P


Summary of Contents for PEERLESS SmartMount SP740P
- Page 1 Installation and Assembly: SmartMount™ Pivot Wall Arm for LCD Screens Models: SP740P, SP740P-S Features: • Fits 22" - 40" LCD screens • Two tensionable pivot points for extensive adjustment of viewing angle ® • VESA 75/100/200 x 100/200 x 200 compatible •...
- Page 2 • Never mount this product to a metal stud wall construction unless the stud can be verified to be constructed of 25 gauge steel minimum, the drywall is 1/2" thick minimum and you obtain and use the Peerless Metal Stud Wall Plate (WSP 490) for metal studs.
- Page 3 Parts List SP740P SP740P-S Description Qty. Part # Part # A wall mount assembly 095-0375 095-0377 B Alligator® anchor 590-0097 590-0097 C .198" ID x .313" OD x .437" H retaining spacer 590-5005 590-5003 D 1/4-20 x 1/2" flat head phillips screw 520-1209 520-2178 E M4 x .7 x 10 mm phillips screw...
- Page 4 Installation to Wood Stud Wall WARNING • Make sure that the supporting surface will safely support the combined load of the equipment and all attached hardware and components. Using a stud finder, locate and mark the edges of the wood stud used in mounting this product. Use of an edge to edge stud finder is highly recommended.
- Page 5 WARNING • When installing Peerless wall mounts on cinder block, verify that you have a minimum of 1-3/8" of actual concrete thickness in the hole to be used for the concrete anchors. Do not drill into mortar joints! Be sure to mount in a solid part of the block, generally 1"...
- Page 6 Attaching Adapter Plate to Screen with VESA 200 x 100 or 200 x 200 Mounting Pattern Note: For VESA 75 mm and 100 mm patterns, see following page. Attach hook bracket (M) to adapter plate (N) using four M5 x 6 mm screws (K) and #10 washers (L) as shown.
- Page 7 Attaching Hook Bracket to Screen with VESA 75 or 100 Mounting Pattern WARNING • If screws don't get three complete turns in the screen inserts or if screws bottom out and bracket is still not tightly secured, damage may occur to screen or product may fail. ®...
- Page 8 LC or PLP models (not UL evaluated). FOR INSTALLING TO PEERLESS LC MODEL ADAPTER BRACKET Note: Refer to LC model adapter bracket instruction sheet for attachment of adapter bracket to screen.
- Page 9 Installing and Removing Flat Panel Screen SCREEN To attach screen to wall mount (A), lower hook bracket (M) with screen at an angle into pockets of wall mount as shown in figure 3.1. Once clips are engaged, push down to seat clips in pockets as shown in figure 3.2.
- Page 10 • To reduce tension, turn tension screw(s) counter-clockwise with allen wrench. Do not turn more than half a turn. TENSION SCREWS 10 of 10 ISSUED: 05-18-05 SHEET #: 095-9235-7 02-22-07 © 2007, Peerless Industries, Inc. All rights reserved. All other brand and product names are trademarks or registered trademarks of their respective owners.
Need help?
Do you have a question about the SmartMount SP740P and is the answer not in the manual?
Questions and answers