Table of Contents
Advertisement
Quick Links
Advertisement
Table of Contents

Subscribe to Our Youtube Channel
Related Manuals for Hinkley WINDWARD


Summary of Contents for Hinkley WINDWARD
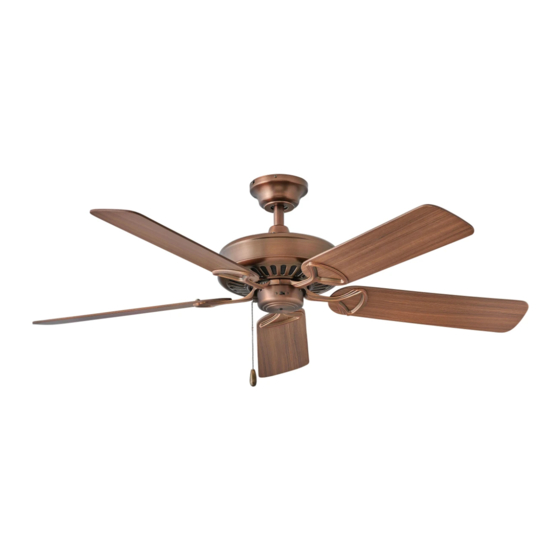
- Page 1 52" WINDWARD ™ INDOOR FAN CEILING FAN INSTRUCTION MANUAL...
- Page 2 SO WE’RE HERE IF YOU HAVE A QUESTION, NEED SOME HELP OR WANT TO CHAT ABOUT OUR PRODUCTS. SEND SUGGESTIONS OUR WAY TOO—WE’RE ALWAYS LOOKING TO MAKE YOUR EXPERIENCE WITH HINKLEY A POSITIVE ONE. > SERVICE@HINKLEY.COM > 800.HINKLEY > LET’S SEE THAT HINKLEY STYLE @HINKLEY...
-
Page 3: Table Of Contents
ENERGY GUIDE INSTALLING THE FAN - HUGGER CONFIGURATION SPECIFICATIONS INSTALLING THE FAN IN THE DOWNROD CONFIGURATION SMART BY BOND WARNING: Read and follow these instructions carefully and be mindful of all warnings shown throughout. ©2019 Hinkley Lighting, Inc. | hinkley.com |... - Page 4 Do not operate the reverse switch while the fan blades are in motion. The fan must be turned off and the blades stopped before reversing the blades direction. | hinkley.com...
-
Page 5: Important Safety Precautions
These factors must be supplied by the person(s) installing, caring for and operating the unit. TOOLS & MATERIALS REQUIRED • PHILLIPS SCREWDRIVER • FLAT SCREWDRIVER • WRENCH OR PLIERS • WIRE CUTTER • STEPLADDER • WIRING SUPPLIES AS REQUIRED BY ELECTRICAL CODE ©2019 Hinkley Lighting, Inc. | hinkley.com |... -
Page 6: Unpacking Your Fan
• Do not discard the carton. If warranty replacement or repair is ever necessary, the fan should be returned in original packing. Remove all parts and hardware. Do not lay motor housing on its side, or the decorative housing may shift, be bent or damaged. • Examine all parts. You should have the following: WINDWARD PACKAGE CONTENT Blade Set of 5 Hanging Bracket Canopy with Trim Ring Downrod Asm. -
Page 7: Preparation
The outlet box must be able to support a minimum of 35 pounds. Attach hanger bracket to outlet box using screws provided with the outlet box. Flat Washer Spring Washer Outlet Box Screw Fig. 1 ©2019 Hinkley Lighting, Inc. | hinkley.com |... -
Page 8: Installing The Fan
This fan has two installation options: Both the 4.5" downrod and hugger configurations are available with your fan. Hugger configuration may be desired in a low ceiling situation. Blades will be approximately 8-10” from the ceiling. HUGGER CONFIGURATION DOWNROD CONFIGURATION | hinkley.com... -
Page 9: Installing The Fan - Hugger Configuration
(Fig. 4), and turn the fan to the right to engage the screws in the keyslot. Insert the 2 remaining screws through the remaining canopy holes and tighten all 4 screws. Fig. 3 Fig. 4 ©2019 Hinkley Lighting, Inc. | hinkley.com |... -
Page 10: Installing The Fan In The Downrod Configuration
Tighten security set screws against downrod using a large flat blade screwdriver to ensure a tight fit against downrod. Downrod Tighten nuts against mounting collar. Security Set Screws Mounting Collar Downrod Pin Cotter Pin Top of Fan Body Fig. 2 | hinkley.com... - Page 11 (Fig. 4) Make wire connections, (refer to section titled "Electrical Yoke Cover Connections"). Slide canopy up and fasten to hanger bracket with 4 screws provided. Top of Fan Body Fig. 3 Slot Fig. 4 ©2019 Hinkley Lighting, Inc. | hinkley.com |...
-
Page 12: Electrical Connections
The white wire (common for light kit) is also there. WARNING: If light kit is not used, DO NOT connect blue wire at the ceiling. Fig. 1 Fig. 3 Fig. 2 | hinkley.com... -
Page 13: Blade Attachment
Use a large flat blade screwdriver for final tightening to fully compress the washers. This will help ensure proper alignment of the blades and noise-free, wobble-free running. Blades Assembly Screws Fig. 2 ©2019 Hinkley Lighting, Inc. | hinkley.com |... -
Page 14: Installation Of Removable Switch Housing
Turn the power on. Your Ceiling Fan is now ready to enjoy! Switch Housing Hub Side Screw (x3) (bottom of motor) Connector (plug) with Side Buckle Connector (receptacle) Switch Housing Keyhole Slot (x3) Pull Chain Optional Light Kit Screws Into Bottom Reverse Switch of Switch Housing | hinkley.com... -
Page 15: Operation
An UPWARD airflow moves warmer air off the ceiling area as shown in Figure 2. This allows you to set your heating unit on a cooler setting without affecting your comfort. SUMMER MODE WINTER MODE (COUNTERCLOCKWISE DIRECTION) (CLOCKWISE DIRECTION) Fig. 1 Fig. 2 ©2019 Hinkley Lighting, Inc. | hinkley.com |... -
Page 16: Care And Cleaning
6. Use the enclosed Blade Balancing Kit if the blade wobble is still noticeable. WARNING: TO REDUCE THE RISK OF PERSONAL INJURY, DO NOT BEND THE BLADE ARM WHILE INSTALLING, BALANCING THE BLADES, OR CLEANING THE FAN. DO NOT INSERT FOREIGN OBJECTS BETWEEN ROTATING FAN BLADES. | hinkley.com... -
Page 17: Energy Guide
SMART BY BOND HINKLEY SMART FAN OPTIONS: In addition to the included wall control, you can control your Hinkley fan through the Bond app. • To use the app, download it for free from the App Store or Google Play. - Page 18 HINKLEY IS PROUD TO PROVIDE YOU WITH CEILING FAN PRODUCTS THAT ENHANCE YOUR SPACE WITH COMFORT, PURPOSE AND STYLE. AS A FAMILY COMPANY, WE ARE COMMITTED TO DESIGN, PERFORMANCE AND QUALITY, AND WHAT’S IMPORTANT TO YOU IS PARAMOUNT TO US.
- Page 19 GLOBAL HEADQUARTERS 33000 Pin Oak Parkway | Avon Lake, Ohio 44012 T (440) 653 5500 | F (440) 653 5555 | hinkley.com...
Need help?
Do you have a question about the WINDWARD and is the answer not in the manual?
Questions and answers