Advertisement
Quick Links
Advertisement

Related Manuals for Walker Edison BTLD46SP


Summary of Contents for Walker Edison BTLD46SP
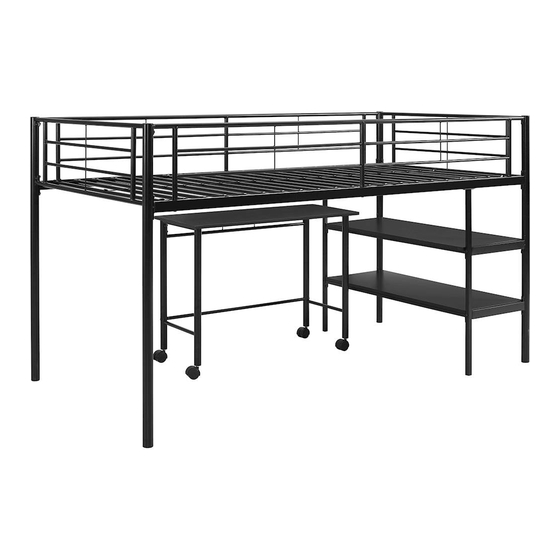
- Page 1 Assembly Instructions...
- Page 2 Instruction Manual IMPORTANT INFORMATION READ BEFORE ASSEMBLING THIS PRODUCT Follow the information on the warning labels found on the bunk bed and on the packaging. Do not remove the warning labels from the bed. Use only a mattress with the dimensions 74-75 in.L x 37.5-38.5 in.W x 6 in.H on the upper bunk. The surface of the mattress must be at least 5 in.
-
Page 3: Parts List
Parts List... -
Page 4: Hardware List
Hardware List... -
Page 5: Assembly Options
Assembly Options Option A - Ladder Left To build this option follow Steps 1-8, Steps 10A-13A and Steps 14-23. Skip Step 9 for this assembly option. Option B - Ladder Right To build this option follow Steps 1-8, Step 9, Steps 10B-13B and Steps 14-23. - Page 6 Attach guardrail (10) and shelf supports (8) to posts (1,4) using bolts (A). Tighten bolts (A) with wrench (G). Please note the position of all pre-drilled holes as shown above before attaching bed parts together. Attach second guardrail (10) posts (2,3) using bolts (A). Tighten bolts (A) with wrench (G). Please note the position of all pre-drilled holes as shown above before attaching bed parts together.
- Page 7 Attach crossbar (5) to post (1) and crossbar (6) to post (4) using bolts (A). Tighten bolts (A) with wrench (G). Please note the position of all pre-drilled holes as shown above before attaching bed parts together. Attach opposite end of crossbar (5) to post (2) and opposite end of crossbar (6) to post (3) using bolts (A). Tighten bolts (A) with wrench (G).
- Page 8 Roll mattress support slats (11) out along the bed frame and secure them to the bed frame using anchors (F) and bolts (A) where indicated above. Bolts (A) will screw directly into crossbars (5,6). Tighten bolts (A) with wrench (G). Attach guardrail (9) to posts (3,4) using bolts (A).
- Page 9 Attach second guardrail (9) to posts (1,2) using bolts (A). Secure guardrail (9) to crossbar (5) using bolts (B). Tighten bolts (A,B) with wrench (G). Attach shelf supports (12) to rails (7) using bolts (A). Tighten bolts (A) with wrench (G).
- Page 10 Attach ladder rungs (13) to post (1) using bolts (A). Tighten bolts (A) with wrench (G). Attach the shelf support assembly from Step 7 to ladder rungs (13) using bolts (B). Rail (7) will attach directly to ladder rungs (13). Tighten bolts (B) with wrench (G).
- Page 11 Secure rails (7) to crossbars (5,6) using bolts (A). Tighten bolts (A) with wrench (G). Attach shelves (14) to the bed frame using bolts (D). Four bolts (D) will be used to attach each shelf. Tighten bolts (D) with wrench (G).
- Page 12 Rotate bed frame so posts (3,4) are at the front and posts (1,2) are at the back.
- Page 13 Attach ladder rungs (13) to post (4) using bolts (A). Tighten bolts (A) with wrench (G). Attach the shelf support assembly from Step 7 to ladder rungs (13) using bolts (B). Rail (7) will attach directly to ladder rungs (13). Tighten bolts (B) with wrench (G).
- Page 14 Secure rails (7) to crossbars (5,6) using bolts (A). Tighten bolts (A) with wrench (G). Attach shelves (14) to the bed frame using bolts (D). Four bolts (D) will be used to attach each shelf. Tighten bolts (D) with wrench (G).
- Page 15 Attach desk support (18) to desk post (15) using bolt (A). Tighten bolt (A) with wrench (G). Attach desk crossbar (20) to desk post (15) using double-ended bolt (E). Please note the position of all pre-drilled holes as shown above before attaching desk parts together. Attach opposite end of desk support (18) to desk post (16) using bolt (A).
- Page 16 Attach desk support (19) to desk post (15) using bolt (A). Tighten bolt (A) with wrench (G). Attach desk crossbar (20) to desk post (15) using double-ended bolt (E). Please note the position of all pre-drilled holes as shown above before attaching desk parts together. Attach opposite end of desk support (19) to desk post (17) using bolt (A).
- Page 17 Screw wheels (24,25) into desk posts (15,16,17). Use wrench (H) to tighten the connection of wheels to posts. Attach desk crossbar (22) to desk post (16) using bolts (A). Tighten bolts (A) with wrench (G).
- Page 18 Attach desk crossbar (21) to desk support (18) using bolt (B). Attach desk crossbar (23) to desk post (16) using bolt (C). Tighten bolts (B,C) with wrench (G). Attach opposite end of desk crossbar (21) to desk support (19) using bolt (B). Attach opposite end of desk crossbar (22) to desk post (17) using bolts (A).
- Page 19 Attach desk top (26) to desk supports (18,19) using bolts (D). Tighten bolts (D) with wrench (G).
Need help?
Do you have a question about the BTLD46SP and is the answer not in the manual?
Questions and answers