Table of Contents
Advertisement
Advertisement
Table of Contents

Related Manuals for oticon BS-H200


Summary of Contents for oticon BS-H200
- Page 1 Instructions for use Phone Adapter 2.0...
- Page 2 This booklet gives you guidance on how to use and maintain your new phone Intended use Phone Adapter 2.0 is intended to be used together with Oticon adapter. Please read the booklet carefully including the Warnings section. ConnectClip, Oticon Streamer Pro, and Oticon wireless hearing aids.
-
Page 3: Table Of Contents
Table of content About Warnings Package content General warnings More info Phone adapter overview Installation Conditions of use Installation Technical information Connect the phone adapter to a power outlet International warranty Connect with phone line and landline phone Australia only Pair Streamer Pro with the phone adapter Warranty Pair ConnectClip with the phone adapter... -
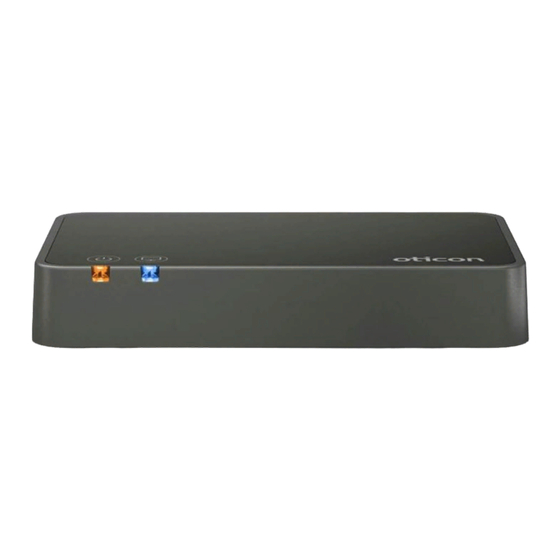
Page 4: Package Content
Package content Phone adapter overview The packaging box consists of the following elements: Front Power indicator Phone indicator Phone Adapter 2.0 Power supply Phone cable (The power supply may vary from country to country) Condition Power indicator Phone indicator Power on, no connection to the Streamer or ConnectClip Pairing with the Streamer or ConnectClip Instructions for use Phone Adapter... -
Page 5: Installation
This is a step-by-step guide on how to install the phone adapter. All needed parts for the installation are included in the package. Power supply For landline phone ConnectLine in/out* For PSTN wall adapter For more information please refer to: www.oticon.global/connectline About Installation Handling Warnings More info... -
Page 6: Connect The Phone Adapter To A Power Outlet
Connect the phone adapter to a power outlet Use the power supply with USB cable from box 1 Box 1 1. Plug the USB connector into the “power” connector on the phone adapter. 2. Plug the power supply into the mains wall socket or another power source. 3. -
Page 7: Connect With Phone Line And Landline Phone
Connect with phone line and landline phone Place the phone adapter in a suitable spot near your landline phone or base Box 2 station. 1. Unplug the phone line from the landline phone (or base station).* 2. Plug the phone line from the wall adapter into the phone adapter “IN”... -
Page 8: Pair Streamer Pro With The Phone Adapter
Pair Streamer Pro with the phone adapter The very first time your Streamer is used with the phone adapter, it must be paired to the phone adapter. ON/OFF Pairing Streamer Pro For pairing: Streamer Pro Streamer Pro Phone Description 1. Make sure the phone adapter is powered on, i.e. the power indicator is top status front adapter... -
Page 9: Pair Connectclip With The Phone Adapter
Pair ConnectClip with the phone adapter Status The very first time your ConnectClip is used with the phone adapter, it must be paired to the phone adapter. Pairing ConnectClip For pairing: ConnectClip ConnectClip Phone Description 1. Make sure the phone adapter is powered on, i.e. the power indicator is Status Power adapter... -
Page 10: Use The Phone Adapter
Use the phone adapter The phone adapter supports both incoming and outgoing phone calls. During a phone call the hearing aids are used as headsets and the microphone, on the Streamer or on ConnectClip, enables hands-free operation. Ensure the phone adapter is correctly installed as described in the following Streamer Pro ConnectClip section before you use the Streamer or ConnectClip for phone conversations... -
Page 11: Incoming Calls Streamer Pro
Incoming calls Streamer Pro How to answer and end a call Make sure that you are able to speak into the Streamer’s microphone. When your landline phone rings, you will hear an incoming call notification in your Microphone hearing aids. The phone indicator on the phone adapter blinks green and at the same time the phone button on the Streamer and the indicator blinks green. -
Page 12: Outgoing Call Streamer Pro
Outgoing call Streamer Pro Receiving a call Streamer Pro How to make a call Streamer Pro Streamer Pro Phone Description top status front adapter Make sure that you are able to speak into the Streamer’s microphone. Streamer and phone adapter connected 1. - Page 13 Making a call Streamer Pro Streamer Pro Phone Description top status front adapter Microphone Streamer and phone adapter are connected Phone Press the Streamer’s phone button briefly and button you will hear a dial tone in the hearing aids Steady Blinking About Installation Handling...
-
Page 14: Incoming Calls Connectclip
Incoming calls ConnectClip How to make a call Make sure that you are able to speak into the ConnectClip’s microphone (A). When your landline phone rings, you will hear an incoming call notification in your hearing aids. The phone indicator on the phone adapter will blink green and at the same time the status indicator on the ConnectClip will blink green (B). -
Page 15: Outgoing Calls Connectclip
Outgoing calls ConnectClip Receiving a call ConnectClip ConnectClip ConnectClip Phone Description How to make a call Status adapter Power Make sure that you are able to speak into the ConnectClip’s microphone (A). ConnectClip and phone adapter are connected. 1. To make a call press the ConnectClip’s multibutton briefly (B). The hook is now off and you will hear a dial tone in the hearing aids. - Page 16 Making a call ConnectClip ConnectClip Phone Description Status adapter Power ConnectClip and phone adapter are connected Press the multibutton on the ConnectClip briefly and you will hear a dial tone in the hearing aids Steady Blinking IMPORTANT NOTICE Use a soft, dry cloth to clean the phone adapter. The phone adapter must never be washed or immersed in water or other liquids.
-
Page 17: Additional Information
Additional information Volume control Use the volume button on the Streamer or ConnectClip to adjust the phone Turn off the phone adapter volume level in the hearing aids. Adjust the volume by pressing up or down briefly. If you don’t want to receive phone calls to your Streamer, turn off the phone Repeat the brief press for further adjustments. -
Page 18: General Warnings
For further support or tips please check the information on adapter during use or because of its use. Your between the phone adapter and the interfering www.oticon.global/support hearing care professional will support you with device. issue handling and, if relevant, reporting to the manufacturer and/or the national authorities. -
Page 19: Conditions Of Use
Conditions of use Operating conditions Temperature: +5°C to +40°C Humidity: 15% - 93% relative humidity, noncondensing Atmospheric pressure: 700 hPa to 1060 hPa Transportation and Temperature and humidity shall not exceed the below limits for storage conditions extended periods during transportation and storage: Temperature: -25°C to +70°C Humidity: 15% - 93% relative humidity, noncondensing Atmospheric pressure: 700 hPa to 1060 hPa... -
Page 20: Technical Information
Model name BS-H200 compliance could void the user’s authority to by one or more of the following measures: USA and Canada operate the equipment. - Page 21 The manufacturer declares that this Phone Declaration of Conformity is available from the Adapter 2.0 is in compliance with the manufacturer. Oticon Australia a division of Audmet Australia essential requirements and other relevant Suite 4, Level 4, Building B provisions of Directive 2014/53/EU.
- Page 22 Description of symbols and abbreviation used in this booklet Description of additional symbols used on labels Warnings Keep dry Text marked with a warning symbol must be read before using the device. Indicates a medical device that needs to be protected from moisture. Manufacturer Caution symbol The device is produced by the manufacturer whose name and address are stated next to the symbol.
-
Page 23: International Warranty
Description of additional symbols used on labels International warranty Korea Certification Mark (KC) The device complies with Korean product safety requirements for electrical and electronic Your device is covered by an international have under applicable national legislation equipment. limited warranty issued by the governing sale of consumer goods. -
Page 24: Australia Only
Warranty Certificate The rights given under this warranty are in Australian customers should contact Oticon addition to other rights and remedies under a Australia at Suite 4, Level 4, Building B, 11 Ta- law in relation to the good or services to which... - Page 25 0000220166000001...
Need help?
Do you have a question about the BS-H200 and is the answer not in the manual?
Questions and answers