
Related Manuals for Amphenol Protimeter ReachMaster Pro


Summary of Contents for Amphenol Protimeter ReachMaster Pro
- Page 1 PROTIMETER ReachMaster Pro BLD5777 INSTRUCTION MANUAL Amphenol INS5777_EN Rev. B 04/2020 Advanced Sensors...
-
Page 3: Table Of Contents
Measurement Specifications: ..........17 7.3 Physical Specifications: ............17 7.3.a Power for sensor module .........17 7.3.b Power for display module .........17 7.3.c Gross weight .............17 7.4 Regulatory Compliance: ............17 7.5 User interface: .................17 7.5.a Display ...............17 7.5.b Application profiles ...........17 Protimeter ReachMaster Pro Instruction Manual | 3... -
Page 4: Quick Start Guide
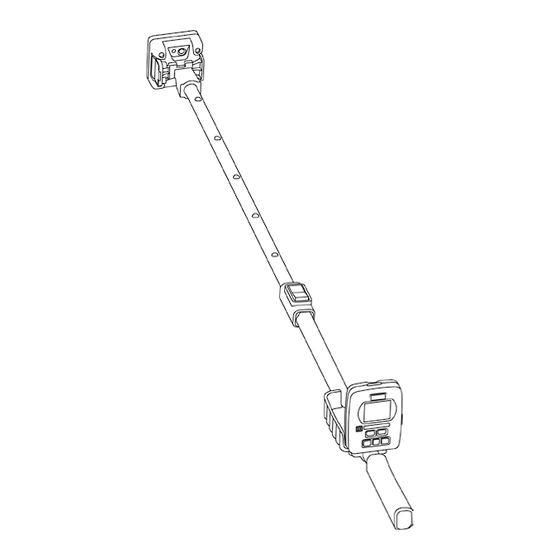
Quick Start Guide ReachMaster Pro has a sensor unit and display unit assem- bled on a telescopic handle for remote access. Before getting started, the sensor module and display module should be turned ON. For this, pull off the battery insulator assembled as a first step from both the sensor and display modules. -
Page 5: Introduction
1. Introduction The Protimeter ReachMaster Pro is a non-invasive moisture measurement device placed on an extendable pole to enable easy access to remote areas. The sensor unit is mounted on the tip of the telescopic pole, communicates with the display unit mounted close to the handle with a docking arrangement. -
Page 6: Display Module Battery Replacement & Installation
1.1 Display Module (cont.) The display unit can be angularly adjusted from 0° to 90° for better viewing experience during measurement. 1.1.1 Display Module Battery Replacement & Installation 6 | INS5777A - 04/2020... -
Page 7: Sensor Module
Care needs to be taken to install the batteries in the right direction according to the markings. Replace the battery cover after installation. 1.2 Sensor Module Protimeter ReachMaster Pro Instruction Manual | 7... -
Page 8: Battery & Abrasion Plate Replacement
1.2 Sensor Module (cont.) The sensor unit can be turned ON using the power button, as shown in the above figure. The sensor unit automatically turns off when the battery is low, or when it is not connected to display unit for more than 2 minutes or if the connected display unit is turned off. - Page 9 The abrasion plate should be replaced when 1mm mark is reached. Four screws need to be removed to replace the abrasion plate, as shown below. Protimeter ReachMaster Pro Instruction Manual | 9...
-
Page 10: Safety Considerations
► Battery Replacement: Use recommended batteries for replacement. 3. Product Components and Accessories: Protimeter ReachMaster Pro has a replaceable abrasion pad, which can be purchased separately when worn out. 10 | INS5777A - 04/2020... - Page 11 3. Product Components and Accessories (cont.) Protimeter ReachMaster Pro has a replaceable abrasion pad which can be purchased seperately when worn out. Below is a list of spare parts that can be ordered seperately: Part No. Description Display Unit BLD5777-D...
-
Page 12: Starting The Device (Turning On And Off)
4. Starting the Device (Turning ON and OFF): Prior to initial use, ensure that the battery insulators are pulled off. Note: The battery status is indicated on the display unit (for both sensor and display units). When low battery is indicated, replace the batteries. -
Page 13: Reachmaster Pro Modes
5. ReachMaster Pro Modes The Protimeter ReachMaster Pro is used to scan the roof and floor for moisture in different materials. 5.1 Measurement mode: Measurement Mode is the default mode while the device is turned ON. The measured value will be displayed on the screen in this mode, and the background color and beeper will change to indicate the moisture level. -
Page 14: Measurement Mode
5.1 Measurement Mode (cont.) A special feature to change the measurement sensitivity helps the device measure better in different materials. Press and hold while in measurement for 2 seconds to enable the sensitivity keys. Once the sensitivity is enabled, an indication will be seen on screen. -
Page 15: Changing Brightness
Sl. No can be entered by changing each digit using key and pressing to confirm and jump to the next digit. Once the last digit is set, it will automatically go back confirming the serial number. In the middle of setting this number if is pressed, this setting will not be applied. Protimeter ReachMaster Pro Instruction Manual | 15... -
Page 16: Calibration
There are two pages in the screen that can be accessed by pressing 6. Care and Maintenance The Protimeter ReachMaster Pro is a remote moisture measurement system that will provide many years of reliable service if the following points are observed: ►... -
Page 17: Technical Specifications
7.4 Regulatory Compliance: CE, RoHS, ETL 7.5 User interface: 7.5.a Display Graphical LCD Size: 2” Resolution: 176 X 220 Backlight (with adjustable brightness) 7.5.b User application profiles Sticky memory last used application settings Protimeter ReachMaster Pro Instruction Manual | 17... - Page 18 Notes: 18 | INS5777A - 04/2020...
- Page 19 Notes: Protimeter ReachMaster Pro Instruction Manual | 19...
- Page 20 Amphenol Thermometrics (U.K.) Limited Crown Industrial Estate Priorswood Road Taunton, TA2 8QY, UK T: +44 1823 335 200 www.protimeter.com www.amphenol-sensors.com Amphenol Advanced Sensors INS5777 Rev B ©2020 Amphenol Thermometrics, Inc. All rights reserved. Technical content subject to change without notice. 04/2020...
Need help?
Do you have a question about the Protimeter ReachMaster Pro and is the answer not in the manual?
Questions and answers