Table of Contents
Advertisement
Quick Links
PB-101 PG2 / PB-102 PG2
Wireless Panic Button
1. INTRODUCTION
The PB-101 PG2 and PB- 102 PG2 are small PowerG pendants, designed for use with
PowerMaster control panels and other PowerG receivers.
To activate transmission, press the pushbutton (s) at the center of the unit. When
activated, the transmitter sends an alarm code, a LED indication that confirms successful
or failed transmission, and (only in PB-102) a buzzer sounds.
The PB-101/102 has several options for carrying or mounting it. The unit is supplied with a
belt clip, a key chain, a lanyard necklace, and a holder which can be attached to the belt
clip or mounted on a wall.
2. OPERATION
Caution! This equipment must be used in non-hazardous locations only. This equipment is designed and listed for use in
security / alarm systems and applications. It is not designed or listed for use in health care signaling or life safety applications.
The following functions are available:
Function
Panic
The signal notifies your
panel of an emergency
situation.
Arm
---
Arm your system in the
Away mode.
Disarm
---
Disarm your system.
3. ASSEMBLY FOR PORTABILITY AND MOUNTING
This section describes how to attach the PB-101/102 to various portability options.
Warning! Choking Hazard; Small parts; The pendant and belt clip are NOT for children under 3 years.
Figure 2 Attaching PB-101/102 to a Belt Clip
1. Slide the PB-101/102 into the holder until you feel it snap
securely inside.
2. To attach the belt clip, slide it onto the rails on the rear of the
holder.
D-304457 PB-101 PG2 / PB-102 PG2 Installation Instructions
PB-101
Press and hold the button down for 3 – 5 seconds, the
red LED lights. The green LED lights to confirm a
successful transmission.
Not applicable
Not applicable
3. To remove the PB-101/102 from the wall-mounted holder or from the belt
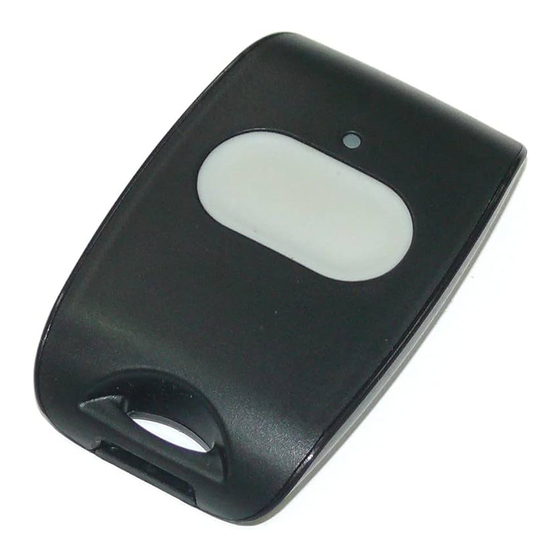
Figure 1. PB-101 and PB-102
clip, press down the top of the holder and push the pendant up with your
fingers.
Figure 3 Attaching PB-101/102 to a Key Chain
Figure 4 Attaching PB-101/102 to a Lanyard Necklace
Installation Instructions
PB-102
Press and hold both buttons
down simultaneously for more
than 3 seconds.
Press and hold this button for at
least 1 second.
Press and hold this button for at
least 1 second.
1
Advertisement
Table of Contents

Subscribe to Our Youtube Channel
Related Manuals for Visonic PB-101 PG2


Summary of Contents for Visonic PB-101 PG2
- Page 1 Installation Instructions 1. INTRODUCTION The PB-101 PG2 and PB- 102 PG2 are small PowerG pendants, designed for use with PowerMaster control panels and other PowerG receivers. To activate transmission, press the pushbutton (s) at the center of the unit. When activated, the transmitter sends an alarm code, a LED indication that confirms successful or failed transmission, and (only in PB-102) a buzzer sounds.
- Page 2 LED turns on, and then release the button. Ensure that the LED stays on for 2 seconds and then flashes for 10 seconds. 4.2. Configuring the Panic Button Parameters (for PowerG Version 18 systems only) Enter the DEVICE SETTINGS menu and follow the configuration instructions for the PB-101 PG2 and PB-102 PG2 panic buttons as described below. Option...
- Page 3 6. PRODUCT LIMITATIONS Visonic wireless systems are very reliable and are tested to high standards. However, due to their low transmitting power and limited range (required by FCC and other regulatory authorities), there are some limitations to be considered: A.
- Page 4 For information regarding the recycling of this product you must contact the company from which you orignially purchased it. If you are discarding this product and not returning it for repair then you must ensure that it is returned as identified by your supplier. This product is not to be thrown away with everyday waste. Directive 2002/96/EC Waste Electrical and Electronic Equipment. D-304457 PB-101 PG2 / PB-102 PG2 Installation Instructions...
- Page 5 WARRANTY Visonic Limited (the “Manufacturer") warrants this product only (the "Product") to the original purchaser only (the “Purchaser”) against defective workmanship and materials under normal use of the Product for a period of twelve (12) months from the date of shipment by the Manufacturer.
- Page 6 * In case of a conflict, contradiction or interpretation between the English version of the warranty and other versions, the English version shall prevail. Email: info@visonic.com Internet: www.visonic.com © VISONIC LTD. 2018 PB-101 PG2 / PB-102 PG2 D-304457 (Rev. 6 05/18) D-304457 PB-101 PG2 / PB-102 PG2 Installation Instructions...
Need help?
Do you have a question about the PB-101 PG2 and is the answer not in the manual?
Questions and answers