Table of Contents
Advertisement
Quick Links
Advertisement
Table of Contents

Related Manuals for Kett Riceter fg Series


Summary of Contents for Kett Riceter fg Series
- Page 1 Riceter fg series Grain / Rice Moisture Tester Operating Manual...
- Page 2 Thank you for purchasing our Grain Moisture Tester, Riceter fg500 series. This tester can measure the moisture of grain by simple operation, but proper operation is necessary for accurate moisture measurement. Please read this operating manual carefully before use. Note: The pictures in this manual are examples and may differ from actual product.
-
Page 3: Table Of Contents
Table of contents Contents of Package ................2 Part Names ....................3 Description of Display ................. 4 How to Place Batteries ................ 6 Before Measurement ................7 Measurement ..................8 Average Value ..................15 Storage ....................16 Rice Husker Instructions ..............17 Roller Assembly Replacement............ -
Page 4: Contents Of Package
Contents of Package Sample tray (2 pcs) Spoon with tweezers Cleaning brush Battery (AA sizex4 pcs) Carrying Case Rice husker TR-130 Operating manual Inspection Certificate... -
Page 5: Part Names
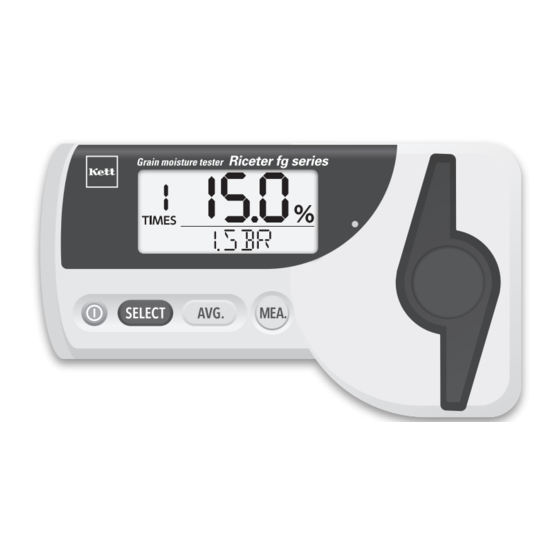
Part Names Display Model No. Handle stop red mark Application table Testing Chamber Handle “POWER” button “MEA.” button (Measure) “SELECT” button “AVE.” button (Average) Note : Application table differ depending on the model number. Above example is fg501. -
Page 6: Description Of Display
Description of Display This tester adopts the auto power off Use of backlight in the display section function. The power of the tester is allows users to see the display clearly automatically turned off in approx. even in the dark. 5 minutes after turning on the power if no operation is performed. - Page 7 Description of Display Meanings of special marks The display may show marks as follows: Battery is dead. Replace the batteries with new ones. Battery mark Caution (displayed immediately after pressing the power switch and while using) Displayed when the measured result exceeded the upper limit of the Over mark Caution measurement range...
-
Page 8: How To Place Batteries
How to Place Batteries Take out the main unit Take out the batteries Open the battery box from the carrying case. from under the battery on the back side of the holder. main unit, and place 4 batteries appropriately. -
Page 9: Before Measurement
How to Place Batteries Before Measurement Battery replacement Riceter fg500 series is equipped with When the battery is running out, the a temperature compensation circuit. bat ter y mark lights up the display. However the test unit and samples Replace all 4 batteries (AA) with new are required to be thermally stabilized ones. -
Page 10: Measurement
Measurement Press the “POWER” button. All of the backlight, all characters on the display section, mark light up for 2 seconds, and then model number and software version number is displayed automatically. The backlight goes out, and the tester becomes a standby state for measuring. - Page 11 Measurement T h e b a c k l i g h t t u r n s o f f a n d Press the "SELECT" button and repeat “A p p l i c a t i o n ”, “ T i m e s ” “ %” a r e until the Selection Indicator and the displayed.
- Page 12 Measurement Put the test sample evenly on the sample tray by just the amount that will be one layer. Note: Both the amount of sample is too much or insuf f icient may cause a Evenly in one layer on the sample tray measurement error.
- Page 13 Measurement Rotate the handle counterclockwise Note: Failure to observe this may cause the tip of the handle to damage the plastic to let the sample tray enter the portion of the sample tray. Be sure to testing chamber. Place the sample fully insert the tray.
- Page 14 Measurement Slowly rotate the handle clockwise. Press the "MEA." button, the decimal When the tip of the handle reaches point blinks, the backlight lights up, the sample (A), and fully rotate the the moisture content and measuring handle to the “handle stop red mark” number are displayed thereafter.
- Page 15 Measurement For continuous measurement, perform After a lapse of 5 minutes, the power the next measurement while the last is automatically turns off and all the measured value is displayed. Replace the displayed items are cleared. test sample, fully rotate the handle, and Pressing the "POWER"...
- Page 16 Measurement Clean testing chamber inside, the sample tray, and metal plate after every measurement. If the last test sample remains, proper measurement cannot be performed. For continuous measurement, disconnect the handle and remove the attached sample and contamination from the tip of the handle and contact section sometimes.
-
Page 17: Average Value
Average Value Pressing the "AVE." button after several Note1: To o b t a i n t h e a ve r a g e va l u e o f m o i s t u r e c o n t e n t s , p r e s s t h e measurements can obtain the average "AV E ."... -
Page 18: Storage
Storage Observe the following instructions to keep moisture tester for a long period of time: • Be sure to remove the batteries. • Clean every portion of the main body in a careful manner. Especially for the measuring unit, disconnect the handle and clean the inner contact section sufficiently. -
Page 19: Rice Husker Instructions
Rice Husker Instructions Rice Husker TR-130 Attach the handle to the body. <Parts> Paddy hopper Brown rice outlet Handle Husk box... - Page 20 Rice Husker Instructions Pour the paddy into the hopper and While holding the TR-130 at the edge close the cover. of a desk or table, turn the handle in the clockwise direction to husk the sample.
- Page 21 Rice Husker Instructions There are two methods to remove the brown rice. (1) Open the top of the paddy hopper. (2) Shake the TR130 and the brown rice Turn the instrument over and the will be removed through the rice brown rice will be removed.
- Page 22 Rice Husker Instructions Discard the husk before the husk box is full.
-
Page 23: Roller Assembly Replacement
Roller Assembly Replacement The Rice husker uses two rollers. One is metal and the other is urethane covered. Replace the assembly when the rollers are worn to maintain husking efficiency. Also replace the assembly when foreign objects have been caught in the rollers. Turn the main unit upside down. - Page 24 Roller Assembly Replacement Mount the new roller assembly and Assemble in the reverse order of disassembly. If the handle does not confirm the gears mesh. turn well, please try again.
-
Page 25: Specifications
Operating temperature : 0 to + 40 °C Display : Digital LCD with backlight illuminator, Minimum display digit : 0.1% Number of calibration curves : Refer the Riceter fg series Application Table Temperature correction : Automatic temperature correction by thermistor Automatic temperature... - Page 28 Notes ● Copying some or all of the contents of this user manual without prior written consent is strictly prohibited. ● The contents of this user manual may be changed at any time in the future without any prior notice. ● The appearance and/or representations of the products and parts depicted in this user manual may not ap- pear exactly as their actual counterparts, but this does not affect their operation or functionality. ● This user manual was intended to be written as clearly and accurately as possible. However, if you are unclear about anything in this user manual or notice any missing information, please contact us directly. ● We cannot be held responsible for any actions or effects resulting from the execution of any operations out- lined in this user manual. 060298-01...
Need help?
Do you have a question about the Riceter fg Series and is the answer not in the manual?
Questions and answers