
Subscribe to Our Youtube Channel
Related Manuals for General Sleep Zmachine Synergy

Summary of Contents for General Sleep Zmachine Synergy
- Page 1 Patient Guide Zmachine ® Synergy 20 minutes before bedtime, begin the instructions on page 6...
- Page 3 The information in this guide has been carefully checked and is believed to be accurate. However, in the interest of continued product development, General Sleep Corporation reserves the right to make changes and improvements to this guide and to the product(s) that it describes, at any time, and without notice or obligation.
-
Page 4: Table Of Contents
Table of Contents About this Guide Table of Contents Introduction Indication for Use Symbol Descriptions Description of Components The Zmachine Synergy Indicators & Elements Warnings and Cautions Disposal Cleaning Interference Using the System Step 1: Clean/Prepare Skin Step 2: Apply Sensor Pads... -
Page 5: Introduction
® The Zmachine Synergy is a high technology sleep monitor developed by General Sleep Corporation. The system records signals related to your brainwave patterns, breathing, and body position during sleep. The system was designed for easy in-home use. Indication for Use ®... -
Page 6: Description Of Components
Description of Components The Zmachine Synergy system may include some or all of the following items: Zmachine Synergy EEG Cable Nasal Cannula Effort Belt Effort Belt Cables Finger Probe Sensor Pads Alcohol Swabs Paper Tape Belt Clip Note: Due to differences in brand and model numbers, part appearances may vary. -
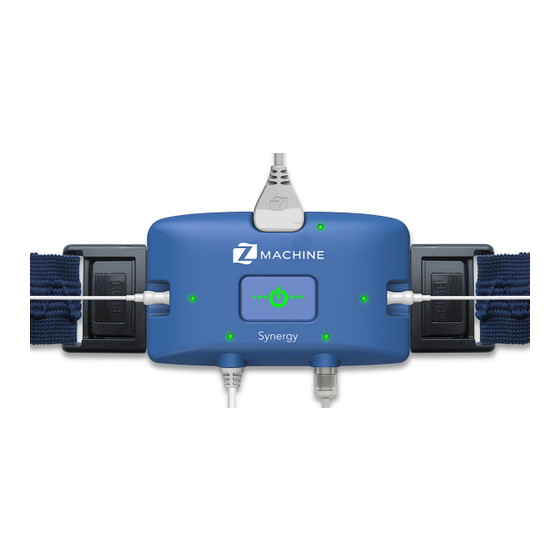
Page 7: The Zmachine Synergy Indicators & Elements
The Zmachine Synergy Indicators & Elements Ref. Description Ref. Description Main system status Effort belt status Sensor pads status Cannula status Effort belt status Finger probe status Ref. Description Power Button: Turns the system on & off Effort Belt: Senses chest movements while breathing... -
Page 8: Warnings And Cautions
Do not expose the Zmachine to excessive heat, as the internal Lithium Ion battery may leak or explode. Only use General Sleep approved parts and accessories described in this guide. Other parts may not function correctly with the Zmachine and could pose a safety hazard or lead to poor performance. -
Page 9: Disposal
Healthcare Provider. Cleaning The outer surfaces of the Zmachine Synergy will be cleaned by your healthcare provider. If you need to remove fingerprints or dirt, use a small amount of water or isopropyl alcohol to dampen a soft cloth and wipe the surface clean. -
Page 10: Step 1: Clean/Prepare Skin
Step 1: Clean/Prepare Skin Use an alcohol swab to clean the bony areas behind the left and right earlobes, and also the back of the neck as shown. Hint: A mirror can be helpful for this and the next step. Note: Let skin air dry for about 20 or 30 seconds after cleaning before proceeding onto Step 2. -
Page 11: Step 2: Apply Sensor Pads
Step 2: Apply Sensor Pads Remove clear backing from sensor pad. Apply a sensor pad to each of the three cleaned areas as shown. Secure each sensor pad with finger by rubbing the outer edge only. Avoid pressing the center as gel will spread onto the adhesive. Hint: If you positioned a sensor pad incorrectly, simply repeat the steps above using a new sensor pad (never reuse a sensor pad). -
Page 12: Step 3: Setup Effort Belt
Step 3: Setup Effort Belt Attach effort belt to Synergy and adjust length to fit your body. Always wear the Synergy over a shirt. TIGHTEN LOOSEN Click belt onto tabs and position high under the armpits with the system above the pectoral muscles/breasts. Adjust belt length for a snug but comfortable fit that hugs your chest and moves with your breathing. -
Page 13: Step 4: Connect Cable And Sensors
Step 4: Connect Cable and Sensors Insert free end of EEG Cable into Synergy. Snap BLACK wire to NECK sensor. Connect the black wire to the neck sensor (not the ears). Snap the two WHITE wires to the two EAR sensors. Either white wire can be connected to either ear sensor. -
Page 14: Step 5: Connect The Cannula
Step 5: Connect the Cannula Place cannula in nostrils, drape over ears, & remove some slack. Adjust slider just a little to remove some slack. Do not tighten. Apply small two pieces of tape as shown. The slider should not be tight; a tight cannula can be uncomfortable. -
Page 15: Step 6: Connect The Finger Probe
Step 6: Connect the Finger Probe Position the finger probe with the cord exiting over the top of your hand as shown. Apply a small piece of tape to secure the cord (be sure to leave a little slack in the cord for comfort). Nail polish and false nails will interfere with the test and should be removed prior to use. -
Page 16: Step 7: Review (Not Really A Step)
Step 7: Review (not really a step) The complete setup should look similar to this... Patient Guide... -
Page 17: Starting The Test
Starting the Test Press the button for about 1-2 seconds until the lights turn on, then release. Do not hold for too long or the system will shut off again. Note: The Synergy will automatically check your sensors. A yellow light indicates that the corresponding sensor is not yet connected or needs further attention (green means good). -
Page 18: Stopping The Test
Stopping the Test Press the button for about 3-4 seconds until the system beeps, then release. All lights will glow orange, then turn off. Unhook yourself from the system. Remove finger probe and tape • Remove nasal cannula and tape •... -
Page 19: Frequently Asked Questions
Do I need to charge the Zmachine Synergy if using for a second night? No. When you receive the Zmachine Synergy it will be fully charged and can run for at least 24 hours, so no need to recharge before a second night. -
Page 20: Legal
Legal Trademark and Intellectual Property Rights The Z logo, Zmachine, and General Sleep are registered trademarks of General Sleep Corporation. The Zmachine has been designed and developed by General Sleep Corporation, Euclid, Ohio, USA. At the time this manual was printed, the Zmachine was protected by the following patents:... - Page 21 The computer software (“Licensed Software”) loaded on the Zmachine (the “System”) is licensed, not sold, for your use under the terms of this license. Consolidated Research, Inc., d/b/a/ General Sleep Corporation (“GSC”) reserves any rights not expressly granted to you. While you may possess the System, GSC retains all ownership rights and title to the Licensed Software.
- Page 22 For purposes of this Agreement (“Agreement”), the following terms have the following meanings: “User” means anyone using the Zmachine Synergy (described in this manual), or any associated systems or software. “De-identified Information” shall mean Information that has been de-identified in accordance with the requirements for de-identification of protected health information under 45 CFR §164.514(b).
Need help?
Do you have a question about the Zmachine Synergy and is the answer not in the manual?
Questions and answers