
Related Manuals for Gomax MX-2000A


Summary of Contents for Gomax MX-2000A
- Page 1 Dual-View Video Processor with Audio Path User Manual rev: 120518 Made in Taiwan...
-
Page 2: Table Of Contents
However, like all electronic equipments, the MX-2000A should be used with care. Please read and follow the safety instructions to protect yourself from possible injury and to minimize the risk of damage to the unit. -
Page 3: Introduction
Despite the advanced video features, MX-2000A also equips audio processor allowing users to do analog switching and convert analog stereo into HDMI streams. -
Page 4: Features
● IR control and software control through USB. ● Portable size. ● Automatically power-saving mode. PACKAGE CONTENTS ● 1x MX-2003B or MX-2000A ● 1x 5V power adapter ● 1x DVI to DVI&VGA breakout cable ● IR remote controller ● 1x VGA to component breakout cable ●... -
Page 5: Specifications
SPECIFICATIONS Model Name MX-2003B MX-2000A Technical Role of usage Multiplexer / video processor Dual output support Yes [DVI + VGA] Yes [HDMI/DVI + YPbPr] HDCP compliance HDMI/DVI [Single-link 4.95Gbps] HDMI/DVI [Single-link 4.95Gbps] Video bandwidth VGA [165MHz] VGA [165MHz] Input Video support... -
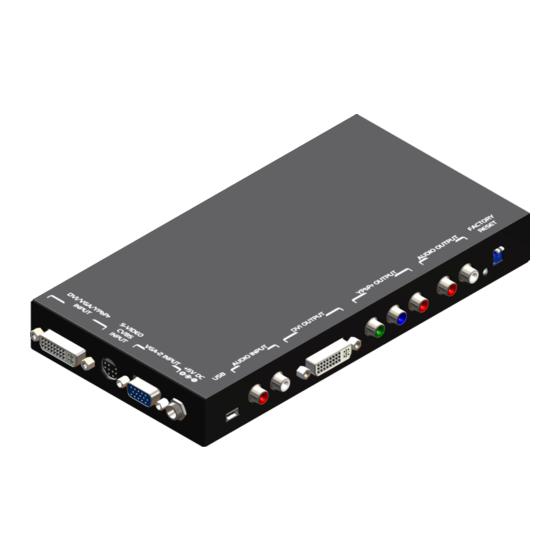
Page 6: Panel Descriptions
You can choose two of the four inputs, one is for main channel and another is for sub channel. Then display two of them simultaneously on the same screen. Figure 2 shows the rear panel connectors of the MX-2000A; Table 1 illustrates how you can connect video devices and display to the MX-2000A. -
Page 7: Hardware Installation
1: I/O C ABLE ONNECTORS Input Connector Video Source [1] DVI [2] VGA — with a DVI-to-VGA adapter (DVA01) [3] Component (YPbPr) — with a DVI-to-VGA adapter (DVA01) and a VGA-to-component breakout cable (VYPBA01) DVI-IN [4] 1x DVI + 1x VGA — with a DVI-to-DVI/VGA breakout cable (DDVY01) [5] 1x DVI + 1x Component (YPbPr) —... - Page 8 7. Connect a device equipped with composite video output to composite input of the MX-2000A. 8. Connect your computer with the MX-2000A by a Mini USB cable and then install the software. 9. Plug in power adapter cable into 5V DC power jack.
- Page 9 IR Remote Control The MX-2000A is now shipped with a compact remote control that allows for direct access to most commands used to control the video processor. 2: IR F ABLE UNCTIONALITIES Mute the audio output Mute Power Power on/off the device...
- Page 10 On Screen Display Menu Image Settings Scheme: Normal, Vivid, Cinema, Game, Sport Five slider controls for video quality: Brightness, Contrast, Saturation, Hue, Sharpness Advanced: Noise Reduction, Flash tone, Dynamic Contrast, Color Noise Reduction: MPEG NR (MPEG Noise Reduction) Temporal NR (Temporal Noise Reduction) Flash tone: Enhance Flash Dynamic Contrast: 5 Level Controls Color: User Defined Color Temperature...
- Page 11 Display Settings Auto Aspect Ratio Aspect Ratio: 16:9, Letter Box, Pillow Box Expand Resolution: Define the output’s resolution 800x600@60, 1024x768@60, 1280x1024@60, 1280x720@60, 1366x768@60, 1440x900@60, 1400x1050@60, 1920x1080@60, 1920x1200@60, 1600x1200@60 PIP: PIP Mode: off, Large PIP, Small PIP, Side by Side (PBP) PIP Position: Bottom-Right, Bottom-Left, Top-Left, Top-Right Multi-PIP Configuration: POP7, 3x3 GRID, POP3, POP12 Multi-PIP On*: YES, NO...
-
Page 12: Operation Software
MX-2000A after you press any key on the remote control. Instruction of Software Connection 1. Power up the MX-2000A and you can see both red and green LEDs on the front panel blink. Make sure the serial port USB connection secure. - Page 13 3. If the serial connection is well established, you can see similar work window as below.
- Page 14 Menu File a. Device Linkage: This will synchronize the status or the MX-2000A with the software, especially after IR commands sent. b. Data Table: It will show a dialog that will list the input and resolution data. c. Factory Reset: This will restore all the system values back to the factory default.
- Page 15 Tree List Dialog a. Output Resolution and Type b. Layout Mode c. Select audio source is from RL or HDMI d. Main channel’s size and position Information e. Sub channel’s size and position information a. Main channel’s input signal select and information. b.
- Page 16 Dialog 1. PAP control dialog: While you move the mouse’s cursor near the borders, in either red or blue, the icon of the cursor will change as the figure below. 2. Data dialog: About output resolution and input signal data. The information is only for software development.
- Page 17 4. Firmware Update dialog: It supports to update the firmware to the newest version. 5. Resolution Parameter dialog: It can edit and save the parameter of output resolution in device. And it also can save the parameters in PC. 6. Serial Port Monitor Monitor the send and receive data with serial port.
-
Page 18: Troubleshooting
Make sure all cables are in good working condition and properly connected to the MX-2000A and displays. Configure the output video resolution so that it doesn’t excess the native resolution of the display. ( in this case, the message of “out of range” is... -
Page 19: Limited Warranty
SELLER will NOT be liable for direct, indirect, incidental, special, or consequential damages resulting from any defect or omission in this manual, even if advised of the possibility of such damages. Also, the technical information contained herein regarding the MX-2000A features and specifications is subject to change without further notice. -
Page 20: Appendix - Supported Resolution
APPENDIX – SUPPORTED RESOLUTION [DVI-IN] socket Supported Mode Resolution Supported Mode Resolution NTSC – 480i / 525i 720x240 @60Hz 832x624 @75Hz PAL– 576i / 625i 720x288 @50Hz VESA 1024x768 @60Hz PAL– 480p / 525p 720x483 @60Hz 1024x768 @60Hz PAL– 480p (16:9) 960x483 @60Hz VESA 1024x768 @70Hz... - Page 21 [DVI-IN] socket Supported Mode Resolution Supported Mode Resolution 480p / 525p 720x483 @60Hz VESA 800x600 @56Hz 480p (16:9) 960x483 @60Hz VESA 800x600 @60Hz HDTV – 720p 1280x720 @50Hz VESA 800x600 @72Hz HDTV – 720p 1280x720 @60Hz VESA 800x600 @75Hz HDTV – 1080i 1920x1080 @30Hz VESA 800x600 @85Hz...
Need help?
Do you have a question about the MX-2000A and is the answer not in the manual?
Questions and answers