
Related Manuals for diLUSSO FS909G5CSD


Summary of Contents for diLUSSO FS909G5CSD
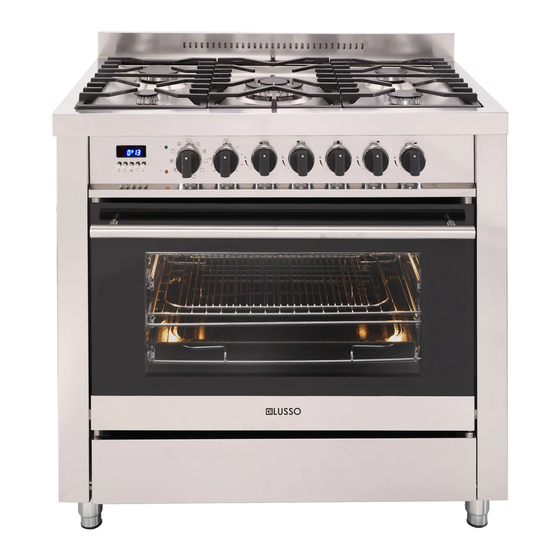
- Page 1 Freestanding Oven FS909G5CSD FS909G5SSD FS607G4DS FS607G4AS FS605G4DS FS605G4AS Installation and Operating Manual...
-
Page 2: Table Of Contents
Installation of the Freestanding Unit Power & Gas Connection Oven Accessories -----------------------------------------------------Page 10 Control Panel ----------------------------------------------------------Page 11 FS607G4AS & FS605G4AS FS607G4DS & FS605G4DS FS909G5CSD FS909G5SSD Using the Gas Hob ----------------------------------------------------Page 14 Using the Electric Oven ------------------------------------------------Page 15 Digital Timer Programmer ---------------------------------------------Page 17 Digital Clock... -
Page 3: Important Notes
Important Notes Dear Customer Thank you for choosing our product. This appliance is easy to use; however please read this handbook carefully before installing and operating it. Herein, you will find the correct method of installation and tips for best use and maintenance of the product. Please keep this handbook for future reference. - Page 4 ● Do not use the oven door as a shelf. ●Do not push down the opened oven door. ●Ensure that the appliance is switched off before replacing the lamp to avoid the possibility of electrical shock . ●Do not use harsh abrasive cleaners or sharp metal scrapers to clean the oven door glass since they can scratch the surface, which may result in shattering of the glass.
-
Page 5: Installation Instructions
Installation Instructions The appliance must be installed by authorised personnel in accordance to the manufacturer ’s instructions and local regulations. This appliance must be installed in accordance with: AS/NZS 5601 - Gas Installations (for Australia) NZS 5261 – Code of Practice for the Installation of Gas Burning Appliances and Equipment (for New Zealand) Local gas fitting regulations AS/NZS 3000 –... -
Page 6: Installation Of The Freestanding Unit
For FS909G5CSD & FS909G5SSD For FS607G4DS, FS607G4AS, FS605G4DS & FS605G4AS Installation of the Freestanding Unit Remove all protective plastic film (if there is any). Install the levelling feet provided and adjust the cooker to a suitable height then you may cover the feet with the kick board if supplied. -
Page 7: Power & Gas Connection
Power & Gas Connection THE APPLIANCE MUST BE CONNECTED IN ACCORDANCE WITH CURRENT GAS & ELECTRICAL RULES AND REGULATIONS. INSTALLATION IS TO BE DONE ONLY BY AUTHORISED PERSONNEL. Gas Connection The gas settings are listed in the data label for both NG and ULPG. Kindly ensure the correct nozzle injectors are used for the gas supply. - Page 8 There are two ways to carr y out the connection to the main gas line: A. The freestanding cooker can be connected with rigid pipe as specified in AS/NZS 5601 . B. The cooker can be connected with a Flexible Hose, which complies with AS/NZS 1869 (AGA Approved), 10mm ID, class B or D, not more than 1.2m long and in accordance with AS/NZS 5601.
- Page 9 Natural Gas Universal LPG Burner : Small (1.0kPa) (2.75kPa) Gas Consumption (MJ/h) 4.00 4.00 Injector Size (mm) 0.91 0.56 Burner : Medium Gas Consumption (MJ/h) 6.70 6.70 Injector Size (mm) 1.18 0.71 Burner : Large Gas Consumption (MJ/h) 11.50 11.50 Injector Size (mm) 1.59 0.91...
- Page 10 Electrical Connection WARNING: THIS APPLIANCE MUST BE EARTHED For a direct connection to the electric network is necessar y to mount a circuit breaker before the appliance according to the electrical regulation. Before making connection to the electrical network , check that the domestic system and the limiter valve can take the appliance load.
-
Page 11: Oven Accessories
For FS607G4DS, FS607G4AS, FS605G4DS & FS605G4AS 2x wire racks 1x baking tray 1x grill insert 1x baking tray tongs For FS909G5CSD & FS909G5SSD 4pairs of telescopic arms 2x telescopic racks 1x grill insert 2x baking tray tongs 1x baking tray... -
Page 12: Control Panel
Control Panel Oven Model : FS607G4AS & FS605G4AS Knob Description Wok Burner Medium Burner on left hand side Medium Burner on right hand side Small Burner Mechanical Timer Function Rotar y Switch Temperature Switch For model FS605G4AS For model FS607G4AS A, B, C, D are gas hob control knobs. - Page 13 Oven Model : FS607G4DS & FS605G4DS Knob Description Wok Burner Medium Burner on left hand side Medium Burner on right hand side Small Burner Digital Timer Function Rotar y Switch Temperature Switch For model FS605G4DS For model FS607G4DS A, B, C, D are gas hob control knobs. E is a digital timer/programmer which can be used to program cooking durations, whereby the oven will switch off or on and off automatically.
- Page 14 Oven Model : FS909G5CSD Knob Description Digital Timer Function Rotar y Switch Temperature Switch Auxiliar y Burner Large Burner Wok Burner Medium Burner Medium Burner FS909G5SSD Knob Description Digital Timer Function Rotar y Switch Temperature Switch Wok Burner Auxiliar y Burner...
-
Page 15: Using The Gas Hob
B is the oven function selector allowing you to select the suitable baking function. C is used to set the oven temperature, it can be set from 50°C to 250°C. D, E, F, G, H are gas hob control knobs. Using the Gas Hob For each control knob, there is a printed diagram to indicate the burner or heating element the knob is controlling. -
Page 16: Using The Electric Oven
Ignition of Burners Equipped with Safety Thermocouples If the gas burners are equipped with safety thermocouples, the thermocouple is part of the flame failure device (FFD). A FFD is designed to stop flammable gas going to the burner if the flame is extinguished. This is to prevent a dangerous build up of gas around the appliance. - Page 17 Top Heat + Fan Heat from the top outer element is circulated by the fan at the rear of the oven, giving a more even distribution of heat from the top. Keep oven door closed when in use. Top Heat Top outer heating element radiates heat down directly to your food, giving your food a golden brown finish.
-
Page 18: Digital Timer Programmer
Digital Timer/Programmer The digital timer is a programmer with the following functions: -24 hour clock display -Timer (up to 23 hours and 59 Min.) -Programmer for automated cooking (start and finish) -Programmer for semi-automated cooking (either only start or only finish). Description of buttons Timer Cooking time... -
Page 19: Digital Clock
Digital Clock The clock is displayed in 24-hour time. When the oven is connected to the power for the first time or after a blackout, three zeros will flash on the programmer panel. To set the oven clock local time please press buttons simultaneously, and adjust by pressing [+] and / or [-] buttons until you have the correct time. -
Page 20: Timer - Buzzer
The cooking program may be reviewed by pressing the corresponding button. The cooking program may be cancelled at any moment by pressing the [+] [-] buttons until zero appears on the panel. Then the oven can work manually. Timer - Buzzer The timer can be used as a count down timer which may be set for a maximum period of 23 hours and 59 min. -
Page 21: Cooking Functions
Cooking Functions FAN FORCED heating By this function a continuous circulation of warm air is created, suitable for the cooking on multiple levels. The oven will reach the preset temperature in a ver y short time. Traditional heating (the upper and lower heating element operate) It is especially suitable for the cooking of game and as well as for the cooking of bread and sponge cakes. - Page 22 Food Shelf Level Temp. Pre-heat time in Time in °C minutes min. Veal cutlet 8--10 Lam cutlet 12--15 Liver 10--12 Chopped meat 12--15 roulades Veal heart 12--15 Roast in the net 20--25 Half-chicken 20--25 Fish filet 12--15 Stuffed tomatoes 10--12 Important : When the oven is in operation, always keep the oven door closed.
-
Page 23: Cleaning And Maintenance
Cleaning and Maintenance Caution: Prior to cleaning or maintenance, always disconnect the power supply. Do not use a steamer cleaner. Failure to correctly follow the below maintenance instructions may void your warranty. 1) HOB MAINTENANCE The surface of the cooktop, trivets, burner caps and burner heads need to be regularly cleaned with warm soapy water, rinsed and then dried well to keep them in good condition. -
Page 24: Oven Chamber
2) MAINTAINING STAINLESS STEEL SURFACES To have your cooker retain its new appearance, regular cleaning and care should be taken to protect the stainless steel finishes. Never use gritty or abrasive sponges. Stains should be removed by applying a clean cloth soaked in warm soapy water before spillage becomes cold or dries up. - Page 25 Fig 4.2 Back / rear Front Fig 4.3 Page 24...
-
Page 26: Top Heating Element
5) TOP HEATING ELEMENT This element must never be sprayed with any detergents. A damp cloth and a bottle brush can be used to clean the roof of the oven chamber and the element itself. This area should be cleaned regularly as cooking fats tend to spit up and stick onto the roof of the chamber and the element, generating smoke and unpleasant odours when the oven is in use. -
Page 27: Replacing The Oven Light Bulb
8) REPLACING THE OVEN LIGHT BULB Disconnect the power from the oven, unscrew the glass protection cap and the bulb, replace the bulb with one suitable for high temperature up to 300℃. Light bulb specifications :: Voltage: 240V Power : 25W Reassemble the glass cap and reconnect the oven. -
Page 28: Telescopic Arms
10) TELESCOPIC ARMS Telescopic arms are fitted to the oven allowing your baking trays to slide out, making it easy to check on your baking and taking food out of the oven. Side rails should firstly be removed from the oven chamber as per section 8 instructions. Gently pull down on the supporting side rail to unclip the telescopic arm from the rail. -
Page 29: Cooking Fan
Test the telescopic arms by sliding them out, ensure the clips are secured correctly and the telescopic arms slide out in the direction of the side rails “V”shaped groove. (Fig 10.3) Follow section 8 instructions on how to reinstall the side rails. Please refer to Section 4 to position the baking racks and baking trays correctly on the telescopic arms. -
Page 30: Troubleshooting
Troubleshooting Some of the problems can be solved by simple maintenance operations. Or when something is not done properly, this can be resolved easily without calling for technical assistance. If your appliance is not working efficiently: Make sure the gas cock is open Check if the plug is in Check that the knobs are set correctly for cooking and then repeat the operations given in the handbook... - Page 31 FAULT POSSIBLE CAUSE SOLUTION Check if cord is plugged in and switched on. No power. Check mains circuit breaker. spark when control knob is pressed. Loose sparkers cable. Call authorised representative. Burner not aligned properly. Remove and re-fit burner. Gas supply off. Check gas supply valve.
- Page 32 Disassembly of the worktop must only be done by a qualified ser vice technician. In case it is necessar y to repair or replace the inside components, the technician should follow the instructions below : Remove the trivets, remove the burner caps and rings, unscrew visible screws and nozzles.
-
Page 33: Technical Data
Burners & Heat Input Table Electrical Connection Voltage : (220-240)V~ Frequency : 50Hz Electrical Shock Classification : Class I Rated Wattage For model FS909G5CSD & FS909G5SSD : 2650W FS607G4DS & FS607G4AS : 2145W FS605G4DS & FS605G4AS : 2000W Page 32...
Need help?
Do you have a question about the FS909G5CSD and is the answer not in the manual?
Questions and answers