
Related Manuals for Owon OW18 Series


Summary of Contents for Owon OW18 Series
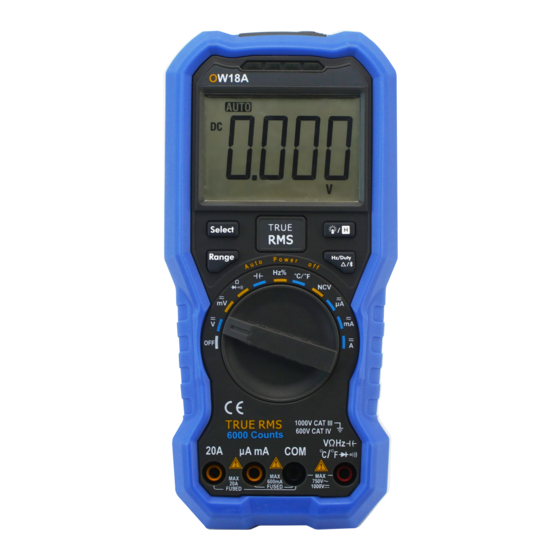
- Page 1 OW18 Series Digital Multimeters User Manual OW18A OW18B OW18D OW18E www.owon.com.cn...
- Page 2 LILLIPUT Company. Fujian LILLIPUT Optoelectronics Technology Co., Ltd. No. 19, Heming Road Lantian Industrial Zone, Zhangzhou 363005 P.R. China Tel: +86-596-2130430 Fax: +86-596-2109272 Web: www.owon.com.cn E-mail: info@owon.com.cn...
- Page 3 1 year from the date of purchase of the product by the original purchaser from the OWON Company. This warranty only applies to the original purchaser and is not transferable to the third party, and does not apply to fuses, disposable batteries or to any product which has been misused, altered, neglected or damaged by accident or abnormal conditions of operation or handling.
-
Page 4: Table Of Contents
Table of Contents 1.Safety Information ....................1 Safety Considerations ......................1 Measurement Category ....................... 3 Safety Terms and Symbols ....................4 2.Quick Start ........................ 5 General Inspection ......................5 Install the Batteries ......................5 Adjusting the Tilt Stand ....................... 6 Power On ........................... - Page 5 5.To Connect with Mobile Device – Only for OW18B/OW18E ........17 Android App ........................18 How to Connect with Android Device ....................18 User Interface in Android App ........................ 19 Operations in Android App ........................20 Multimeter Offline Record (Android) ..................... 22 iOS App ..........................
-
Page 6: Safety Information
1.Safety Information 1. Safety Information Safety Considerations Before any operations, please read the following safety precautions to avoid any possible bodily injury and prevent damage to this product or any other products connected. To avoid any contingent danger, use this product only as specified. EC Declaration of Conformity: Meets intent of Directive 2004/108/EC for Electromagnetic Compatibility. - Page 7 1.Safety Information When servicing the multimeter, use only the specified replacement parts. Use caution when working above 60 V DC, 30 V AC RMS, or 42.4 V peak. Such voltages pose a shock hazard. When using the test leads, keep your fingers behind the finger guards on the test ...
-
Page 8: Measurement Category
1.Safety Information Measurement Category The multimeter has a safety rating of 1000 V, CAT III and 600 V, CAT IV. Measurement category definition Measurement CAT I applies to measurements performed on circuits not directly connected to the AC mains. Examples are measurements on circuits not derived from the AC mains and specially protected (internal) mains- derived circuits. -
Page 9: Safety Terms And Symbols
1.Safety Information Safety Terms and Symbols Safety Terms Terms in this Manual. The following terms may appear in this manual: Warning: Warning indicates the conditions or practices that could result in personal injury or death. Caution: Caution indicates the conditions or practices that could result in damage to this product or other property. -
Page 10: Quick Start
Manual. You can check whether there is any loss of accessories with reference to this description. If it is found that there is any accessory lost or damaged, please get in touch with the distributor of OWON responsible for this service or the OWON's local offices. -
Page 11: Adjusting The Tilt Stand
2.Quick Start (2) Lift the tilt stand and loosen the screws with a suitable Phillips screwdriver and remove the battery cover. (3) Observe the battery polarity indicated inside the battery compartment, Insert the batteries. (4) Place the battery cover back in its original position and tighten the screws. Caution: To avoid instruments being damage from battery leakage, always remove the batteries and store them separately if the multimeter is not going to be used for a long period. -
Page 12: Selecting The Range
2.Quick Start Selecting the Range Auto ranging is set as default when the meter is powered on, is displayed. When auto ranging is enabled, press to enter the manual range mode. In manual range, each additional press of sets the multimeter to the next higher range, unless it is already in the highest range, at which point the range switches to the lowest range. -
Page 13: Rotary Switch
2.Quick Start Description Details Display screen Page 9 ① Keypad Page 9 ② ③ Rotary switch Page 8 Input terminals Page 11 ④ Transistor test holes Page 15 ⑤ (only for specific models) LED indicator ⑥ Non-contact voltage detector (NCV) ⑦... -
Page 14: Keypad
2.Quick Start milliamperes; For OW18D/OW18E: up to200 milliamperes. DC or AC current measurement * The model with function does not have the position. Keypad Description Details Select DC or AC Select Resistance/Continuity /Diode Auto/Manual range Page 7 Backlight & Flashlight Page 6 Data Hold Page 16... - Page 15 2.Quick Start Symbol Description Details Auto range Page 7 Sleep mode Page 7 Relative enabled Page 16 Data hold enabled Page 16 Diode test selected Page 13 Continuity test selected Page 13 Bluetooth enabled Page 17 Page 12 and Page 14 Measurement display ("OL"...
-
Page 16: Input Terminals
2.Quick Start Ampere Current Resistance Ω Hertz Frequency Percent, Duty cycle Farad Capacitance Input terminals The terminal connections for the different measurement functions of the multimeter are described in the table below. Warning: Before starting any measurement, observe the rotary switch position of the multimeter, and then connect the test leads to the correct terminals. -
Page 17: Making Measurements
3.Making Measurements 3. Making Measurements Measuring AC or DC Voltage Warning: Do not measure any voltage of over 1000 Vdc or 750 Vac rms to avoid instrument damage or electric shock. Do not apply more than 1000 Vdc or 750 Vac rms between the common terminal and the earth ground to avoid instrument damage or electric shock. -
Page 18: Testing For Continuity
3.Making Measurements Testing for Continuity Caution: To avoid possible damage to your multimeter or to the equipment under test, disconnect the circuit power and discharge all high-voltage capacitors before testing for continuity. (1) Rotate the rotary switch to . Press once to enter continuity testing mode, will be displayed. -
Page 19: Measuring Frequency
3.Making Measurements (3) Probe the test points and read the display. Measuring Frequency (1) Rotate the rotary switch to (2) Connect the black test lead to the terminal and the red test lead to the terminal. (3) Probe the test points and read the display. (4) Press to switch between the frequency and duty cycle measurements. -
Page 20: Measuring Transistor - Only For Specific Models
3.Making Measurements Measuring Transistor — Only for specific models (1) Rotate the rotary switch to (2) Verify the type of the transistor is NPN or PNP, and locate the Emitter, Base and Collector leads. Insert leads of the transistor into the corresponding test holes on the panel. -
Page 21: Multimeter Features
4.Multimeter Features 4. Multimeter Features Data Hold Mode (1) Press to freeze the display during measurement, will be shown on the display. (2) Press again to exit this mode. Making Relative Measurements When making relative measurements, reading is the difference between a stored reference value and the input signal. -
Page 22: To Connect With Mobile Device - Only For Ow18B/Ow18E
QR Codes below with your mobile device, select the Bluetooth 4.0 Android APP and install it. Bluetooth 4.0 Android APP Note: The help content below may be not completely consistent with the application software, only for reference. Visit www.owon.com.cn to get the latest version of this user manual. -
Page 23: Android App
5.To Connect with Mobile Device – Only for OW18B/OW18E For iPhone You can search "OWON" in the APP Store, select the APP with the icon, and then install it. Note: The help content below may be not completely consistent with the application software, only for reference. -
Page 24: User Interface In Android App
5.To Connect with Mobile Device – Only for OW18B/OW18E (6) Click "BDM" in the device list to pair. User Interface in Android App Double View Double View Click to disconnect Press&hold to edit name Click to enter Single View Next Single Graph Exit/About... -
Page 25: Operations In Android App
5.To Connect with Mobile Device – Only for OW18B/OW18E Single View Single View Offline Record Click to disconnect Voice out Press&hold to edit Range Same keys of Function (Details follow) the multimeter Data Hold Previous Next Double Graph Exit/About page page view &Table... - Page 26 You may change to different voices by installing different TTS engines. TTS engines can be downloaded by scanning QR Codes or v www.owon.com.cn isit Upgrade Online: Click , and click "About". Click "Upgrade". Data Graph and Table : Click to view data graph and table.
-
Page 27: Multimeter Offline Record (Android)
5.To Connect with Mobile Device – Only for OW18B/OW18E Multimeter Offline Record (Android) When measuring with OW18B/OW18E, you can use Android device APP to send a command, the multimeter will start recording the measurements. After receiving the command, the connection will be disconnected automatically. The multimeter will record the measuring data in its own memory. -
Page 28: Ios App
5.To Connect with Mobile Device – Only for OW18B/OW18E will connect with the multimeter to read data. Select , the multimeter will continue recording, the connection will be aborted. (4) After completion of the record, to read the measuring data, reconnect the Android device and the multimeter. - Page 29 5.To Connect with Mobile Device – Only for OW18B/OW18E Turn on Bluetooth, and return to the multimeter APP. (3) Turn on the multimeter, press and hold until appear on the display. (4) Tap on the center to launch device connection. (5) Select the desired multimeter in the device list.
-
Page 30: User Interface In Ios App
5.To Connect with Mobile Device – Only for OW18B/OW18E User Interface in iOS App Single Device View Single Device View Press&hold Delete the to edit name device Add device Single device view Voice out Multi-device view Offline record Graph&Table view Edit name/setting Slide to show About... - Page 31 5.To Connect with Mobile Device – Only for OW18B/OW18E Multi-device View Function (Details follow) Range AUTO/MANUAL Slide up/down to show other device Slide left to show the Delete softkey Function Description Table Display Function Display Function Direct Current Measuring Capacitance Alternating Current Measuring Frequency Measuring Resistance...
-
Page 32: Operations In Ios App
5.To Connect with Mobile Device – Only for OW18B/OW18E Selecting File Interface Be selected File operations Setting Interface Record interval in the Upper/lower limit Alert on/off application software Operations in iOS App Customize the meter name The device name of the meter can be customized. Press and hold the device name (in single device view), or click softkey (in single or multi-device view) and select "Change Device Name", a dialog box below will pop up. -
Page 33: Multimeter Offline Record (Ios)
5.To Connect with Mobile Device – Only for OW18B/OW18E Add meter : In single or multi-device view, click softkey. Select meter : In single device view, slide left or right to switch the meter view. In multi-device view, click a device item to select it, the background is turned to blue. Disconnect meter : In single device view, click "Delete". - Page 34 5.To Connect with Mobile Device – Only for OW18B/OW18E (3) Set "Record interval" and "Records counts" (maximum records count is 10,000). Tap on "start offline record". The memory in the multimeter can only store the recording data of one time. When start to record, the earlier offline record stored in the multimeter will be overwritten.
- Page 35 5.To Connect with Mobile Device – Only for OW18B/OW18E (7) Tap on "Display data", the data will be displayed in Data Graph and Table interface.
-
Page 36: To Connect With Computer - Only For Ow18B/Ow18E
6.To Connect with Computer – Only for OW18B/OW18E To Connect with Computer – Only for OW18B/OW18E To connect the multimeter to a computer, a Bluetooth USB adapter should be plugged into the USB port of computer. Use only the Bluetooth USB adapter (optional) supplied with the product. ... - Page 37 6.To Connect with Computer – Only for OW18B/OW18E (3) Select "I accept the agreement", and then click "Next".
- Page 38 6.To Connect with Computer – Only for OW18B/OW18E (4) Select the destination folder, and then click "Next". (5) Click "Install".
- Page 39 6.To Connect with Computer – Only for OW18B/OW18E (6) Uncheck "View the Release Notes", and click "Finish" to exit Setup. (7) Plug the Bluetooth USB adapter into a USB port on your computer. Right click [Computer], you can find it on the desktop, or in [Start] menu. In the drop down menu, click on [Manage], the “Computer Management”...
- Page 40 6.To Connect with Computer – Only for OW18B/OW18E Note: If an unknown device is displayed, try to install the driver manually following the steps below. How to install the driver manually Right click the unknown device icon, in the drop down menu, click "Update Driver Software...".
- Page 41 6.To Connect with Computer – Only for OW18B/OW18E Select "Browse my computer for driver software". Select a directory path for the driver, and click "Next". After installing successfully, click "Close". In Device Manager, check if "TI CC2540 USB CDC Serial Port (COM#)" is displayed under Ports (COM &...
-
Page 42: Step 3: Connect To Multimeterble Software
6.To Connect with Computer – Only for OW18B/OW18E Step 3: Connect to multimeterBLE software (1) After installing the Bluetooth USB adapter driver successfully, run the multimeterBLE software, the configure dialog box appears. Make sure that the Bluetooth USB adapter is plugged into the computer. To find the “Port”... - Page 43 6.To Connect with Computer – Only for OW18B/OW18E scan is finished, select the desired multimeter in the device list. Click the "Connect" button. (4) The measurements will be shown if the connection is successful. You can tap on the softkey on the right to add another multimeter.
-
Page 44: User Interface In Multimeterble Software
6.To Connect with Computer – Only for OW18B/OW18E User Interface in MultimeterBLE Software Single Device View Single Device View Move the cursor here to show , click to delete the device Add device Single device view Multi-device view Start offline record Read offline record Graph&Table view About... -
Page 45: Operations In Multimeterble Software
6.To Connect with Computer – Only for OW18B/OW18E Graph&Table View Save the displayed data into .CSV file Clear the data that is being displayed Check to auto scroll the data table Check to unify the unit types in data table Select device Graph Data table... - Page 46 6.To Connect with Computer – Only for OW18B/OW18E record function may not work correctly. Please check the batteries of the meter to ensure them in a good state. (1) Connect the multimeterBLE software with the multimeter, see " How to Connect with "...
- Page 47 6.To Connect with Computer – Only for OW18B/OW18E (7) Click "Open Directory" to open the directory where the CSV files are saved.
-
Page 48: Technical Specifications
7.Technical Specifications 7. Technical Specifications All these specifications apply to the multimeter unless otherwise explanation. Standard conditions: The environment temperature is 18℃ to 28℃, the relative humidity is less than 80%. Note: When measuring AC voltage/current or capacitance, accuracy guarantee range is 5% to 100% of the range. - Page 49 7.Technical Specifications 10Ω 200.00kΩ 100Ω 2.0000MΩ 1kΩ 20.000MΩ ±(0.5%+1dig) 200.00MΩ 10kΩ ±(5.0%+10dig) 2.0000nF 0.01pF 20.000nF 10pF 200.00nF 2.0000μF 100pF Capacitance (F) ±(3.0%+10dig) 20.000μF 10nF 200.00μF 100nF 2.0000mF 20.000mF 1μF 20.000Hz 0.01Hz 200.00Hz 0.1Hz 2.0000kHz Frequency (Hz) 20.000kHz 10Hz ±(0.1%+4dig) 100Hz 200.00kHz 2.0000MHz 1kHz...
- Page 50 7.Technical Specifications OW18A/OW18B multimeter Resolu-t Function Measurement Range Function 60.00mV/600.0mV 0.01mV ±(0.5%+2dig) DC Voltage (V) 600.0mV/6.000V/60.00V/600.0V 0.1mV 1000V ±(0.8%+2dig) 600.0mV 0.01mV ±(0.8%+3dig) 600.0mV 0.1 mV ±(2%+5dig) AC Voltage (V) 6.000V/60.00V/600.0V ±(0.8%+3dig) 750V ±(1%+3dig) μA 600.0μA/6000μA 0.1μA ±(0.8%+2dig) DC Current (A) 60.00mA/600.0mA 0.01mA ±(0.8%+2dig)
- Page 51 7.Technical Specifications other current should flow through except within the measuring duration. When measuring capacitance, for the 60.00mF range, the measuring duration should be over 30 seconds. When measuring frequency, the typical waveform is Square or Sine. The signal meets the following conditions.
-
Page 52: Appendix
8.Appendix 8. Appendix Appendix A: Enclosure Standard Accessories: K-type Bolt driver Multimeter Leads Quick guide 9V battery (6F22) thermocouple Alligator Clips (only for OW18B/OW18E) Options: Bluetooth USB adapter to PC (only for OW18B/OW18E) Appendix B: General Care and Cleaning Warning: To avoid electrical shock or damage to the multimeter, ensure that the insides of the casing stay dry at all times. - Page 53 8.Appendix Dirt or moisture in the terminals can distort readings. Follow the steps below to clean your multimeter. 1. Turn the multimeter off and remove the test leads. 2. Turn the multimeter over and shake out the dirt in the terminals. 3.
Need help?
Do you have a question about the OW18 Series and is the answer not in the manual?
Questions and answers