Datalogic MEMOR 20 User Manual
Rugged mobile computer with 1d/2d imager
Hide thumbs
Also See for MEMOR 20:
- Quick start manual (2 pages) ,
- Quick start manual ,
- Quick start manual (2 pages)
Table of Contents
Advertisement
Advertisement
Table of Contents

Related Manuals for Datalogic MEMOR 20


Summary of Contents for Datalogic MEMOR 20
- Page 1 MEMOR™ 20 USER’S MANUAL Rugged Mobile Computer with 1D/2D Imager...
- Page 2 Memor and SoftSpot are trademarks of Datalogic S.p.A. and/or its affiliates, registered in many countries, including the U.S. and the E.U. • SafeSwap is a trademark of Datalogic S.p.A. and/or its affiliates • Android is a trademark of Google Inc. The Android robot is reproduced or modified from work created and shared by Google and used according to terms described in the Creative Commons 3.0 Attribution License.
- Page 3 TABLE OF CONTENTS INTRODUCTION ......................1 Conventions ........................1 Product Overview ......................1 Memor™ 20 – Dare to be the best .....................1 Top performance while extremely rugged ................1 Wireless charging meets swappable battery ................1 Authentication and security ......................1 Communications .........................2 Available Models ......................
- Page 4 Configure, Rename or Unpair Bluetooth@ Devices ..............50 NFC ..............................51 Second Display .......................52 Touch Mode ........................52 Recovery Mode .......................53 DATALOGIC APPLICATIONS ..................54 Battery Manager ......................54 Battery Info ............................55 Battery Info - Realtime ......................55 Battery Info - Lifetime ......................56 Battery Info - Manufacturer ......................
- Page 5 USB ADB Driver ......................71 SDK Add-on ........................71 Install ADB Driver ..........................71 Create a New Application based on Datalogic SDK Add-on with Android Studio ......72 Datalogic SDK ........................ 72 Datalogic OEMConfig ...................... 72 Wi-Fi QR Code Generator ....................72 DATA CAPTURE......................
- Page 6 CONTENTS NOTES MEMOR™ 20...
-
Page 7: Product Overview
(GMS). Additionally, it has been validated by Google for the ‘Android Enterprise Recom- mended’ program for rugged devices. The Memor 20 is our most rugged PDA designed for the harshest environments, with an IP65 and IP67 sealing rating and 1.8 m / 6.0 ft repeated drops to concrete. -
Page 8: Available Models
LTE-Advanced with dual SIMs. AVAILABLE MODELS The Memor 20 is available in different models depending on the features it is equipped with. All options are listed below: Americas Models •... -
Page 9: General View
CONTENTS GENERAL VIEW Top View 2nd Display Data Capture Window Front View Good Read Indicator Charging/Status LED Front Camera Touch Panel Display Fingerprint USER’S MANUAL... -
Page 10: Side View
CONTENTS Side View Volume Power Control Button Buttons Left Right Trigger Trigger Back View LED Flash Rear Camera Handstrap Light Eyelet Battery Swap Latches and LEDs SIM 1 Card Socket SIM 2 Card Socket MEMOR™ 20... -
Page 11: Bottom View
CONTENTS Bottom View USB Rubber Door and USB Type-C Port CAUTION: Do not apply any sticker to the Memor 20. USER’S MANUAL... - Page 12 94A050047 USB CABLE W/SCRW, VEHICLE DOCK, MEMOR 20 94ACC0256 POWER ADAPTER,12/24VDC CLA, MEMOR 20 94ACC0302 UNLOCK KEY FOR FULL DOCKS, MEMOR 20 (5pcs) 94ACC0303 MOUNTING PLATE, 3 SLOT DOCK, MEMOR 20 94ACC0304 MOUNTING PLATE, SINGLE SLOT DOCK, MEMOR 20 94ACC0305...
-
Page 13: Install The Battery
During the charging process the charging LED positioned at the top left side of the dis- play glows red constantly. Once the charging process has been completed, the charging LED glows green constantly. NOTE: The Memor 20 may get warm during charging. This is normal and does not mean a malfunction. USER’S MANUAL... -
Page 14: Charge With Usb
The charger is modular, with one adapter and five switchover plugs. You can also use the USB cable to charge the Memor 20 from any self-powered USB hub or USB port on a computer. -
Page 15: Battery Information
To maximize operating autonomy, the Memor 20 checks its battery level at all times. If the battery is not sufficiently charged, the Memor 20 will not turn on when the ON/OFF Power button is pressed. In this case, either substitute with a charged battery, insert the Memor 20 into a powered cradle, or plug it into a wall charger. -
Page 16: Battery Safety Guidelines
Using the battery pack in this manner may also result in a loss of performance and a shortened life expectancy. Use only a Datalogic approved power supply. The use of an alternative power supply will void the product warranty, may cause product damage and may cause heat, an explosion, or fire. - Page 17 CONTENTS WARNING: Do not use the battery pack if it is damaged in any part. Battery pack usage by children should be supervised. Collect and recycle waste batteries separately from the device in compli- ance with European Directive 2006/66/EC, 2011/65 and subsequent modi- fications, with US and China regulatory laws and regulations about the environment.
-
Page 18: Install The Sim Card
SIM CARD INSTALL THE SIM CARD Memor 20 supports up to two nano SIM cards. 1. Turn off the Memor 20. 2. Press the battery latches and remove the battery pack: 3. Pull the rubber label to remove the SIM door, then open the SIM card tray: 4. - Page 19 CONTENTS 5. Reinsert the SIM door and press it. 6. Reinsert the battery (see " Install the Battery" on page 7 USER’S MANUAL...
- Page 20 MOUNT THE HANDSTRAP MOUNT THE LIGHT HANDSTRAP MEMOR™ 20...
- Page 21 CONTENTS MOUNT THE FULL HANDSTRAP USER’S MANUAL...
-
Page 22: Getting Started
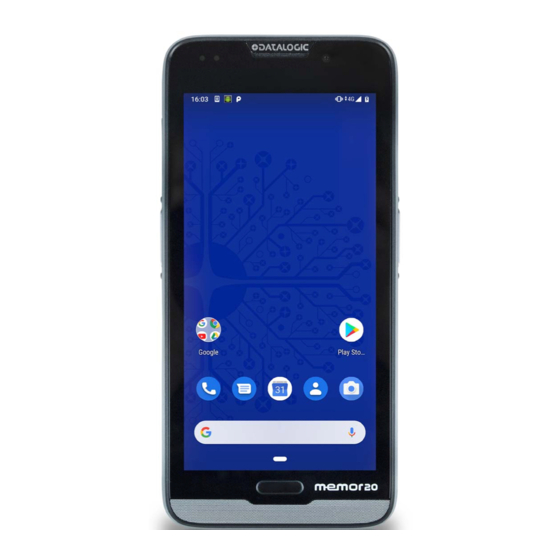
GETTING STARTED TURN ON THE DEVICE To turn on the Memor 20, press and hold the power button for at least 4 seconds. HOME SCREEN Notification/ Status Bar Datalogic Apps Google Apps Favorites Tray Home Home Screen Items Notification/Status Displays the time, status icons (right side), and notification icons (left side). -
Page 23: Status Bar Icons
CONTENTS Status Bar Icons Wi-Fi is on. Battery is low. External power source is con- Wi-Fi not connected. nected. Wi-Fi connected no internet. Battery is full. Connected to a Wi-Fi network. Battery is partially drained. Bluetooth is on. Airplane mode. USER’S MANUAL... -
Page 24: Suspend Mode
CONTENTS SUSPEND MODE Suspend mode automatically turns the screen off and locks the device to save battery power when the terminal is inactive for a programmed period of time. Press and release the power button to toggle the terminal in or out of suspend mode: To unlock the home screen, tap anywhere on the screen and drag your finger upward. -
Page 25: Battery Swap
Such mode is associated with a unique LED notification process, called "SafeSwap" for application data protection, that is object of a Datalogic pending patent application. To switch to Swap Battery mode and SafeSwap notification follow the steps below: 1. - Page 26 NOTE: Replace the battery pack within 90 seconds after its removal from the device. CAUTION: The spare battery pack is configured in ship mode at the factory. Before inserting a new battery, charge it with the CHARGER, 4 SLOT BAT- TERY, MEMOR 20 (available as accessory, p/n 94ACC0246). MEMOR™ 20...
- Page 27 CONTENTS APPLICATIONS All Apps screen displays icons for all installed applications. The table below lists the default applications installed on the Memor 20. Icon Description Battery Manager - Provides information on the battery type, charge, status and temperature, allows to set the charging profile and to log battery data (see "Bat-...
- Page 28 66). Scanner – Enables data capture (see "Data Capture" on page 73). Settings - Use it to configure the Memor 20 (see "Settings" on page 28). SoftSpot - A configurable application meant to provide easy access to frequently used functionalities (see "SoftSpot™"...
-
Page 29: Touch Gestures
CONTENTS TOUCH GESTURES Tap the screen with your finger or with the stylus to open items and select options. Hold your finger or the stylus on the screen and drag across the screen to Drag scroll or pan. Drag in a list to select multiple items. Tap and hold your finger or the stylus on an item to see a list of actions... -
Page 30: Reset The Device
CONTENTS RESET THE DEVICE Configuration Reset Configuration reset sets the configuration of the device (all its settings) to a known sta- tus: the factory status or an enterprise-user-defined status. Reset Wi-Fi, Mobile & Bluetooth Resets all network settings. 1. Tap Settings > System > Advanced > Reset options > Reset Wi-Fi, mobile & Blue- tooth. -
Page 31: Factory Reset
CONTENTS Factory Reset Brings the device to the default configuration, clearing all the user-customized settings. 1. Tap Settings > System > Reset options > Erase all data (factory reset). 2. Tap RESET PHONE. Enterprise Reset Enterprise Reset brings the device to an enterprise-user-defined configuration, clearing all data and settings except the ones persisted by the enterprise system applications in enterprise flash partition and in the... -
Page 32: Setup Wizard
CONTENTS SETUP WIZARD After the first boot or a factory reset, the start dialog of the Setup Wizard is displayed, with initial settings for you to configure. Device Owner Mode Scan the Device Owner (DO) QR code with one of the side triggers to activate the Device Owner mode for Android Enterprise. -
Page 33: Led Indicators
CONTENTS LED INDICATORS The LEDs illuminate to indicate various functions or errors on the reader. The following tables list these indications. The good read LED indicator is programmable, and may or may not be enabled (" for more details). The Charging LED is Scanner Settings"... - Page 34 SETTINGS OVERVIEW Settings app allows you to check or set system parameters to customize your device. To open the Settings screen, tap the Settings icons on the All Apps screen or pull down the notification panel and then tap the Settings icon on the bottom right cor- ner:...
-
Page 35: Scanner Settings
CONTENTS DATALOGIC SETTINGS Scanner Settings Before you start reading barcodes, use the Settings app to view and configure all set- tings for the scanner. From the applications menu, tap Settings > Datalogic Settings > Scanner Settings. Select the desired configuration from the following options:... - Page 36 Enable Display Notification Enables display notifications (toasts). If cleared, the scanner is disabled until you launch a scanner listener application developed using the Datalogic SDK or enable a keyboard/ intent wedge. Good Read Audio Mode Sets the audio tone to: •...
- Page 37 CONTENTS Good Read Use it to enable good read notifications (LED, Green Spot): Enable good read to enable/disable notifications (main enabler), then select the notification you want to use. USER’S MANUAL...
- Page 38 CONTENTS Formatting Allows to format the barcode text by enabling and configuring the use of prefix, suffix, group separator and code identifier: Label Prefix Label prefix to enter the characters you will be using as prefix. Tap Add special select a special character to be added in the current cursor position: Label Suffix Label suffix to enter the characters you will be using as suffix.
- Page 39 AIM ID is inserted at the beginning of the decoded barcode. DLM identifier is a Datalogic specific character identifier. User defined identifier is a user specific character identifier you can set in the related symbology settings menu.
-
Page 40: Scanner Options
CONTENTS Scanner Options Scanner Options to customize the Memor 20 scanning behavior. Enable Picklist If enabled, it allows you to pick and decode a barcode from multiple barcodes printed close together, when the scan illumination intersects more than one barcode. Only the targeted barcode will be returned. - Page 41 CONTENTS Image Capture Profile Sets the scanner profile for image capture: • automatic based on enabled symbologies • capture frames taking into account motion • capture frames taking into account reflections. Target Mode If enabled, when the scan button is pressed, the scanner will project an aiming pattern to assist in centering over the barcode before scanning.
- Page 42 CONTENTS Decode Timeout Drag the Decode timeout slider to set the maximum amount of time the scanner attempt to decode after target timeout (in case Spot Timeout is enabled) or after the scan button is pressed (in case Target mode is disabled): Enable Multi Scan If selected, it allows you to capture multiple labels sequentially.
- Page 43 CONTENTS Wedge Use it to enable or disable the keyboard wedge and the intent wedge: Enable Keyboard Wedge Enables/disables the keyboard wedge mode. Keyboard Wedge Only on Focus If selected, the scanner is enabled whenever a text area is in focus and can receive text. It provides a safer way to input keystrokes into the foreground application, allowing to send captured data in the form of key events only to the current text area with active keyboard input.
- Page 44 CONTENTS Commit Text The printable characters are injected into the text area, emulating the pressure of key- board keys for not printable keys. Enable Intent Wedge Enables the broadcast of specific intents to the listening applications. The broadcasted intent can have its custom Action, Category and extra content fields. The scanner is enabled whenever the intent option is flagged.
-
Page 45: Symbology Settings
CONTENTS Symbology Settings Each barcode symbology can be customized with additional settings that may affect that specific barcode decoding. Tap Symbology settings to configure symbology decoding options: Refer to the sample symbology control panels for examples of the types of fields and options you can modify. - Page 46 CONTENTS Advanced Barcode Options Linear Quiet Zones Linear quiet zones to reduce the blank margin on either side of a linear barcode. Inverted Decoding Defines the decoding mode for regular/reverse barcodes for both 1D and 2D barcodes: MEMOR™ 20...
-
Page 47: Global Settings
CONTENTS Scan Engine Details Provides information on the scan engine. Global Settings Use this section to change symbologies settings globally and to persist them. Enable All Symbologies Enables all barcode symbologies. Disable All Symbologies Disables all barcode symbologies. Reset Configuration Resets back to default scanner configuration settings. -
Page 48: Power Management
You have two options to set the suspend timeout (see " Suspend Mode" on page 18 more information on Suspend Mode): 1. Tap Settings > Datalogic Settings > Power Management: • Suspend on external power sets the number of seconds without user input activ- ity before the system is suspended while running on external power. -
Page 49: Wake-Up Configuration
Wake-Up Configuration The default wake-up sources are the left side trigger, the right side trigger and the pistol trigger. Tap Settings > Datalogic Settings > Power Management > Configure wake-up sources to enable/disable wake-up sources. -
Page 50: System Update
To transfer the OTA package from your PC to the Memor 20, follow the steps below: 1. Connect the device and the PC via USB cable (see “USB Connection” on page 74);... - Page 51 Tap the notification to display a report showing the installed update components. NOTE: During the update, ensure that: • battery level is more than 20% if the Memor 20 is not connected to a power source; • battery level is more than 15% if the Memor 20 is connected to a power source (USB or dock).
-
Page 52: Network & Internet
If the device finds a network that you connected to previously, it will connect to it auto- matically. 2. Tap Wi-Fi. The Memor 20 scans for available Wi-Fi networks within range and lists them. Secured networks are indicated with a lock icon. -
Page 53: Add A Wi-Fi Network
CONTENTS If the network is secured, a dialog box appears requesting information relevant to the network security protocol (e.g., password, key, or certificate). Enter the required information, then tap Connect: Add a Wi-Fi Network 1. Tap Settings > Network & Internet and verify that the Wi-Fi is turned on. 2. - Page 54 CONTENTS 5. Tap Save. Ethernet To enable ethernet communication, tap Settings > Network & Internet > Ethernet switch right to the position. Ethernet to display the MAC address and the IP address: Ethernet configuration to configure the ethernet settings: MEMOR™ 20...
-
Page 55: Connected Devices
CONTENTS CONNECTED DEVICES Bluetooth Settings To create a Bluetooth® pairing between your device and another device that has Blue- tooth® capabilities, ensure that the two devices are turned on, discoverable, and within close range. Enable Bluetooth® 1. To turn on the Bluetooth®, tap Settings > Connected Devices > Connection pref- erences >... - Page 56 CONTENTS Configure, Rename or Unpair Bluetooth@ Devices Settings > Connected devices > Previously connected devices. Select a device and tap the settings icon next to its name. The Device Details window displays on the screen. Type the Edit icon to rename the paired device. FORGET to unpair: To rename your device, tap...
- Page 57 CONTENTS To enable enable short-range wireless data exchange, tap Settings > Connected Devices > Connection preferences and switch right to the NFC ON position. Android Beam is automatically enabled: USER’S MANUAL...
-
Page 58: Second Display
CONTENTS SECOND DISPLAY If enabled, the second display on the top of the Memor 20 will display the notifications when the device is locked and the screen is off. To enable the second display feature, tap Settings > Second Display and switch right to the ON position. -
Page 59: Recovery Mode
To enter boot menu: 1. Turn off the Memor 20 (see “” on page 9). 2. Press the power button and the volume up button simultaneously. 3. The device turns on and the Recovery Mode screen appears. -
Page 60: Datalogic Applications
DATALOGIC APPLICATIONS BATTERY MANAGER This application provides information about the battery features and status, allows to configure the battery charging profile and to log battery data. All Apps > Battery Manager icon, then tap the menu icon on the top left corner of the screen, or swipe right to display the menu. -
Page 61: Battery Info
CONTENTS Battery Info Battery Info section provides information about the battery’s health, capacity, man- ufacturer, level and charging status. Battery Info - Realtime This window provides real-time information about the battery. Discharging Mode Charging Mode The top section shows the battery level and the time left to full discharge (when in dis- charge mode) and to full charge (when in charge mode). - Page 62 CONTENTS Battery Info - Lifetime This window displays information and statistics about battery life, health and usage over its whole life cycle. Health Shows the current battery health and signals potential errors. State of Health Shows the current battery's health level. Total Discharge Shows how much the battery has been used over its whole life cycle.
- Page 63 CONTENTS Battery Info - Manufacturer This window displays the model name, the type, the nominal capacity, the serial num- ber, the product number and the manufacture date of the battery. USER’S MANUAL...
-
Page 64: Charging Profile
CONTENTS Charging Profile Charging Profile - Setup This window allows to customize the charging process according to the user's needs and priorities. To configure a charging profile, select 1 or 2 of the following preferences: • Battery Lifetime. • Maximum Capacity. •... -
Page 65: Data Logging
CONTENTS Data Logging The data logging feature allows to collect, store, display and analyze minute-by-minute battery data. Setup Use the Setup window to select the data you want to log. The data logging is disabled by default. To enable it, tap Enable Data Logging. - Page 66 CONTENTS Logs Logs window displays data details by date. MEMOR™ 20...
- Page 67 CONTENTS Manage Manage window allows to remove or export logs. Select one or more logs and tap Remove to remove them. Tap to confirm: Select one or more logs and tap Export to export data and store them for extended peri- ods.
- Page 68 Settings section allows to set the value ranges that will be used to create the graphs. If you charge the Memor 20 with a wireless charging pad, you’re not allowed to custom- ize the charging profile. If the Show Wireless Pad Notification check box is selected, the system displays a warn- ing message saying that the charging profile won’t be applied.
- Page 69 Below are some screenshots showing the different cradle options: If the Memor 20 is inserted into the Single Slot Dock Full or into the 3-Slot Dock Full, you can unlock and lock the device without using the unlock key, by tapping the...
- Page 70 CONTENTS Settings Unlock Timeout You can set the time available to the user to remove the cradle after tapping the UNLOCK button. Tap Unlock timeout [s] and digit your desired unlock timeout (5 by 5 seconds): Set Slot ID Allows to change the ID of the slot where your device is inserted. The ID value is expressed in hexadecimal, ranging from 0000 to FFFF.
- Page 71 CONTENTS Behaviour on Unlock Led On is selected, the dock bottom LED illuminates solid green anytime you unlock the device. It is enabled by default. Favourite Cradle Source Power Allows to select the charging mode (standard or fast). Enable Cradle Failures In case of a failure notification, it displays the reason of the failure (see the dock’s Quick Start Guide for more details).
-
Page 72: Desktop Configuration Utility (Dxu)
Datalogic DXU is a unified device configuration utility and firmware update utility. DXU can connect directly to the Memor 20 that connects either directly to a PC via USB or remotely over a network via Wi-Fi. DXU reports information about currently connected devices. - Page 73 CONTENTS SOFTSPOT™ Datalogic’s SoftSpot technology is a user-definable "floating soft trigger" meant to pro- vide easy access to the barcode scanner application and other frequently used function- alities on mobile scanning devices. Tap the SoftSpot icon on the favorites tray or on the All Apps screen to launch SoftSpot: Tap the SoftSpot to scan barcodes.
- Page 74 CONTENTS Speed of transparency Sets the lapse of time it takes for the SoftSpot to turn transparent. Actions You can use SoftSpot to quickly switch between the applications you actively use. Configure actions > > Application to add the applications you want to launch with SoftSpot.
- Page 75 CONTENTS Images Normal Image and/or Decoded Image to change the SoftSpot images. You have six options: three default images and three custom images. Display Decoded Image For Sets the duration of the decoded image. Enable Continuous Scan on Double Tap To enable the Continuous Scan mode and scan barcodes consecutively, switch right and then double-tap the SoftSpot.
- Page 76 SURELOCK With SureLock you can secure and lock the Memor 20 to ensure its responsible usage, improve productivity and reduce maintenance cost. It allows access to only required applications and prevents the users from making any intended or unintended changes in the device. Only administrators can access the pass- word protected settings to either modify lockdown configurations or exit the lockdown.
-
Page 77: Install Adb Driver
SDK add-on is a library which extends the Android SDK and development tools. For more information and instructions to install SDK Add-on, Android™ Studio and Android SDK, visit the website https://datalogic.github.io/android/overview. Install ADB Driver 1. Install Android SDK Manager (visit the website https://datalogic.github.io/... -
Page 78: Create A New Application Based On Datalogic Sdk Add-On With Android Studio
CONTENTS Create a New Application based on Datalogic SDK Add-on with Android Studio For information and instructions to configure Datalogic SDK Add-on in Android Studio, refer to the website: https://datalogic.github.io/android/overview. DATALOGIC SDK For information on the Datalogic SDK APIs, visit the web site: https://data- logic.github.io/android/overview. -
Page 79: Imager Data Capture
DATA CAPTURE The Memor 20 has an integrated imager that collects data by scanning bar codes. See " for instructions on configuring the scanner settings. Scanner Settings" on page 29 IMAGER DATA CAPTURE The imager uses digital camera technology to take a digital picture of a bar code, the image is stored in memory and software decoding algorithms are executed to extract the data from the image. -
Page 80: Usb Direct Connection
CONNECTIONS USB CONNECTION USB Direct Connection You can use the provided USB Type-C cable to directly connect the Memor 20 to a host computer and transfer data through the USB interface. Memor 20 Host Computer USB Type-C Cable 1. Turn on the Memor 20. -
Page 81: Usb Dock Connection
4. Remove the cap from the pogo pins on the dock. 5. Remove the USB rubber cap from the Memor 20 6. Insert the USB/ethernet plug included in the Memor 20’s box and fasten it with the two provided screws. -
Page 82: Ethernet Connection
4. Remove the cap from the pogo pins on the dock. 5. Remove the USB rubber cap from the Memor 20 6. Insert the USB/ethernet plug included in the Memor 20’s box and fasten it with the two provided screws. -
Page 83: Mimo (Multiple-Input And Multiple-Output)
CONTENTS WI-FI CONNECTION The Memor 20 has a IEEE 802.11 a/b/g/n/ac and 802.11 k/r/v WLAN (Wireless Local Area Network) radio and can communicate with other 802.11 a/b/g/n/ac and 802.11 k/ r/v Wi-Fi compliant products including access points, workstations via PC card adapters and other wireless portable devices. -
Page 84: Wwan Connection
CONTENTS WWAN CONNECTION The Memor 20 enhances your connectivity solutions giving you an opening to an inter- national wireless infrastructure that is the global standard. It is optimized for the follow- ing two-way communications: • Voice: GSM voice data (dial-up). -
Page 85: Bluetooth® Serial Connection
CONTENTS BLUETOOTH® SERIAL CONNECTION The Memor 20 can communicate with a Bluetooth® device, such as a printer, within a range of 10 m, using the on-board Bluetooth® module. NOTE: Area coverage and Bluetooth® radio performance may vary, due to environmental conditions or interference caused by other devices (micro- wave ovens, radio transmitters, etc.). -
Page 86: Wireless And Radio Frequencies Warnings
However, certain electronic equipment may not be shielded against the RF signals generated by Memor 20. Datalogic recommends persons with pacemakers or other medical devices to follow the same recommendations provided by Health Industry Manufac- turers Associations for mobile phones. -
Page 87: Technical Features
TECHNICAL FEATURES TECHNICAL DATA Physical Characteristics Dimensions 17.0 x 7.97 x 1.92 cm / 6.69 x 3.14 x 0.76 in Weight With Battery: 295 g / 10.4 oz 5.7 inch LTPS in 18:9 format - FHD resolution 1080 x 2160; LED Primary Display backlight Second display on top for enriched Android notifications: 0.7 inch... - Page 88 CONTENTS Environmental Operating: -20 to 50º C / -4 to 122º F Temperature Storage/Transport: -30 to 70º C / -22 to 158º F Withstands drops from 1.8 m / 6.0 ft onto concrete (with rub- ber boot); Withstands drops from 1.2 m / 4.0 ft Drop Resistance onto concrete (without rubber boot).
- Page 89 Minimum Element Width PDF: 0.0762 mm / 3 mils Data Matrix: 0.152 mm / 6 mils Software Datalogic’s SoftSpot technology for configurable soft trig- gers; Supports Datalogic’s Queue Busting app; Applications Pre-licensed device and browser lockdown powered by 42Gears; Enterprise class PTT offered by Zello...
- Page 90 CONTENTS Safety & Regulatory The product meets necessary safety and regulatory Agency Approvals approvals for its intended use Enviromental Compliance Complies to EU RoHS Warranty Warranty 1-Year Factory Warranty MEMOR™ 20...
-
Page 91: Test Codes
TEST CODES High Density Codes - 0.25 mm (10 mils) Code 39 17162 Interleaved 2/5 0123456784 Code 128 test EAN 13 EAN 8 USER’S MANUAL... - Page 92 CONTENTS Medium Density Codes - 0.38 mm (15 mils) Code 39 17162 Interleaved 2/5 0123456784 Code 128 test 100% EAN 13 100% EAN 8 MEMOR™ 20...
- Page 93 CONTENTS Low Density Codes - 0.50 mm (20 mils) Code 39 17162 Interleaved 2/5 0123456784 Code 128 test 120% EAN 13 120% EAN 8 USER’S MANUAL...
- Page 94 CONTENTS 2D Codes Datamatrix ECC200 Example Inverse Datamatrix ECC200 Example MEMOR™ 20...
-
Page 95: Maintenance
MAINTENANCE CLEANING Periodically clean the Memor 20 Healthcare device and the docks using a soft cloth slightly dampened with only water, or one of the following allowed cleaning agents: • Sani-Cloth® HB, Sani-Cloth® Plus, • Super Sani-Cloth® • Hepacide Quat II •... -
Page 96: Safety And Regulatory Information
Use only the components and accessories supplied by the manufacturer for the specific Memor 20 being used. • Do not attempt to disassemble the Memor 20 PDA, as it does not contain parts that can be repaired by the user. Any tampering will invalidate the warranty. •... -
Page 97: Support Through The Website
A reseller is acquainted with specific types of businesses, application software, and computer systems and can provide individualized assistance. REFERENCE DOCUMENTATION For further information regarding Memor 20 refer to the SDK Help on-line and to the Memor 20 User’s Manual, downloadable from our developer portal: https://developer.datalogic.com/mobile-computers. - Page 98 GLOSSARY Access Point A device that provides transparent access between Ethernet wired networks and IEEE 802.11 interoperable radio-equipped mobile units. Hand-held mobile computers, PDAs or other devices equipped with radio cards, communicate with wired networks using Access Points (AP). The mobile unit (mobile computer) may roam among the APs in the same subnet while maintaining a continuous, seamless connection to the wired net- work.
- Page 99 CONTENTS CDRH Center for Devices and Radiological Health. A federal agency responsible for regulating laser product safety. This agency specifies various laser operation classes based on power output during operation. Character A pattern of bars and spaces which either directly represents data or indicates a control function, such as a number, letter, punctuation mark, or communications control con- tained in a message.
- Page 100 CONTENTS Host A computer that serves other mobile computers in a network, providing services such as network control, database access, special programs, supervisory programs, or program- ming languages. International Electrotechnical Commission. This international agency regulates laser safety by specifying various laser operation classes based on power output during oper- ation.
- Page 101 CONTENTS Pairing A Bluetooth@ pairing occurs when two Bluetooth@ devices agree to communicate with each other and establish a connection. Parameter A variable that can have different values assigned to it. Random Access memory. Data in RAM can be accessed in random order, and quickly written and read.
- Page 102 CONTENTS Visible Laser Diode (VLD) A solid state device which produces visible laser light. WLAN A Wireless Local Area Network links devices via a wireless distribution method (typically spread-spectrum or OFDM radio), and usually provides a connection through an access point to the wider internet.
- Page 103 NOTES...
- Page 104 © 2020 Datalogic S.p.A. and /or its affiliates • All rights reserved • Without limiting the rights under copyright, no part of this documentation may be reproduced, stored in or introduced into a retrieval system, or transmitted in any form or by any means, or for any purpose, without the express written permission of Datalogic S.p.A.
Need help?
Do you have a question about the MEMOR 20 and is the answer not in the manual?
Questions and answers
how can I change the time I keep put find my city I enter it but the wrong time displays on top
To change the time settings on a Datalogic device with part number 20 (Memor 20):
1. Enable Auto Time Zone: This automatically fetches the time zone from the cellular network. Default is false. Only applies if the device has cellular capability.
2. Select Time Zone: Manually set the device's time zone. If auto time zone is enabled and the device is connected to a cellular network, this setting will be overwritten.
3. Enable 24-hour Format: Switch the clock to 24-hour format. Default is false.
4. Set NTP Server: Enter the primary NTP server address for time synchronization. Default is empty. A reboot is required to apply.
5. Set Secondary NTP Server: Enter a secondary NTP server address. Default is empty. A reboot is needed.
6. NTP Server Connection Timeout: Configure timeout settings for NTP server connection (details not fully provided in the context).
Changing these settings may require a restart for the changes to take effect.
This answer is automatically generated