Table of Contents
Advertisement
Advertisement
Table of Contents

Related Manuals for Holman WeatherWHIZ WS5001


Summary of Contents for Holman WeatherWHIZ WS5001
- Page 1 Model no WS5001 User Guide 1 of 12 2019...
-
Page 2: Table Of Contents
Contents Introduction Package Contents Tech Specs Overview Indoor Display Console Outdoor Sensor Installation Installing the Batteries Mounting the Indoor Display Console Mounting the Outdoor Sensor Setup Time and Measurement Format Setup Daily alarm set-up Daily Alarm On/Off Snooze Function Temperature and Humidity Weather Forecast Air Pressure and Weather Icons Wind Direction... -
Page 3: Introduction
Introduction Tech Specs Thank you for purchasing our L Six keys: MODE / + / Minus / ALARM WeatherWhiz™ Professional Weather Station. / ALERT / SNOOZE / LIGHT Please read the operating instructions carefully to L Time display: 12/24 format familiarise yourself with the features and modes of operation before using the instrument. -
Page 4: Overview
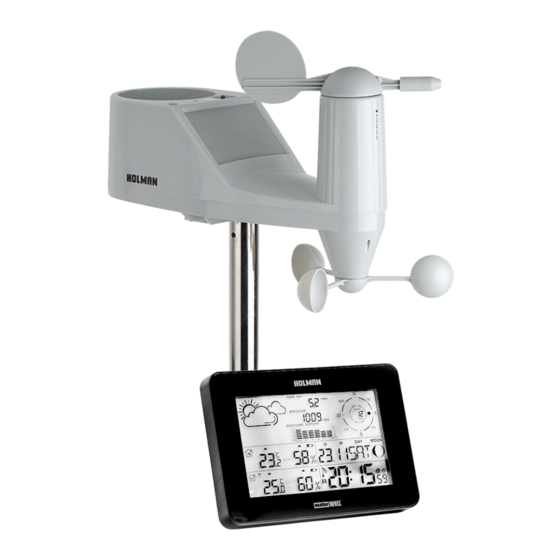
Overview Indoor Display Console A. MODE B. + C. – D. ALARM E. ALERT F. SNOOZE/LIGHT G. Battery compartment H. Base stand 1. Weather 2. Living face 3. Indoor humidity trend 4. Low battery 5. Rain 6. Barometer 7. Wind direction 8. -
Page 5: Outdoor Sensor
Overview Outdoor Sensor 1. Wind direction 2. RF CHANNEL (hold for transmitting RF signal) 3. Rain gauge 4. Spirit level 5. ON/OFF for battery (ensure ON when in use) 6. Battery compartment 7. Wind speed 8. Metal pole 9. Box for thermometer and hygrometer 5 of 12... -
Page 6: Installation
Installation Installing the Batteries Mounting the Indoor Display Console ΠThe Indoor Display Console can be 1. Open the battery cover located at the back of the main unit and outdoor sensor stood onto any flat surface or wall mounted with the mounting hole on the back Tech Specs 2. -
Page 7: Setup
Setup Time and Measurement Format Setup Daily Alarm On/Off 1. Press and hold MODE for 3 sec 1. Press ALARM once to activate A1 2. Press ALARM twice to cancel A1 and activate 2. 12/24 hour time format will flash. Use + / Minus to select. -
Page 8: Air Pressure And Weather Icons
Setup Air Pressure and Weather Icons Moon Phase 1. Air pressure reading can be adjusted by ΠThe weather station uses saved holding SNOOZE/LIGHT for 3 seconds data to show the moon phase 2. Altitude will flash; use + / Minus to set 3. -
Page 9: Rf Connection To Outdoor Sensor
Setup RF Connection to Outdoor sensor ΠPress and hold ALARM for 3 sec to search for Outdoor Sensor ΠThe RF light on the Outdoor Sensor will flash when trying to connect ΠRF reception is weaker in rooms with concrete walls and in office buildings;... -
Page 10: Notes
Notes 10 of 12... -
Page 11: Warranty
As well as your statutory rights referred to above and any other rights and remedies you have under any other laws relating to your Holman product, we also provide you with a Holman guarantee. Holman guarantees this product against defects caused by faulty workmanship and materials for 2 years domestic use from the date of purchase. - Page 12 Should you have any questions about this product or its operation please call customer service on 1300 716 188. Head Office/Service 11 Walters Drive, Osborne Park WA 6017 Ph: +61 8 9416 9999 Fax: +61 8 9416 9920 service@holmanindustries.com.au www.holmanindustries.com.au 12 of 12 Copyright © 2019 Holman Industries...
Need help?
Do you have a question about the WeatherWHIZ WS5001 and is the answer not in the manual?
Questions and answers