Table of Contents
Advertisement
Quick Links
Advertisement
Table of Contents

Related Manuals for Vidos Duo M1022


Summary of Contents for Vidos Duo M1022
- Page 1 USER’S MANUAL 2 wire system video door intercom M1022 Firma Handlowa Wena l. Jerozolimskie 311 05-816 Reguły/ near Warszawy 4" VIDEO HANDS-FREE COLOR TFT MONITOR Poland tel. +48 22 8370286; +48 22 8174008 e-mail: biuro@vidos.pl www.vidos.pl W.20180827...
- Page 2 CHRACTESISTICS OF THE SYSTEM Restore to Default ............. 9 VIDOS is a state-of-the-art solution characterised by its exceptional ease of configuration and installation. Monitor Parameter Setting ............9 The system operation is based on the simplicity of connection through 2 non-polarity wires only.
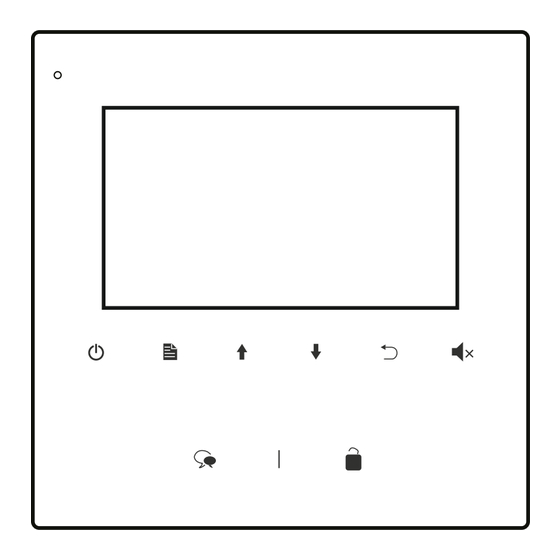
- Page 3 1.Parts and Functions Use the screws to fix the Mounting Bracket on the mounting box.(fitting accesories includes a Bracket (Two pieces of 4X25 screws are needed for fastening the Mounting Bracket), Special 2 wire connectors to connect with Monitor) Microphone LCD Screen Mounting Hook Wire the system correctly(see the later connection chapter) then hang the Monitor on...
- Page 4 5.Intercom Function 6.Divert Call Function When the monitor is in standby mode, press Menu Button to enter main menu page. Use When the monitor is in standby mode, press Menu Button to enter main menu page. Button to move upward / downward to select Intercom Call item, press Menu Button to move upward / downward to select Divert Call item, press Menu...
- Page 5 8.Light Function 10.Restore to Default When the monitor is in standby mode, press Menu Button to enter main menu page.Use When the monitor is in standby mode, press Menu Button to enter main menu page. Use Button to move upward / downward to select Light item, press Menu Button to / Button to move upward / downward to select Restore item, press Menu Button to...
- Page 6 11.4 How to set the slave monitor address 11.7 User Code Setup In the building system, you can configure up to 32 apartamens in the basic version Maximum 4 monitors can be connected in one apartmen t,one master monitor together Each apartment must have a individual address from 00-31 and this address should be set on with 3 slave monitors, so you should set the addres s correctly.(note:must have one monitors or uniphones.
- Page 7 14. Specifi cations 12. Basic Connection Power supply: DC 20-28V door Power consumption: Standby 0.17W; Working 4.7W station Communication: Hands-free P26/40 Screen: 4 Inch digital color TFT Display Resolutions: 480∗3(R, G, B) x 272 pixels BUS(IM) BUS(DS) Video signal: 1Vp-p, 75Ω, CCIR standard Doorbell Button RING Mounting:...
- Page 8 8. The condition to perform repair works is to deliver the Product with the Warranty Card and the proof of purchase. 9. Service Centre: Firma Handlowa Wena Al. Jerozolimskie 311 , 05 - 816 Reguły / near Warsaw Poland tel. +48 228 370 286; +48 228 174 003 e-mail: biuro@vidos.pl www.vidos.pl...
Need help?
Do you have a question about the Duo M1022 and is the answer not in the manual?
Questions and answers