Alps Electric FlexPitch Operator's Manual
Leak tester
Hide thumbs
Also See for FlexPitch:
- Operator's manual (140 pages) ,
- Quick start manual (35 pages) ,
- Field installation manual (34 pages)
Table of Contents
Advertisement
Quick Links
ALPS
Air Logic Power Systems, LLC
2440 W Corporate Preserve Drive Unit 600
Oak Creek, WI 53154 - USA
Phone: 414-574-4151 Fax: 414-574-4152
24 Hour Service Hotline: 800-325-8717
www.alpsleak.com and info@alpsleak.com
FLEXPITCH LEAK TESTER
ADVANCED OPERATOR MANUAL
FLEX PITCH ADVANCED OPERATOR MANUAL
i
TM 2017-005 REV03 © 06/31/2017
Advertisement
Table of Contents

Related Manuals for Alps Electric FlexPitch


Summary of Contents for Alps Electric FlexPitch
- Page 1 2440 W Corporate Preserve Drive Unit 600 Oak Creek, WI 53154 - USA Phone: 414-574-4151 Fax: 414-574-4152 24 Hour Service Hotline: 800-325-8717 www.alpsleak.com and info@alpsleak.com FLEXPITCH LEAK TESTER ADVANCED OPERATOR MANUAL FLEX PITCH ADVANCED OPERATOR MANUAL TM 2017-005 REV03 © 06/31/2017...
- Page 2 Power Systems LLC. Software Installation of any new or modification of existing software into the FlexPitch machine not approved by Air Logic Power Systems LLC may adversely affect the operation or performance of the machine and possibly void the warranty and or service agreements. Please consult Air Logic Power Systems Service Department prior to installing or modifying existing software on this machine.
-
Page 3: Table Of Contents
Conveyor Speed Overview and Use ..................27 Reject Timing Overview ....................... 28 How to Use Reject Timing ....................29 Optional Functions Overview & Use ..................30 Recipes Overview ........................ 32 How to Use Recipes ......................33 FLEXPITCH ADVANCED OPERATOR MANUAL TM 2017-005 REV05 © 08/01/2017... - Page 4 Bottle Change Over and Setup 71 Change Over Steps Guide ....................71 New Bottle Setup Guide for Test Settings ................74 FlexPitch Advanced Operator Additions Laser Height Quick Reference Procedure (IB-1500) ............83 FLEXPITCH ADVANCED OPERATOR MANUAL TM 2017-005 REV05 © 08/01/2017...
-
Page 5: General Information
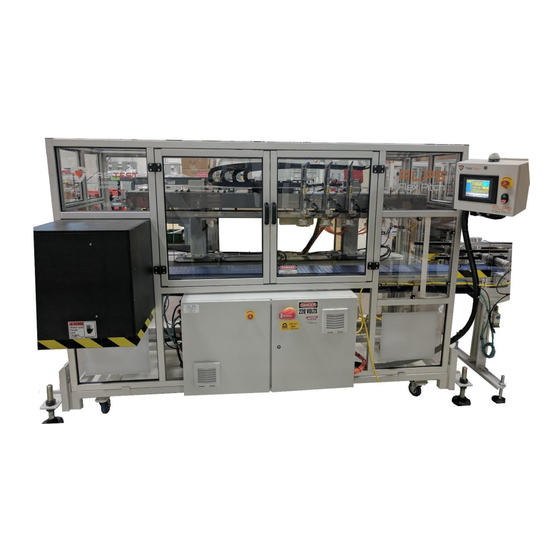
The FlexPitch has built in flexibility with 2- 4 test heads for a variety of container sizes up to 350oz. This makes the FlexPitch ideal to leak test difficult containers. The FlexPitch Multi-Moving head leak tester provides tool-less adjustments and no formatted parts to change, making quick bottle changeovers. -
Page 6: Machine Designation And Serial Number Location
Along with it are the 24-Hour service hotline phone number and the UL Panel Rating plate. LABEL ALPS 24-hour service hotline phone number Identification and serial number plaque ALPS rating label UL Certification Sticker FLEXPITCH ADVANCED OPERATOR MANUAL TM 2017-005 REV05 © 08/01/2017... -
Page 7: Safety
Safety Safety: Warning Labels and Descriptions Safety is always critical. The ALPS FlexPitch machine is equipped with a full complement of warning decals and labels. A standard series of warning and caution labels are in place to inform the operator of certain hazards relative to the function of this machine. Please observe these warnings. - Page 8 This warning is seen on the front of the discharge chute. Do not thrust your hand up this chute while the machine is operating. Contact with moving bottle material poses a slight to moderate threat of injury FLEXPITCH ADVANCED OPERATOR MANUAL TM 2017-005 REV05 © 08/01/2017...
- Page 9 DANGER: STARTS AUTOMATICALLY This warning is displayed on all plexiglass doors as a warning that the machine starts and stops automatically as a function of its normal operating scheme. FLEXPITCH ADVANCED OPERATOR MANUAL TM 2017-005 REV05 © 08/01/2017...
-
Page 10: Safety: Warning Messages
PERSONAL OR FATAL BODILY INJURY EXISTS! VOLTAGE HAZARD! THE FLEXPITCH MACHINE USES 220 VOLTS AC POWER WHICH CAN CAUSE SERIOUS INJURY OR DEATH ON CONTACT. DO NOT DEFEAT THE SAFETY FEATURES OF THIS EQUIPMENT TO GAIN ACCESS TO INTERNAL VOLTAGES. -
Page 11: Jokab Door Sensors: Positions
Both doors must be closed before the machine can be restarted. The colored LED atop the HMI control box will return to steady green. FLEXPITCH ADVANCED OPERATOR MANUAL TM 2017-005 REV05 © 08/01/2017... -
Page 12: Safety-Operational Status/Conditional Status
Machine in bypass Mode or in Pause Condition Machine stopped, door ajar or waiting for operator to press START. The circuit is open, interrupted, e-stop has been pressed or a fault has occurred. FLEXPITCH ADVANCED OPERATOR MANUAL TM 2017-005 REV05 © 08/01/2017... -
Page 13: Glossary Of Common Terms
When performing a self-test, a pressure path to a test orifice is opened. The Test Leak Orifice orifice size can help determine the size of the leak that can be detected based on current test settings. FLEXPITCH ADVANCED OPERATOR MANUAL TM 2017-005 REV05 © 08/01/2017... -
Page 14: Introduction To Components
Touchscreen (HMI). machine status, counter, alarms, and fault conditions. Contains the Start/Stop and e-stop palm buttons. Emergency Stop E-Stop palm-button. Start/Stop Buttons Controls Starting and Stopping of the machine. FLEXPITCH ADVANCED OPERATOR MANUAL TM 2017-005 REV05 © 08/01/2017... -
Page 15: Working Components
Airflow shut-off, pressure control and filtration. Unit (not shown, located on back of machine) Main Disconnect Controls incoming power to the machine. Reject Chute Ejects and monitors (reject verification option) bad bottles FLEXPITCH ADVANCED OPERATOR MANUAL TM 2017-005 REV05 © 08/01/2017... -
Page 16: Theory Of Operations15
Leak Test Operations Pressure Test Untested bottles are transferred from line conveyor to the FlexPitch. When the FlexPitch begins to detect bottles the test-probes will extend to seal and pressurization the bottles. The Pressure Test ensures the bottle reaches the specified Peak Pressure. If any one of the bottles fails to reach Peak Pressure, that bottle will be rejected for a Fill Failure. -
Page 17: Photo Eye Function And Position
Photo Eye Function and Position Photo Eyes Introduction and Positions Bottles transition from the production line conveyor into the FlexPitch conveyor for leak testing. During this transition bottles will be monitored and controlled by various photo eyes. The machine will reject failed or untested bottles with the reject cylinder. -
Page 18: Advanced Operator Hmi Use
The options and settings built into the FlexPitch are password-protected. A password is required for editing production values. If not previously logged in, when attempting to edit or change settings a password login pop up box and keyboard will appear. The FlexPitch ships with default passwords. -
Page 19: How To Log In And Out
AIR LOGIC POWER SYSTEMS (ALPS) THEORY OF OPERATIONS How to Log In and Out Log In is accessible through out FlexPitch Menu system. It provides access to obtain operator, supervisor, or technician user privileges. To Login select the desired level and enter password as shown on the next page. -
Page 20: How To Enter Passwords
. Select any function. 2. A password prompt screen appears. Touch the white input area. Enter PASSWORD and touch ENTER (ENT ) on the keypad screen at right. 3. Press OK. FLEXPITCH ADVANCED OPERATOR MANUAL TM 2017-005 REV05 © 08/01/2017... -
Page 21: How To Edit Hmi Settings
The allowable minimum and maximum values are displayed in the TENKEY box. Exceeding MAX and MIN limits is not permissible. Touch CLR (clear) to clear an errant value. Touch BS (back space) to correct a mistake. Click CANCEL to nullify entry. FLEXPITCH ADVANCED OPERATOR MANUAL TM 2017-005 REV05 © 08/01/2017... -
Page 22: The Setting Menus
Leak test production by the FlexPitch requires proper settings. The Settings Menu is where all the settings for production are viewed and edited. Test Pressures & Reject Limits Overview These Menus contain the time settings required to perform leak tests on the FlexPitch Select Test Settings... -
Page 23: Test Pressures & Reject Limits Overview
Start fill time 1 to 10 IWC pressure start counting. Probe force POUNDS Probe force on the bottle (option maybe viewable only) Fill Pressure Available pressure fill pressure (option maybe viewable only) FLEXPITCH ADVANCED OPERATOR MANUAL TM 2017-005 REV05 © 08/01/2017... -
Page 24: Test Pressures & Reject Limits Helpful Hints
Probe Force Probe Force is relative to a Apply only enough force to good seal to allow for ensure the bottle can be pressurization sealed and pressurized FLEXPITCH ADVANCED OPERATOR MANUAL TM 2017-005 REV05 © 08/01/2017... -
Page 25: Bottle Size And Stroke Overview
AIR LOGIC POWER SYSTEMS (ALPS) THE SETTINGS MENU Bottle Size and Stroke Overview Bottle Size contains the bottle width and stroke settings that allow the FlexPitch to move the test probes accordingly. Select Test Settings On-line instructions are also available for this function... -
Page 26: How To Use Bottle Size And Stroke
How to Use Bottle Size and Stroke CAUTION! Caution! Damage to probe carriage and probes can occur. The diameters of the test probes currently installed on the FlexPitch must be smaller than the bottle sized entered. 1. Measure the diameter of the bottle 2. -
Page 27: Probe Take Off Overview
C. Test Probe extends perfectly onto the bottle, and the Probe Take-Off is correct Use the HEAD 1 Probe Take-Off Arrows Up or Down to position and align the test probes onto the bottles On-line instructions are also available for this function. FLEXPITCH ADVANCED OPERATOR MANUAL TM 2017-005 REV05 © 08/01/2017... -
Page 28: Conveyor Speed Overview And Use
THE SETTINGS MENU Conveyor Speed Overview and Use The Conveyor Speed Settings for the FlexPitch provide an indication of the Feet Per Minute (FPM) rate and the Container Per Minute (CPM) rate. If the option for Analog Output for Conveyer” is turned ON then PLC scaling and desired FPM selection will be visible. However, this feature does not pertain to the FlexPitch. -
Page 29: Reject Timing Overview
THE SETTINGS MENU Reject Timing Overview Reject timing contains the encoder positions that allow the FlexPitch when to reject a defective bottle. When making changes to this setting it is very important to test and verify that only the failed leak test bottle(s) are indeed being rejected. -
Page 30: How To Use Reject Timing
3. If necessary adjust reject pulse time a. Increase or decrease time as necessary based on speed of machine and reject window. Again, insuring only the bad bottle is rejected. FLEXPITCH ADVANCED OPERATOR MANUAL TM 2017-005 REV05 © 08/01/2017... -
Page 31: Optional Functions Overview & Use
Select Settings Spacing Wheel The Spacing wheel will keep the infeed of bottles to the FlexPitch at a fixed distance. This can help with bottle control and help increase test times allowing the leak test to detect smaller holes. 1. Enter FPM Rate. This value can be found in the Conveyor Speed Settings when machine is running. - Page 32 4. Use Re-arm delay so photo eye triggers once per bottle. a. If photo eye misses a bottle decrease delay. b. If 2 or more counts occur on single bottle increase delay. FLEXPITCH ADVANCED OPERATOR MANUAL TM 2017-005 REV05 © 08/01/2017...
-
Page 33: Recipes Overview
A recipe is selected and loaded into the machine PLC from the CARD long-term memory card and/or HMI memory. DELETE EXISTING A recipe is selected and deleted from the HMI memory. RECIPES FLEXPITCH ADVANCED OPERATOR MANUAL TM 2017-005 REV05 © 08/01/2017... -
Page 34: How To Use Recipes
3. A window opens asking you, “Are you sure you want to write?” Press “YES” to continue, “NO” to exit back. 4. Press BUTTONS IN ORDER: 5. A screen appears to load the conveyer settings then to load regulator settings. FLEXPITCH ADVANCED OPERATOR MANUAL TM 2017-005 REV05 © 08/01/2017... - Page 35 AIR LOGIC POWER SYSTEMS (ALPS) THE SETTINGS MENU 6. Press the “Go to Main Screen” button or “Home” button to return home. FLEXPITCH ADVANCED OPERATOR MANUAL TM 2017-005 REV05 © 08/01/2017...
- Page 36 2. New Recipe name is called. Pressing the Grey area (“Default” Area shown below) will allow you to name the new recipe (30 characters maximum). Press the “Press To Continue Recipe Saving” button. FLEXPITCH ADVANCED OPERATOR MANUAL TM 2017-005 REV05 © 08/01/2017...
- Page 37 5. Press BUTTONS IN ORDER: . This saves the recipe name to the recipe data file, and prompts a notification window that operation Completed. 6. Press the “Home” button to return home. FLEXPITCH ADVANCED OPERATOR MANUAL TM 2017-005 REV05 © 08/01/2017...
- Page 38 3. A window appears to “Memory Card”. 4. All recipes will be downloaded automatically to the memory card. A window appears to say operation “Completed”. Press the Home button to return home. FLEXPITCH ADVANCED OPERATOR MANUAL TM 2017-005 REV05 © 08/01/2017...
- Page 39 . A window appears with message “Completed”. 5. Press BUTTONS IN ORDER: 6. New Recipe name will appear in Load Existing Recipe window. 7. Press the Home button to return home. FLEXPITCH ADVANCED OPERATOR MANUAL TM 2017-005 REV05 © 08/01/2017...
- Page 40 3. A window opens asking you, “Are you sure you want to delete?” Press “YES” to continue, “NO” to exit back. 4. Press BUTTONS IN ORDER: 5. A window opens saying the deleted recipe is “Completed”. 6. Press the Home button to return home. FLEXPITCH ADVANCED OPERATOR MANUAL TM 2017-005 REV05 © 08/01/2017...
-
Page 41: Test Results Menu
Total counts for every possible type of leak test rejection is displayed in this screen. Self-Test Counters Total counts, overall and per self-test head, for self- test performed, passed, rejected and self-test reject %. FLEXPITCH ADVANCED OPERATOR MANUAL TM 2017-005 REV05 © 08/01/2017... -
Page 42: All Results, Individual Results, Timer Details And Recent Rejects Overview
These times are used to help determine servo Alarms the key is to have “Spare Time at Start and End” to avoid Servo Timing Alarms. See information help screens on FlexPitch HMI on how to use spare time. Servo Position: The user selects a test head station number. -
Page 43: How To Use All Results
• Self-Test All button to activate the Self-Test Function for all the test heads. • Station Results navigates to Test Result screen. • Leak testing data is displayed from each selected test probe Test Result station. FLEXPITCH ADVANCED OPERATOR MANUAL TM 2017-005 REV05 © 08/01/2017... -
Page 44: How To Use Individual Results
To use this function, stop production, and place a container under the proper test probe and push the manual test button. The leak test results will be displayed on the screen. FLEXPITCH ADVANCED OPERATOR MANUAL TM 2017-005 REV05 © 08/01/2017... -
Page 45: How To Use Timer Details
Cycle Retract Time shows the current time settings for easy comparison to the cycle time. These times added together should not exceed the cycle time. However, in order to use all available test time it should be close. FLEXPITCH ADVANCED OPERATOR MANUAL TM 2017-005 REV05 © 08/01/2017... -
Page 46: How To Use Recent Reject
T1 % loss, and T2 % loss is displayed for each rejected bottle. The Recent Rejects view the last 20 bottle rejects. 1. Select the MORE to show 11-20 and back to Recent Rejects screen 1-10. FLEXPITCH ADVANCED OPERATOR MANUAL TM 2017-005 REV05 © 08/01/2017... -
Page 47: Alarm Log & Counters Overview
Alarm tracking time stamp details Log In The user can Log-In as an Operator, Supervisor, or ALPS Technician. The user can Log Out of the machine. Close The Test Results Menu is closed. FLEXPITCH ADVANCED OPERATOR MANUAL TM 2017-005 REV05 © 08/01/2017... -
Page 48: How To Use Alarm Counters
• Servo hardware (HW) • Auto self-test • Test too long • Minimum pressure exceeded at start Select RESET ALARM COUNTERS if resetting alarm count totals to zero is desired FLEXPITCH ADVANCED OPERATOR MANUAL TM 2017-005 REV05 © 08/01/2017... -
Page 49: How To Use Alarm Log
Selected values highlight in yellow. To select an individual listing to delete: To select a group of listings. To de-select a group of listings FLEXPITCH ADVANCED OPERATOR MANUAL TM 2017-005 REV05 © 08/01/2017... -
Page 50: Maintenance Menu
The I/O diagnostics is useful for checking if key devices are working properly. The analog calibration screens is where ALPS technicians will perform the calibration of pressure transducers. Transducer calibration is factory set and described in further detail in the maintenance manual. FLEXPITCH ADVANCED OPERATOR MANUAL TM 2017-005 REV05 © 08/01/2017... -
Page 51: Manual Test Overview
Test setting are working properly. The Manual Self-Test, functions just like a Manual Test except the FlexPitch activates a leak path to an orifice. In this case the bottle is always expected to FAIL. Again, verifying the test settings are correct and able to detect the required hole size. - Page 52 If the bottle is out range one of the indicators will turn red and stay red until adjustments are made and a successful in range test is accomplished. The manual test result on top of the menu will indicate the reason. FLEXPITCH ADVANCED OPERATOR MANUAL TM 2017-005 REV05 © 08/01/2017...
- Page 53 The MIN and MAX indicators will turn red if the bottle pressure is not within the range. A red light indicates out of range. To change a MIN or MAX value select the associated gray box. FLEXPITCH ADVANCED OPERATOR MANUAL TM 2017-005 REV05 © 08/01/2017...
- Page 54 Follow the steps below. 1. If necessary stop production flow of bottles into the FlexPitch. 2. To ensure the FlexPitch is not in production push the stop. Status should say: System Stopped: Waiting for Run Button. Place a bottle under test probe for station selected Select the Manual Test.
-
Page 55: How To Use Manual Self Test
Follow the steps below. 1. If necessary stop production flow of bottles into the FlexPitch. 2. To ensure the FlexPitch is not in production push the stop. 3. Status should say: System Stopped: Waiting for Run Button. 4. Place a bottle under test probe for station selected 5. -
Page 56: Inputs And Outputs Overview
MAINTENANCE MENU Inputs and Outputs Overview I/O Diagnostics provide real-time analog inputs, analog outputs, digital inputs, and digital outputs on the FlexPitch machine. These screens are useful to verify the functionality of the devices on the FlexPitch machine. Select Maintenance... -
Page 57: How To Use Inputs And Outputs
The Digital Outputs provide access to manually test the digital outputs of the FlexPitch. While the machine is stopped, individual outputs may be turned on to diagnose problems. See the FlexPitch Maintenance Manual for more information How to Use Inputs and Outputs... - Page 58 Servo at Tracking point for servo Zero Servo Servo is in fault condition Alarm Spare HS2 Spare servo Encoder Encoder signal Phase A Encoder Encoder signal Phase B FLEXPITCH ADVANCED OPERATOR MANUAL TM 2017-005 REV05 © 08/01/2017...
- Page 59 How to Use Analog Outputs The Analog Output values should vary nomically when the optional devices listed are present on the FlexPitch. For instance, if the FlexPitch option for electronic regulators are present this output would change in accordance to how the Fill Pressure is set.
-
Page 60: Station Diagnostic Overview
This can be useful to determine if the station has inordinately high amount of rejects. In addition to the counter the menu also provides the ability to test outputs and monitor inputs for the selected station. FLEXPITCH ADVANCED OPERATOR MANUAL TM 2017-005 REV05 © 08/01/2017... -
Page 61: How To Use Station Diagnostic
How to use Station Diagnostic If necessary stop production flow of bottles into the FlexPitch To ensure the FlexPitch is not in production push the stop Status should say: System Stopped: Waiting for Run Button. Place bottle under test probe for desired station to test... -
Page 62: Analog Calibration Overview And Use
For further information refer to the Maintenance Manual. Select Maintenance About Overview and Use For information on the ALPS software versions and the machine serial number view the ABOUT display Select Maintenance FLEXPITCH ADVANCED OPERATOR MANUAL TM 2017-005 REV05 © 08/01/2017... -
Page 63: Supervisor Menu Introduction
Infeed rails will move according to bottle size with Recipe being loaded Down Bottle Eject bottle from conveyor if it falls on the conveyor Checks bottle for a specific height and ejects if it’s over or under. Laser Height FLEXPITCH ADVANCED OPERATOR MANUAL TM 2017-005 REV05 © 08/01/2017... -
Page 64: How To Use System Options
MAINTENANCE MENU How to Use System Options Caution! Enabling or disabling options that are either present or not present on the FlexPitch may adversely affect production operations Select the option desired. When option is ON it will turn yellow. OFF is gray. -
Page 65: How To Use Auxiliary Test
How to use Auxiliary Test To turn on function select where test should occur. Only one selection is possible for each Auxiliary. The function that is ON will be highlighted in yellow. FLEXPITCH ADVANCED OPERATOR MANUAL TM 2017-005 REV05 © 08/01/2017... -
Page 66: Reject Alarms Overview
Machine and Alarm occurs at value entered Individual Reject % Limit Consecutive Selection will navigate back to primary Reject settings menu Setting FLEXPITCH ADVANCED OPERATOR MANUAL TM 2017-005 REV05 © 08/01/2017... -
Page 67: How To Use Reject Alarm
10. Turn OFF Alarm Mode Warning Turns Gray 11. Enter desired machine percentage for Reject % Limit 12. Enter desired head percentage for Reject % Limit 13. Select to navigate to primary setting menu FLEXPITCH ADVANCED OPERATOR MANUAL TM 2017-005 REV05 © 08/01/2017... -
Page 68: System Bypass Overview And Use
AIR LOGIC POWER SYSTEMS (ALPS) MAINTENANCE MENU System Bypass Overview and Use System Bypass allows bottles to pass through FlexPitch without testing or rejecting them. Select Supervisor Select System Bypass Sub menus will appear To activate select System Bypass. Once activated it can be deactivated in the same manor FLEXPITCH ... -
Page 69: Select Inputs Outputs Overview And Use
The input selected and used will be highlighted in yellow. There are up to 4 possible addresses to use. For instance, if one address is used for RUNNING the next position (Address) can be used for PAUSED. 1 to 4 1 to 4 FLEXPITCH ADVANCED OPERATOR MANUAL TM 2017-005 REV05 © 08/01/2017... -
Page 70: Auto Self-Test Overview
How often it’s performed is programmed by the number of bottles transitioning through the FlexPitch. The Auto Self-Test can help ensure the test settings and recipe used for production are indeed detecting defective bottles in accordance with the required hole size. -
Page 71: How To Use Auto Self-Test
Check test settings ii. Check station probe alignment iii. Check correct orifice is installed 8. Alarm must be re-set before machine can run. Same as above except Alarm Mode will stop machine. FLEXPITCH ADVANCED OPERATOR MANUAL TM 2017-005 REV05 © 08/01/2017... -
Page 72: Bottle Change Over And Setup
Turn clockwise to raise, counter-clockwise to lower. Place the bottle that will run on the FlexPitch underneath a test probe. Raise or lower the probe carriage to a level just ¼ inch above the top of the bottle opening. - Page 73 Setup Rails Step Procedure Description 1. Railing Place bottle to run on the FlexPitch on the conveyor. Adjust rails so that bottles enter the Adjustment FlexPitch centered under the probes. Vertical Height Adjustment There is no precise adjustment for retainer railing, but railings can be adjusted vertically to maintain bottle alignment along the conveyor.
- Page 74 AIR LOGIC POWER SYSTEMS (ALPS) BOTTLE CHANGE 3. Spacing If Spacing Wheel option is installed setup spacing wheel. Wheel FLEXPITCH ADVANCED OPERATOR MANUAL TM 2017-005 REV05 © 08/01/2017...
-
Page 75: New Bottle Setup Guide For Test Settings
1. From the settings menu, navigate to the Bottle Size screen. Push the “Change 1. Setup the new Bottle Size” button. bottle size 2. Verify the probe diameter, enter the new bottle size and push the “Acknowledge button”. The probe heads will rehome. FLEXPITCH ADVANCED OPERATOR MANUAL TM 2017-005 REV05 © 08/01/2017... - Page 76 The probe pressure can also be viewed in the test pressure settings and manual test displays 3. Place a bottle Make sure the bottle is centered under the probe properly. under a test probe FLEXPITCH ADVANCED OPERATOR MANUAL TM 2017-005 REV05 © 08/01/2017...
- Page 77 Test If any of the indicators turned red or the peak pressure did not fall within range proceed to the applicable step 6-10. Otherwise proceed to Step 11 FLEXPITCH ADVANCED OPERATOR MANUAL TM 2017-005 REV05 © 08/01/2017...
- Page 78 25 IWC. Decrease the Fill Pressure until the Over Pressure Fill is no longer present after performing a manual test. FLEXPITCH ADVANCED OPERATOR MANUAL TM 2017-005 REV05 © 08/01/2017...
- Page 79 Detail Timers, the FlexPitch must be ready to receive and run the associated bottles through the system. The Timers may be set close to what the cycle time of the FlexPitch is or will be. However, at this point, accuracy is not that important.
- Page 80 Fill Time Outs. 5. Enter Probe Retract Time. This value is the time allowed for the probes to retract. Recommendation in most applications set to minimum range. FLEXPITCH ADVANCED OPERATOR MANUAL TM 2017-005 REV05 © 08/01/2017...
- Page 81 Navigate to the manual test menu and select a head to help set reject limits for Test 1 and Test 2. These limits should be 10%-15% above a good bottle. 19. Procedure is Complete FLEXPITCH ADVANCED OPERATOR MANUAL TM 2017-005 REV05 © 08/01/2017...
- Page 82 Setup reject verification adjust time according to elapsed time. If desired enable Chute Intrusion Alarm If Verification Photo Eye is constantly blocked chute intrusion alarm will occur This concludes the Advanced Operator Manual FLEXPITCH ADVANCED OPERATOR MANUAL TM 2017-005 REV05 © 08/01/2017...
-
Page 83: Flexpitch Advanced Operator Additions
AIR LOGIC POWER SYSTEMS (ALPS) BOTTLE CHANGE FlexPitch Advanced Operator Additions FLEXPITCH ADVANCED OPERATOR MANUAL TM 2017-005 REV05 © 08/01/2017... -
Page 84: Laser Height Quick Reference Procedure (Ib-1500)
4 Auto-Adjust Indicator 13 Mode Button 5 Bank Indicator 14 Jog Arrow buttons: Left, Right, Up, Down-Set Tolerances 6 Zero-Shift Button 15 Hold Indicator 7 Sub-Display Id Indicators 16 Percentage Indicator FLEXPITCH ADVANCED OPERATOR MANUAL TM 2017-005 REV05 © 08/01/2017... - Page 85 Part 1. Left: Zeros will appear in the sub-display. Press the Zero-shift button. Setting the Display High/Low NOTE: The FlexPitch uses the raw analog value for comparison. The HI/GO/LO lights are to be used for informational purposes only. Set new tolerance settings: (High, Low, Shift-(R.V. Display).
- Page 86 7. Press ZERO-SHIFT function button at lower left. The display will now read ZERO POINT AT TOP OF BOTTLE. 8. Manually advance the container forward, through and out of the sensor field. Slide Locking Screw FLEXPITCH ADVANCED OPERATOR MANUAL TM 2017-005 REV05 © 08/01/2017 Receiver Transmitter...
- Page 87 2. Raise and lower the laser sensor over the container. Part 3: FlexPitch Bottle Height Calibration Calibrate the analog value to the bottle height Steps: 1. On the HMI, navigate to the Laser Height Results Screen FLEXPITCH ADVANCED OPERATOR MANUAL TM 2017-005 REV05 © 08/01/2017...
- Page 88 6. Return to the Laser Height Results screen. Enter in the Min and Max height for the bottle. These are the reject limits for the Laser Height. Anything shorter than the minimum, or taller than the maximum, will be rejected. FLEXPITCH ADVANCED OPERATOR MANUAL TM 2017-005 REV05 © 08/01/2017...
- Page 89 Steps: Hold the MODE button and rapidly press the SET button (5) times until the word “RESET” displays. Press the DOWN arrow button () until YES appears in the sub-display. FLEXPITCH ADVANCED OPERATOR MANUAL TM 2017-005 REV05 © 08/01/2017...
- Page 90 (lower digital display) and then the main screen reading will display near “100”. 4. Registration is completed. The reference light (LED) cannot be registered with external inputs. Always use the buttons on the main unit. FLEXPITCH ADVANCED OPERATOR MANUAL TM 2017-005 REV05 © 08/01/2017...
- Page 91 AIR LOGIC POWER SYSTEMS (ALPS) BOTTLE CHANGE Mode Gain will be displayed around 100 at both displays. FLEXPITCH ADVANCED OPERATOR MANUAL TM 2017-005 REV05 © 08/01/2017...
- Page 92 Press the RIGHT arrow button () to advance to the next setting. Receiving/Blocked Light Mode (2.L-d) This function sets whether to display according to the light transmitted into the receiver or according to the blocked light. FLEXPITCH ADVANCED OPERATOR MANUAL TM 2017-005 REV05 © 08/01/2017...
- Page 93 According to the judgment value (P.V.), set the output mode (NO/NC) (Normally Open/Normally Closed), of the judgment output ON/OFF and edge check the output. Let remain in Normally Open (no). FLEXPITCH ADVANCED OPERATOR MANUAL TM 2017-005 REV05 © 08/01/2017...
- Page 94 Advanced Settings Mode ( This is a gateway to the advanced settings levels: (settings 5-20) Press the RIGHT arrow key () to advance to (Pro) settings. Hold Setting: (5.hld)-(For Auto-Peak Hold) FLEXPITCH ADVANCED OPERATOR MANUAL TM 2017-005 REV05 © 08/01/2017...
- Page 95 3. Press the UP/DOWN arrow keys () until (TG.Lu) is equal to (0.0050) 4. (Press the RIGHT arrow key () to accept. 5. Press the RIGHT arrow key () multiple times until (END) to exit this setting mode. FLEXPITCH ADVANCED OPERATOR MANUAL TM 2017-005 REV05 © 08/01/2017...
Need help?
Do you have a question about the FlexPitch and is the answer not in the manual?
Questions and answers