Table of Contents
Advertisement
Advertisement
Table of Contents

Related Manuals for Cake Kalk&


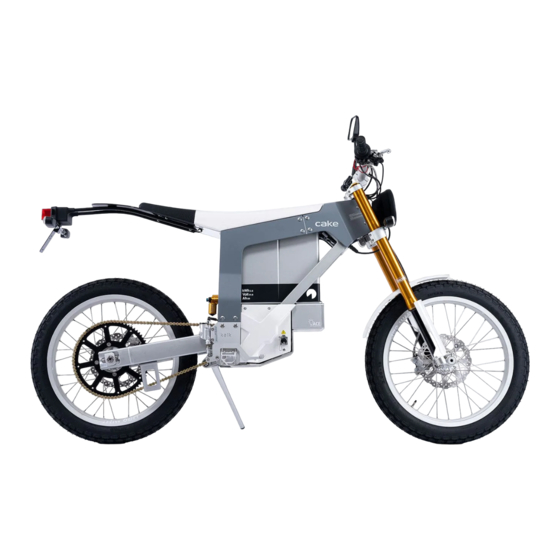
Summary of Contents for Cake Kalk&
- Page 1 Kalk & Manual...
- Page 2 Hello & Welcome! We are extremely flattered that you have chosen to ride a CAKE electric motorbike. It’s our obligation to do the best we can to serve you with product, information, service and spare parts for an effortless experience. ...
-
Page 3: Table Of Contents
Table of contents Table of contents 1. Introduction and Getting started 1.1 Introduction 1.2 Unboxing 1.3 Getting started 2. General information 2.1 Safety advice 2.2 Controls and Power modes 2.3 Starting procedure 2.4 Charging 2.5 Specifications 3. Regular inspection and Maintenance 3.1 Before each ride 3.2 Service table and Service intervals 3.3 Wheels and Tires... -
Page 4: Introduction And Getting Started
The manual features easy step-by-step guidance with pictures and what tools are needed. 1.3 Getting started Before you are ready to take your first ride on the KALK&. Please follow the steps below to make sure to not make any damage to the vehicle, property or injure yourself or others. -
Page 5: General Information
2.1 Safety advice Riding When riding a CAKE bike for the first time, there are a few things to consider. The bike has an electric motor with instant torque and a primary drive with no gears or clutch, which means you have all the power available at all times in the throttle. -
Page 6: Controls And Power Modes
• Handlebar control Brakes As the Kalk& bike is built for off-road use, it does not have ABS brakes to give the rider full control over the bike when riding in off-road conditions. Please be cautious not to lock the wheels when braking in traffic. The front brake is located on the right side on the handlebar, and the rear brake is located by the right foot peg and is operated by the right foot. - Page 7 Kill switch The kill switch is located on the right side of the handlebar. When the kill switch is connected with the magnet, the bike is turned on. When you are done riding or in case of an emergency, pull the kill switch to turn off the bike.
- Page 8 Changing Brake mode When the bike has been activated. Press the button middle right to change Brake mode. You will always change the Brake mode, starting from “1 – No brake” to “2 – Medium brake” to “3 – Hard brake” and back to “1 –...
- Page 9 Power mode 1 - Easy This mode is ALWAYS recommended when riding a CAKE bike for the first time. It has a limited top speed of 45kmh (28mph) and soft acceleration.
- Page 10 Power mode 3 - Full With no restrictions when it comes to the performance, this mode is perfect when you need all the power available. This mode is highly recommended for highly skilled riders only. Charging screen As a safety measure, you are not able to ride your bike while charging the bike.
-
Page 11: Starting Procedure
Before you start the vehicle, please remember that this is an all-electric vehicle that is completely silent when it’s on. To start your CAKE Kalk&, follow the steps below. 1. Make sure that your bike is charged and that the charger is removed from the bike as it won’t turn on otherwise. -
Page 12: Charging
• Never charge the bike without supervision. • Never let the bike charge unattended. • Never use the charger in any other application than with the CAKE Kalk& bike. • Never use any other charger than the original CAKE charger. -
Page 13: Specifications
3.1 Before & after each ride on To make sure that your bike is always in good condition and avoid injury or damage, please make sure to always take care of your CAKE Kalk& bike by the following steps. • Check the angle of your mirrors. -
Page 14: Service Table And Service Intervals
3.2 Service table and Service intervals Service intervalls - After every: Ride 10hrs 20hrs 6 months Check tire pressure Check thread depth, tire Check rims for damage Check spoke tension Check brake discs Check brake pads Check brake fluids Check braking ability test drive Check brake hoses for damage Check front wheel bearings Check rear wheel bearings... -
Page 15: Wheels And Tires
You will find that the spokes keep nicely tightened because they are now ‘’settled ‘’ in the hub and rim. Now your CAKE wheels are ready to race. Keep checking your spokes regularly. By checking regularly, we don’t mean that the spokes have to be tightened every time. -
Page 16: Handlebar And Cockpit
• Check that the tires are inflated with the correct pressure • Check the tires tread pattern is at least 3mm deep • Check for bent spokes • Check that all spokes have the correct tension • Check that the brake discs are straight •... -
Page 17: Brakes
Use help of a friend if needed. When you don’t have the battery inside the bike, always be careful handling the battery. If dropped, inspect it visually and get in contact with a CAKE Employee if there’s any damage to it. -
Page 18: Owning And Operation
5.3 Storing Follow these following steps to ensure that your CAKE Kalk& is always in a good condition and to extend the life of the bike. We recommend you to ride the bike at least once every month as some of the bike’s components... -
Page 19: Locking The Bike
For inspection, please go through the procedures under Chapter 3 ”Regular inspection and Maintenance”. In case of a broken or damaged component, visit www.ridecake.com/spareparts to order spare components. If you can’t find what you are looking for or have any questions, please get in contact with CAKE directly. -
Page 20: Troubleshooting
This could potentially happen if the sensors in the motor get humid/water. The issue is temporary, please put the bike inside to let it dry for 24 hours. Get in touch with CAKE directly regardless if the issue disappears or not. -
Page 21: Tools
Loosen the headset bolt just a bit before tightening it hard. Tighten the screws on the upper triple clamp and test the suspension to see if the play is still there. Repeat if necessary. Get in contact with CAKE if the issue doesn’t resolve after the actions above. -
Page 22: Contact And Support
For the Kalk&, CAKE recommends you to buy and use the following tools • Hex keys in mm, 1-10mm • Screwdriver • Torx keys, T7-T45 • Rubber hammer • Wrench kit in mm • Tire iron • Pressurized air pump •...
Need help?
Do you have a question about the Kalk& and is the answer not in the manual?
Questions and answers