Table of Contents
Advertisement
Quick Links
Advertisement
Table of Contents

Related Manuals for Keysight M9186A


Summary of Contents for Keysight M9186A
- Page 1 Keysight M9186A PXI Voltage/Current Source Startup Guide...
- Page 3 M9186A Startup Guide...
- Page 4 1400 Fountaingrove Parkway performance of this document or of Santa Rosa, CA 95403 any information contained herein. Should Keysight and the user have a Sales and Technical Support separate written agreement with WA R N I N G To contact Keysight for sales and technical warranty terms covering the material support, refer to the "support"...
- Page 5 • Service personnel are trained to work capable of withstanding the voltage being nent, call a Keysight office for information. on live circuits, perform safe installa- measured. tions, and repair products. Only properly The instrument and accessories must be...
- Page 6 WA R N I N G To prevent electrical shock, dis- The C-Tick mark is a registered trademark of the Australian Spec- connect the Keysight Technolo- trum Management Agency. gies instrument from mains before cleaning. Use a dry cloth or one...
-
Page 7: Table Of Contents
Install the softwares 8 Step 4: Install the Module 10 M9186A front panel features 14 Interlock function 15 M9186A system connections 16 Step 5: Verify the Operation of the M9186A Module 17 Conduct performance verification (optional) 19 Specifications 20 M9186A Startup Guide... - Page 8 THIS PAGE HAS BEEN INTENTIONALLY LEFT BLANK. M9186A Startup Guide...
-
Page 9: Introduction
Keysight M9186A PXI Voltage/Current Source Introduction The scope of this Startup Guide is to detail the processes of receiving and setting up the Keysight M9186A PXI Voltage/Current Source, installing the required software, and verifying basic module operation. If you have any questions after reviewing this information,... -
Page 10: Step 1: Unpack And Inspect The Module
Keysight M9186A PXI Voltage/Current Source Step 1: Unpack and Inspect the Module The M9186A is shipped in materials which prevent damage from static. C A U T I O N The module should only be removed from the packaging in an anti-static area after ensuring that correct anti-static precautions are taken. -
Page 11: Inspect The Module For Damage
500 V. Inspect the module for damage After unpacking the M9186A, carefully inspect the unit for any shipping damage. Report any damage to the shipping agent immediately, as such damage is not covered by the warranty (warranty information can be found at the beginning of this manual). -
Page 12: Return The Module For Service
Keysight M9186A PXI Voltage/Current Source Return the module for service Should it become necessary to return the M9186A for repair or service, follow the steps below: 1 Review the warranty information shipped with your product. 2 Contact Keysight to obtain a Return Material Authorization (RMA) and return address. -
Page 13: Step 2: Verify The Shipment Contents
Keysight M9186A PXI Voltage/Current Source Step 2: Verify the Shipment Contents The following items are included in the M9186A shipment: • M9186A voltage/current source Software and Product Information CD- ROM (M9186- 10001) - contains software, drivers, and all product documentation in PDF format. -
Page 14: Step 3: Install The Software
Internet Explorer 6.0 or greater Explorer 7 or greater Explorer 7 or greater Chassis A cPCI, PXI-1, or PXIh chassis peripheral slot. The Keysight M9018A chassis is recommended. Interface controller A PXI or PXIe remote or embedded controller. Remote controller... - Page 15 Keysight M9186A PXI Voltage/Current Source Table 1 Minimum system requirements Embedded controller A Keysight M9021A System Interface Card, or equivalent embedded controller running one of the above operating systems. Note: The embedded controller must be compatible with the Keysight M9018A chassis. Softwares •...
-
Page 16: Power Up The Controller
2 Connect your I/O peripherals (mouse, keyboard, and monitor). 3 Power up the chassis. Install the softwares The M9186A softwares are located on the bundled CD (M9186- 10001). The same softwares are also available for free download at the Keysight Web site: www.keysight.com/find/M9186A. - Page 17 Keysight M9186A PXI Voltage/Current Source Figure 2 InstallShield Wizard for Keysight M9186A 3 After installation is complete, power down the chassis (and the host PC if using the remote controller). M9186A Startup Guide...
-
Page 18: Step 4: Install The Module
• Before installing the M9186A into the chassis, ensure that the chassis is powered off and unplugged to prevent damage to the module. The M9186A module can be used in a chassis with a cPCI, PXI-1, or PXIh N O T E chassis peripheral slot. - Page 19 Keysight M9186A PXI Voltage/Current Source Figure 3 Installing the module to the chassis 5 Hold the module by the injector/ejector handle, and slide it into an available PXI (or hybrid) slot, as shown in Figure • Install the module into the PXI slot of the chassis by placing the module card edges into the front module guides (top and bottom).
- Page 20 Keysight M9186A PXI Voltage/Current Source 10 Install all chassis covers and filler panels after installing the module. Missing filler panels may disrupt necessary air circulation in the chassis. 11 If you are using a remote controller, connect the System Interface Card in the chassis to host computer.
- Page 21 Keysight M9186A PXI Voltage/Current Source Module installation procedures Press down the ejector. Slide the M9186A module into any slot until the backplane connectors touch. Seat the M9186A module into the mainframe by pulling up the ejector. Tighten the top and bottom screws to secure the M9186A module to the mainframe.
-
Page 22: M9186A Front Panel Features
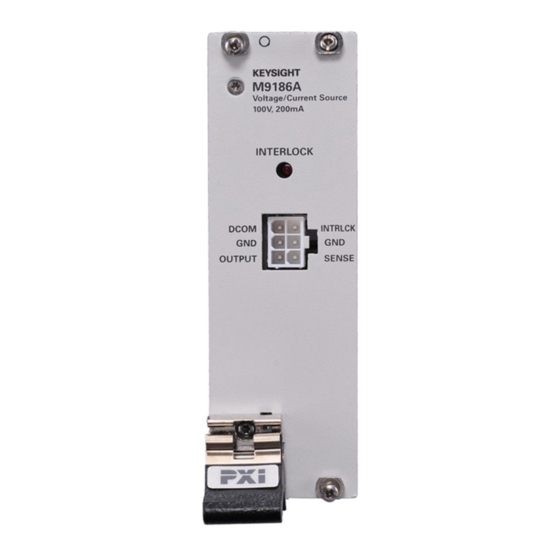
Keysight M9186A PXI Voltage/Current Source M9186A front panel features Front panel connectors DCOM Digital circuits common ground return. INTRLCK Disable the interlock function when shorted to DCOM. Floating analog ground. OUTPUT Voltage/Current source output SENSE Current sense through internal precision resistors. -
Page 23: Interlock Function
The INTRLCK pin needs to be physically shorted to DCOM pin on the front N O T E panel connector in order to enable the output of the M9186A. M9186A Startup Guide... -
Page 24: M9186A System Connections
Keysight M9186A PXI Voltage/Current Source M9186A system connections Figure 6 M9186A functional block diagram M9186A Startup Guide... -
Page 25: Step 5: Verify The Operation Of The M9186A Module
Keysight M9186A PXI Voltage/Current Source Step 5: Verify the Operation of the M9186A Module The intention of this step is to verify the basic operations of the newly installed module. Run the Keysight Connection Expert (KCE) by clicking its desktop shortcut icon, or by clicking Start > All Programs >... - Page 26 Next, specify your desired output value, select a sense resistor value, and click Apply. Figure 9 Specify an output value You may refer to Keysight M9186A Soft Front Panel Help for details on how to use the SFP. M9186A Startup Guide...
-
Page 27: Conduct Performance Verification (Optional)
Conduct performance verification (optional) Requirements for verification The M9186A is verified by setting a typical low dc voltage (for example, 5 V or 20 V) and measuring the OUTPUT pin with respect to the GND pin on the front panel connector. -
Page 28: Specifications
If a problem is found, perform the following checks: 1 Verify that all relevant hardware is turned on. 2 Verify that the M9186A paths are correctly set from the SFP and that the multimeter is set to the proper voltage measurement range and that cable is properly connected. - Page 29 (tel) (65) 6375 8100 (fax) (65) 6755 0042 Or visit Keysight World Wide Web at: www.keysight.com/find/assist Product specifications and descriptions in this document are subject to change without notice. Always refer to the Keysight web site for the lat- est revision.
- Page 30 This information is subject to change without notice. © Keysight Technologies 2010 - 2015 Edition 3, June 2015 *M9186-90001* M9186-90001 www.keysight.com...
Need help?
Do you have a question about the M9186A and is the answer not in the manual?
Questions and answers