Table of Contents
Advertisement
Quick Links
818366_a.qxd
1/24/02
3:18 PM
Abrasi-Blast
Respirator
instructions
This manual must be read carefully by all persons who have or will have the
responsibility for using or servicing the product. Like any complex piece of
equipment, the Abrasi-Blast Respirator from MSA will perform as designed only
if it is used and serviced according to the instructions. Otherwise, it could fail
to perform as designed, and persons who rely on this respirator could sustain
serious personal injury or death.
The warranties made by MSA with respect to the product are voided if the product
is not installed, used, and serviced in accordance with the instructions in this
manual. Please protect yourself and your employees by following the instructions.
Please read and observe the WARNINGS and CAUTIONS inside. We encourage
our customers to write or call for a demonstration of this equipment prior to use
or for any additional information relative to use or repairs. Call 1-800-MSA-2222
during regular working hours.
TAL 201 (L) Rev. 1
Page 1
© MSA 2002
Prnt. Spec. 10000005389 (A) Mat. 818366
TM
Doc. 818366
Advertisement
Table of Contents

Related Manuals for MSA Abrasi-Blast Series


Summary of Contents for MSA Abrasi-Blast Series
- Page 1 The warranties made by MSA with respect to the product are voided if the product is not installed, used, and serviced in accordance with the instructions in this manual.
-
Page 2: Table Of Contents
The The wearer must comply with the fol- D or higher quality. baffle must be used if nosecup lowing MSA respirator use limitations: E- Use only the pressure ranges and is not in place. 1. The limitations outlined in the hose lengths specified in the users 8. -
Page 3: General Description
COMBINATION protection provided. CARTRIDGES CARTRIDGES Routine Use in Air-Supplied • 1,000 Times Exposure • 100 Times Exposure Type CE, MSA Pressure Demand air- Mode - Including Entry Limit Limit line respirators (Configuration 5) are Continuous Use and • IDLH • IDLH... -
Page 4: Required Tools
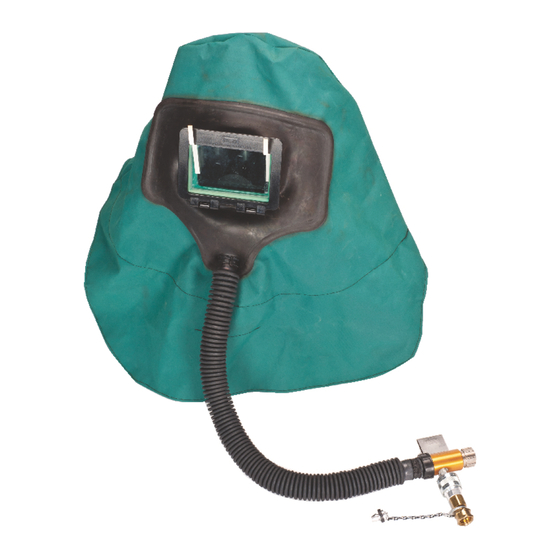
818366_a.qxd 1/24/02 3:18 PM Page 4 Assembly/Required Tools All Abrasi-Blast respirators are air source is disconnected or lost for equipped with a heavy rubber hood to any reason. provide limited protection to the user’s head and neck from rebounding abra- The pressure demand air-line respira- sive materials. -
Page 5: Unpacking And Inspection
818366_a.qxd 1/24/02 3:18 PM Page 5 Unpacking & Inspection/Component Assembly UNPACKING & INSPECTION b. If the breathing tube is worn end of the breathing tube under the hood, locate the 3/4” through the elastic collar locat- The Abrasi-Blast respirator consists of metal plug in the collar inside ed on the waist area of the the following subassemblies:... -
Page 6: Donning The Respirator
Medium abrasive 3. Install the protective lens cartridge. nected to the air source where the air- blasting Select the proper cover lens for supply hose from MSA is attached. .090” tempered Medium abrasive the job. (Use the chart below as a... - Page 7 818366_a.qxd 1/24/02 3:18 PM Page 7 Donning Failure to follow these precautions freeze in the vortex and reduce air the facepiece headstraps. The can result in serious personal injury flow. Air temperatures above 140 Velcro strip on the collar does not or death.
- Page 8 818366_a.qxd 1/24/02 3:18 PM Page 8 Donning B. Combination Duo-Flo Type 8. Grip the facepiece between your any way, wear the breathing tube Respirators thumb and fingers with both on the outside of the hood only. 1. Be sure that inlet air pressure is hands.
-
Page 9: Using The Respirator
818366_a.qxd 1/24/02 3:18 PM Page 9 Donning/Using the Respirator D. Respirator Fitting Tests a. Pull the respirator collar down A qualitative or quantitative respirator around your neck. The collar is fitting test must be carried out for designed to stretch over your each wearer of a combination air-sup- shirt or coverall collar to help plied and air purifying type respirator. -
Page 10: Injury Or Death
818366_a.qxd 1/24/02 3:18 PM Page 10 Using the Respirator heats of reaction with sorbent mate- rials in the canister. Select the proper cover lens for the Do not use near flame or hot metal, job. A thinner lens may not last because hood material may burn. -
Page 11: Cleaning And Disinfecting
4 cfm rate when the tation. proper pressure is used at the inlet of • High breathing resistance is the air-supply hose from MSA. encountered. • Any feeling of nausea, dizziness Adjusting the Temperature with the or ill-being develops. -
Page 12: Maintaining The Respirator
Use only genuine wear or damage. ter has served its useful life and MSA parts. Do not make repairs or should be replaced. design modifications other than as TAL 201 (L) Rev. 1 - 818366... -
Page 13: Accessories
1. Remove the lens housing assem- can be obtained locally or through bly from the hood. MSA. To install the kit: 1. Hold the support assembly so that the “coated” arms are up and the rubber block is toward the face- piece lens. - Page 14 Separate the holder halves. e. Position the holder to fit com- fortably on your hip. ABRASI-BLAST PARTS Consult the MSA Safety Equipment Catalog for parts and part numbers. c. To move the spectacles up or down, slide the rubber block up or down on the support arms.
-
Page 15: Abrasi-Blast Hood Styles And Accessories
818366_a.qxd 1/24/02 3:18 PM Page 15 Abrasi-Blast Hood Styles and Accessories SHOULDER MODEL WAIST-LENGTH MODEL Shoulder Waist Length Hood Length Hood Part No. Part No. 468725 468724 Includes Collar Includes Collar Facepiece and Breathing Tube Facepiece and Must Be Ordered Breathing Tube Separately Must Be Ordered... -
Page 16: Facepiece Assemblies
818366_a.qxd 1/24/02 3:18 PM Page 16 Facepiece Assemblies Demand (Single Valve) Demand (Dual Valve) Pressure Demand SIZE RUBBER SIZE RUBBER SIZE RUBBER SMALL MEDIUM LARGE SMALL MEDIUM LARGE SMALL MEDIUM LARGE PART Model Model Model Hycar Silicone PART Model Model Model Hycar Silicone PART... -
Page 17: Flow Control Devices
818366_a.qxd 1/24/02 3:18 PM Page 17 Flow Control Devices ADJUSTABLE VALVE-CONNECTORS WITH COMPONENTS Complete Assembly Valve-Connector Body Valve-Connector Body With Socket Assembly Less Socket Assembly Quick Disconnect High Pressure Low Pressure High Pressure Low Pressure Components (35-40 psig) (10-15 psig) (35-40 psig) (10-15 psig) Snap-Tite Aluminum... - Page 18 818366_a.qxd 1/24/02 3:18 PM Page 18 Flow Control Devices Combination Duo-Flo Complete Duo-Flo Valve Assembly with Quick Disconnect Plug and Socket Pressure Demand Air-Line Components Assy. (35-90 PSIG) Plug Snap-Tite Aluminum 466077 66273 Snap-Tite Brass 476919 630306 Snap-Tite Stainless Steel 476920 629671 Foster Steel...
-
Page 19: Pressure Gauge Assembly
MSA air-supply hose, thus assuring that the air pressure is within the NIOSH approved range. The gauge is sup-... -
Page 20: Interconnecting Air-Line Hoses
INTERCONNECTING AIR-SUPPLY SNAP-TITE Aluminum (AL) HOSES Do not use non-locking quick-dis- MSA air-supply hoses can be inter- connects to interconnect air-supply connected up to a maximum length of hoses. Use only the threaded con- 300 feet without voiding the NIOSH nector (3/4-16 UNF) or the locking- approval of the device. -
Page 21: Quick Disconnects
818366_a.qxd 1/24/02 3:18 PM Page 21 Quick Disconnects 479026 Plug For (C) Quick Disconnect Assembly 479027 Plug For (AL) Quick Disconnect Assembly TAL 201 (L) Rev. 1 - 818366... - Page 22 818366_a.qxd 1/24/02 3:18 PM Page 22 Notes TAL 201 (L) Rev. 1 - 818366...
- Page 23 818366_a.qxd 1/24/02 3:18 PM Page 23...
- Page 24 818366_a.qxd 1/24/02 3:18 PM Page 24...
Need help?
Do you have a question about the Abrasi-Blast Series and is the answer not in the manual?
Questions and answers