Advertisement
Table of Contents
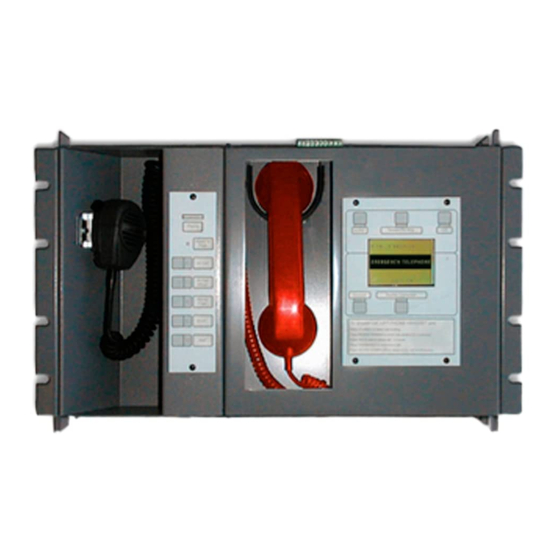
3-ASU and 3-ASU/4 Audio Source Unit
Installation Sheet
Description
The 3-ASU and 3-ASU/4 provide controls for emergency
paging. The 3-ASU/4 also provides a four-slot rail for installing
local rail modules.
Both units can store and play back prerecorded messages and
have inputs for connecting remote microphones and MN-FVPN
VoIP Encoder/Decoder modules.
The 3-ASU and 3-ASU/4 require one chassis space in an
enclosure. The 3-ASU includes a filler plate that mounts on the
cabinet inner door to prevent access to the electronics.
Installation
WARNING:
Remove all sources of power from the cabinet
before installing or removing components. Failure to do so may
result in serious injury or loss of life.
1.
Attach the chassis to the backbox using the hardware
provided. Align the backbox mounting studs with the holes
indicated in Figure 1.
2.
Attach the ASU to the chassis using six 6/32 x 3/8 pan
head screws. Press the RCIC card onto the PEM studs.
See Figure 2.
3.
Connect the ribbon cable (P/N 250195-01) between the
ASU card and the RCIC card.
4.
If used, install the 3-ASUMX memory card. Make sure the
write protect switch is in the "off" or "write enabled"
position.
5.
Connect the RCIC card to the other chassis rail
assemblies. See Figure 6 or Figure 7.
6.
Plug the ribbon cable (P/N 250194-00) from the 3-ASU
cover assembly into J3 on the ASU card. See Figure 3.
7.
Lift the 3-ASU cover assembly onto the chassis mounting
studs then attach it with the locknuts provided in the
hardware kit. See Figure 4.
© 2013 UTC Fire & Security. All rights reserved.
Figure 1: Chassis mounting diagram
Note:
3-ASU/4 chassis shown.
Figure 2: Circuit board mounting diagram
Note:
3-ASU chassis shown.
1 / 6
P/N 270482 • REV 06 • REB 18JAN13
Advertisement
Table of Contents

Related Manuals for Edwards 3-ASU


Summary of Contents for Edwards 3-ASU
- Page 1 MN-FVPN VoIP Encoder/Decoder modules. The 3-ASU and 3-ASU/4 require one chassis space in an enclosure. The 3-ASU includes a filler plate that mounts on the cabinet inner door to prevent access to the electronics. Installation...
- Page 2 Figure 3: Cover installation Figure 4: Installation complete Note: 3-ASU/4 chassis shown. Wiring Wire the 3-ASU and 3-ASU/4 as shown in Figure 5, Figure 6, and Figure 7. Notes • All wiring is supervised and power-limited. • If a 3-RS485 card is not installed, connect AUDIO DATA PRIMARY on the ASU card to AUDIO A OUT on the 3-CPUx card.
- Page 3 Figure 6: 3-ASU RCIS card wiring diagram P/N 270482 • REV 06 • REB 18JAN13 3 / 6...
- Page 4 Figure 7: 3-ASU/4 RCIC card wiring diagram 4 / 6 P/N 270482 • REV 06 • REB 18JAN13...
-
Page 5: Specifications
Specifications Voltage 24 VDC Current Standby 80 mA Alarm 80 mA Ground fault 0.1 Ω impedance Wire size 22 to 12 AWG (0.5 to 2.5 mm²) Dimensions 12.0 x 19.0 x 5.25 inches (30.48 x 48.26 x 13.34 cm) Mounting One chassis space Audio channels 8 simultaneous... - Page 6 6 / 6 P/N 270482 • REV 06 • REB 18JAN13...
Need help?
Do you have a question about the 3-ASU and is the answer not in the manual?
Questions and answers