Table of Contents
Advertisement
Quick Links
Read the separate safety instructions before using the appliance
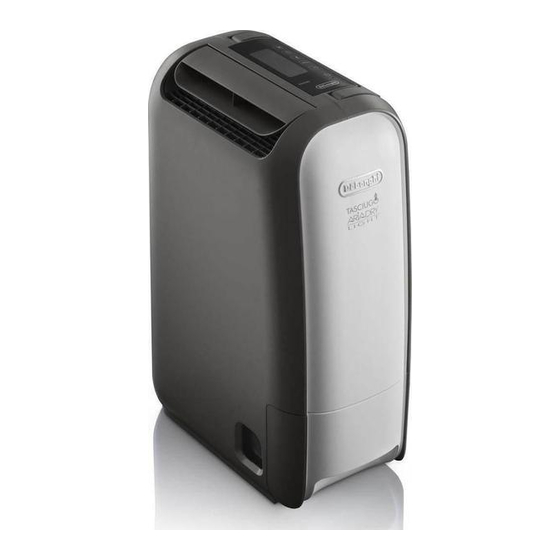
1. DESCRIPTION
1.1 Description of appliance (A)
A1. Control panel
A2. Deflector
A3. Lifting handle
A4. Dust filter or nano silver filter
A5. Air inlet grille
A6. Water level viewing window
A7. Condensate collection tank
A8. Tank extraction grip
A9. Air outlet grille
A10. Continuous drain rubber stopper
A11. Condensate drain hose
1.2 Description of control panel (B)
B1. ON/STAND-BY button
B2. Mode button
B3. Dimming button
B4. Ioniser button
B5. Delay shutdown button
B6. Deflector swing button
1.3 Display (C)
C1. Mode indicators
C2. Humidity indicator
C3. Delay shutdown (1~12 hours) + dimming level
C4. Ioniser indicator (ON)
C5. Swing indicators
C6. Alarm (blinks when the unit is malfunction)
C7. Water full/absent (blinks when the tank is full or not in place)
C8. Timer indicator (ON)
C9. Dimmer indicator (ON)
Please note: Before plugging the appliance check the cap on
back of water tank is correctly inserted.
2. INSTALLATION
min. 20 cm
min. 20 cm
min. 60 cm
min. 20 cm
min. 50 cm
Position the appliance in the room to be dehumidified.
Please follow the minimum distances between the appliance
and furniture or walls, as stated in figure.
Failure to do so would obstruct ventilation, jeopardising correct
operation of the appliance.
When the appliance is functioning, you should keep all doors
and windows closed while the appliance is in operation.
If doors and windows are opened, the temperature and humidity
in the room may change and it could therefore require longer to
dehumidify the room.
With temperatures of less than 1°C or above 40°C,
dehumidification is automatically deactivated and the appliance
switches to fan only mode.
If the humidity is lower than 20%, the safety circuit triggers
automatically and the dehumidifier shuts down to avoid
damage.
If the humidity in the room drops, the dehumidification capacity
is automatically reduced.
Do not drop or tilt the appliance.
If the appliance falls over, place it upright immediately.
Even when the room is dehumidified, condensation and mould
may form externally or in poorly ventilated points, for example
behind furniture.
3. DRAINING THE CONDENSATE WATER
The condensate can be drained in 2 ways:
3.1
Draining into the tank
The condensate is drained directly into the tank (A7).
When the tank is full, the appliance stops and the display (C)
C7
shows the tank alarm
1. Extract the tank slowly using the designed grip, holding
C3
the appliance firmly (fig. 1) and empty it into a sink or a
bathtub.
C2
2. Position the handle of the tank vertically as shown (fig. 2)
for carrying to the pouring site.
3. Empty the tank by the opening (fig. 3) No need to remove
the lid unless for washing the tank.
C1
4. (Replace the lid and) lower the handle.
5. Put the tank back in the appliance.
When the empty tank is put back, the appliance starts
functioning according to the previous settings. The tank full icon
C5
goes off.
Please note:
•
Do not remove the float inside the tank. The float is required
to sense when tank is full.
•
Replace the lid correctly before returning the tank to the
appliance.
•
When you remove the tank, do not touch internal parts of
the dehumidifier. It could damage the appliance.
10
C6
C4
(C7). Proceed as follows:
Advertisement
Table of Contents

Related Manuals for DeLonghi DNS80


Summary of Contents for DeLonghi DNS80
- Page 1 Read the separate safety instructions before using the appliance Position the appliance in the room to be dehumidified. Please follow the minimum distances between the appliance 1. DESCRIPTION and furniture or walls, as stated in figure. 1.1 Description of appliance (A) Failure to do so would obstruct ventilation, jeopardising correct A1.
- Page 2 • Push the tank into place carefully. If it knocks against the (Auto will light on by default at the first run). walls or is incorrectly inserted, the appliance may not : Super dry mode to dry laundry. Use this function.
- Page 3 the multiplication of and destroy any bacteria or spores 4.5 Swing the air coming into contact with them 1. Touch the Swing button (B6) to set automatic 5.4 For long periods of downtime swing of the deflector, the icon (C5) will be displayed. •...
- Page 4 7. ALARMS ON THE DISPLAY ALARM CAUSE SOLUTION The tank (A6) is missing or incorrectly Put correctly the tank back in place (see par. “3.1 positioned Draining into the tank” The tank is full Empty the tank (see par. “3.1 Draining into the tank”) Contact Customer Care 8.
Need help?
Do you have a question about the DNS80 and is the answer not in the manual?
Questions and answers