Table of Contents
Advertisement
Quick Links
Item #: 766782
Rev Date: 2016-02-29
Installation and Operation Manual
Serenity
Series
™
Auto Sensing Everything
Bathroom Fan
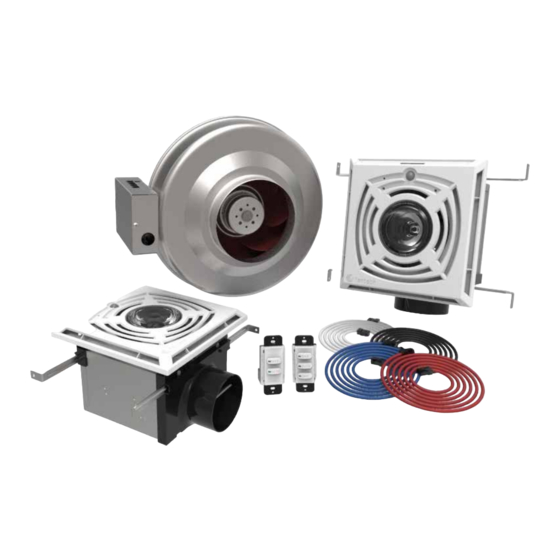
Serenity Solo Kit Includes:
(1) 4-inch Exhaust Fan
(2) 4-inch Pressure Collars
(1) Fan Mounting Bracket
(1) Recessed Luminaire (4-inch take off)
(1) 10W LED bulb
(4) Hanger Bars
(1) Grille Set (Back Plate, Grille, Vent Cap)
(1) Low Voltage Primary Wall Switch (Max,Auto, Off)
(1) 25 ft CAT5E cable (White)
(1) 50 ft CAT5E cable (Red)
(1) Hardware Pack (fan mounting)
(1) Hardware Pack (luminaire/grille mounting)
(1) Grille/ Back Plate Installation Templates
Serenity Duet Kit Includes:
(1) 6-inch Exhaust Fan
(2) 6-inch Pressure Collars
(1) Fan Mounting Bracket
(1) Wye (6x4x4)
(2) Recessed Luminaire (4-inch take off)
(2) 10W LED bulb
Serenity Duet shown
(8) Hanger Bars
(2) Grille Set (Back Plate, Grille, Vent Cap)
(1) Low Voltage Primary Wall Switch (Max,Auto, Off)
(1) Low Voltage Secondary Wall Switch (Max,Auto)
(1) 25 ft CAT5E cable (White)
(1) 50 ft CAT5E cable (Red)
(1) 25 ft CAT5E cable (Blue)
(1) 50 ft CAT5E cable (Black)
(1) Hardware Pack (fan mounting)
(2) Hardware Pack (luminaire/grille mounting)
(2) Grille/ Back Plate Installation Templates
Technical / Customer Support:
United States Tel.: 800.747.1762
Canada Tel.: 800.565.3548
Advertisement
Table of Contents

Related Manuals for Fantech Serenity Series


Summary of Contents for Fantech Serenity Series
- Page 1 Item #: 766782 Rev Date: 2016-02-29 Installation and Operation Manual Serenity Series ™ Auto Sensing Everything Bathroom Fan Serenity Solo Kit Includes: (1) 4-inch Exhaust Fan (2) 4-inch Pressure Collars (1) Fan Mounting Bracket (1) Recessed Luminaire (4-inch take off) (1) 10W LED bulb (4) Hanger Bars (1) Grille Set (Back Plate, Grille, Vent Cap)
-
Page 2: Motion Detection
3. Remove unit from package and inspect within 15 days after receipt. If damaged, report damage to carrier. Do Not 6. Use only Fantech LED bulb (model PBB10-ES, 10W operate this unit with visible damage to the blower or max) -
Page 3: Performance Specification
Dimensions Performance Specification The performance charts below indicate the Proper duct design and installation is important maximum delivered airflow with the supplied for achieving adequate airflow performance. grilles and fittings in place. Chart 1: Serenity Solo Performance 4100 rpm 3200 rpm 2400 rpm 1600 rpm 775 rpm... -
Page 4: Basic Installation Rules
Installation Installation (cont.) Basic Installation Rules Grille Installation Grille Installation (cont.) 1. For sound attenuation, at least 4 feet of flex 1. Plan Location of Inlet Grilles 4. Secure Back Plate to Ceiling duct is recommended between grille and fan. Based on the bathroom layout and fixtures, plan the location of the ceiling grille(s) for the most With the ceiling or dry wall in place, determine the proper orientation of the back plate effective ventilation. -
Page 5: Fan Installation
Installation (cont.) Installation (cont.) Duct Installation Fan Installation 1. Attach the inner liner of the flex duct to the Grille Housing Collar and seal the connection with 1. Before installing the fan, it is important to tape or mastic per ADC standards. review page 6, Basic Installation Rules. -
Page 6: System Configuration
Setup Commissioning System Configuration Commissioning mode maps out the system performance and provides a maximum airflow the system can achieve. System configuration is where altitude correction is performed and The primary grille has control over both Altitude settings and continuous It is important that the installation is fully completed prior to entering commissioning mode as this affects system where the operating modes are selected. -
Page 7: Operation
Wall Switch Action Wall Switch Action Button Indicator Flexibility is built into the Serenity Series so that each installation could • Turn System Off (Press & Hold 4 Seconds) Solid be fine-tuned to satisfy individual needs. Each mode described in the Custom Configuration section has the ability to be adjusted if desired. - Page 8 Notes Notes...
- Page 9 Fantech reserves the right to make technical changes. For updated documentation please refer to www.fantech.net Fantech®...
Need help?
Do you have a question about the Serenity Series and is the answer not in the manual?
Questions and answers