Table of Contents
Advertisement
Quick Links
Advertisement
Table of Contents

Related Manuals for OWC Mercury Accelsior Pro Q


Summary of Contents for OWC Mercury Accelsior Pro Q
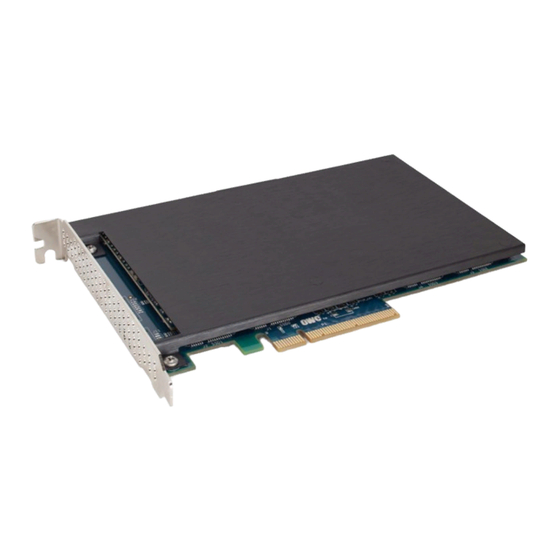
- Page 1 M E R C U R Y A C C E L S I O R P R O Installation Guide...
-
Page 2: Table Of Contents
2.1 Installation: Mac Pro 2009–2012 2.2 Installation: Mac Pro 2008 2.3 Installation: PC Logic Board (ATX) Support Resources ................3.1 Driver information 3.2 Formatting 3.3 Troubleshooting 3.4 About Data Backup 3.5 Contacting Technical Support OWC Mercury Accelsior Pro Q Table of Contents... -
Page 3: Introduction
Functions and features may change depending on the firmware version. The latest product details and warranty information can be found on the product web page. OWC’s Limited Warranty is not transferable and subject to limitations. OWC Mercury Accelsior Pro Q... -
Page 4: Device Setup
Once removed you should see a view of the Mac Pro similar to the one below. 2. To create more room, remove the two drive trays on the left. If you find it difficult to access the items required in subsequent steps, remove the remaining two trays. OWC Mercury Accelsior Pro Q Device Setup... - Page 5 GPU. The appearance of your GPU may vary. 5. Loosen the two thumbscrews on the PCIe slot cover plate at the back of the Mac Pro, then remove the plate. You may need to use a short Phillips screwdriver. OWC Mercury Accelsior Pro Q Device Setup...
- Page 6 8. Pull the entire fan assembly straight out. If it catches on the cut-outs (shown below-right) you may have to tilt it or lift upward slightly as you pull. OWC Mercury Accelsior Pro Q Device Setup...
- Page 7 11. Connect the male 4-pin connector on the power splitter cable to the power port on the logic board (shown in Step 9). Make sure the clip on the cable is oriented so that is rests on the top side of the power port. It should snap into place. OWC Mercury Accelsior Pro Q Device Setup...
- Page 8 GPU, make sure the outer part of the fan assembly that you slid to the left in Step 3, is still to the left so that you can slide the rear portion of the GPU into the case first. OWC Mercury Accelsior Pro Q Device Setup...
- Page 9 18. Reseat all drive trays that were removed during the installation. Then re-seat the side cover on the Mac Pro and secure it using the latch on the back of the computer. The installation process is now complete. Proceed to Section 3.1 —Driver Information OWC Mercury Accelsior Pro Q Device Setup...
-
Page 10: Installation: Mac Pro 2008
3. Loosen the two thumbscrews on the PCIe slot cover plate , then remove the plate. You may need to use a short Phillips screwdriver. OWC Mercury Accelsior Pro Q Device Setup... - Page 11 6. Remove the CPU heat sink cover. It is attached with magnets; you may need to lift up from the edge closest to the logic board first, then carefully wiggle the cover until it comes loose, at which point you can pull it out towards you to remove it. OWC Mercury Accelsior Pro Q Device Setup...
- Page 12 9. Place your hand on the upper-left inside region of the fan assembly and gently pull it towards you. You may need to jiggle the assembly slightly for it to come loose. OWC Mercury Accelsior Pro Q Device Setup...
- Page 13 12. Plug the other connector on the included cable into the logic board’s power port referenced in Step 10. Note here that the clip should be oriented toward the bottom of the power port, so that it slides over the triangular latch and snaps into place. OWC Mercury Accelsior Pro Q Device Setup...
- Page 14 RAM riser card, in order to get a better angle with the screwdriver. The riser looks like a blue plate with two circles cut out on the corners. OWC Mercury Accelsior Pro Q Device Setup...
- Page 15 18. Remove the rear slot cover that corresponds to the open 16x PCIe slot, then carefully install the Accelsior Pro Q into that slot. Note: this SSD should also work in one of the other available PCIe slots, but at substantially reduced speeds. OWC Mercury Accelsior Pro Q Device Setup...
- Page 16 21. Reseat all drive trays that were removed during the installation. Then, re-seat the side cover on the Mac Pro and secure it using the latch on the back of the computer. The installation process is now complete. Proceed to Section 3.1 —Driver Information OWC Mercury Accelsior Pro Q Device Setup...
-
Page 17: Installation: Pc Logic Board (Atx)
1. Remove the PC case. Locate an available PCIe 2.0 or PCIe 3.0 slot marked ‘x8’ or ‘x16’. 2. Align the Mercury Accelsior Pro Q to the notches on the PCIe slot as shown below, then gently press the Accelsior Pro Q downward until it snaps into place. -
Page 18: Support Resources
SUPPORT RESOURCES 3.1 Driver Information In order to use the Mercury Accelsior Pro Q as designed, you need to first install a driver for your computer. A PC should detect the Accelsior Pro Q automatically and suggest the correct driver for download. If you installed this device in a Mac Pro, please visit the URL below to download and install your driver, before formatting and using the drive (see Section 3.2). -
Page 19: Contacting Technical Support
3.5 Contacting Technical Support Phone: M–F, 8am–5pm CST (866) 692-7100 (N. America) | +1 (815) 338-4751 (Int’l) Chat: M–F, 8am–8pm CST www.owcdigital.com/support Email: Answered within 48 hours www.owcdigital.com/support OWC Mercury Accelsior Pro Q Support Resources... - Page 20 The material in this document is for information purposes only and subject to change without notice. While reasonable efforts have been made in the preparation of this document to assure its accuracy, OWC, its parent, affiliates, officers, employees, and agents assume no liability resulting from errors or omissions in this document, or from the use of the information contained herein.
Need help?
Do you have a question about the Mercury Accelsior Pro Q and is the answer not in the manual?
Questions and answers