Table of Contents
Advertisement
Quick Links
©2010 GrowSpan™
All Rights Reserved. Reproduction
is prohibited without permission.
Revision date: 01.12.10
GrowSpan™
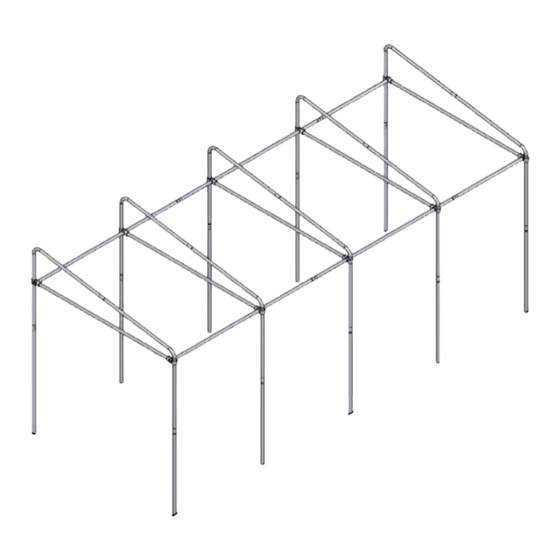
Lean-To Cold Frame
Photo may show a different but similar model.
CANOPY-TOP COLD FRAMES
STK#
DIMENSIONS
104176
12' W x 10' L
104177
12' W x 20' L
104178
12' W x 30' L
104179
12' W x 40' L
104180
12' W x 50' L
104181
12' W x 60' L
1
Advertisement
Table of Contents

Related Manuals for GrowSpan 104176


Summary of Contents for GrowSpan 104176
- Page 1 CANOPY-TOP COLD FRAMES GrowSpan™ Lean-To Cold Frame Photo may show a different but similar model. STK# DIMENSIONS 104176 12' W x 10' L 104177 12' W x 20' L 104178 12' W x 30' L 104179 12' W x 40' L...
-
Page 2: Safety Precautions
BEGIN TO ASSEMBLE THE SHELTER. • Location should be away from structures that could Thank you for purchasing this GrowSpan™ Cold Frame. cause snow to drift on or around the building. When properly assembled and maintained, this product will •... -
Page 3: Assembly Procedure
These words and phrases are common to most joints and to fasten brackets to rafters. GrowSpan™ shelters and identify the different parts of the shelter. (Some are used in this document. Others may not apply to this particular shelter.) These terms describe the shipped parts and can also be found on the materials list/spec sheets included with the shipment. -
Page 4: Required Tools
CANOPY-TOP COLD FRAMES REQUIRED TOOLS The following list identifies the main tools needed to assemble the shelter. Additional tools and supports may be Space below is reserved for customer notes. needed depending on the structure, location, and application. • Tape measure or measuring device •... - Page 5 CANOPY-TOP COLD FRAMES The following graphics and photos will help you identify the different parts. (Some parts are not shown.) FA4482B 100441 Nut Setter Tek Screw 08LT1601 08LT1602 Rafter Pipe Rafter Pipe Plain Swaged 10016107 Swaged and Plain Rafter Sections Combo Socket Tee Revision date: 01.12.10...
- Page 6 CANOPY-TOP COLD FRAMES GrowSpan™ Lean-To Cold Frame OVERVIEW This section describes assembling your Lean-To Cold Frame. For details, please see section, Assembling the Cold Frame Components. See illustration below to identify main parts of the cold frame. 1. Locate the required parts for each assembly procedure.
- Page 7 CANOPY-TOP COLD FRAMES LAY OUT THE BUILDING SITE NOTE: Setting customer-supplied baseboards on the site in the correct positions is another way to prepare for the After the site is prepared, identify the location of the shelter frame assembly. corners to help square the frame after it is assembled. NOTE: If a baseboard Rod or Ground Taking these steps before assembling the shelter saves...
-
Page 8: Rafter Assembly
CANOPY-TOP COLD FRAMES ASSEMBLE THE COLD FRAME COMPONENTS 4. Position the combo socket tees and top cross rail so the center of the top cross rail is 7'-6'' above the end of NOTE: Assistance is required to assemble the cold frame. the rafter leg. -
Page 9: Frame Assembly
CANOPY-TOP COLD FRAMES FRAME ASSEMBLY 4. Locate the pipes required for a purlin. Refer to the Side Profile drawings in the Quick Start Guide at the back of Assemble the frame. the instructions for the correct pipes. Gather the parts: 5. - Page 10 If the shelter is moved, inspect all parts and connections before reassembling. • For replacement or missing parts, call 1-800-245-9881 for assistance. NOTE: With the exception of Truss Arch buildings, GrowSpan™ shelters and greenhouses do not have any tested loading criteria. Revision date: 01.12.10...
- Page 11 CANOPY-TOP COLD FRAMES 9'-10 9/16" Height 8'-1 1/8" QUICK START GUIDE 7'-6" Height 12' Wide Lean-to Cold Frame To Chord 12'-0" Width FRONT Grid Represents 12" Squares Frame shown may differ in length from actual frame. Revision date: 01.12.10...
- Page 12 CANOPY-TOP COLD FRAMES Revision date: 01.12.10...
- Page 13 CANOPY-TOP COLD FRAMES Revision date: 01.12.10...
- Page 14 CANOPY-TOP COLD FRAMES Revision date: 01.12.10...
- Page 15 CANOPY-TOP COLD FRAMES Revision date: 01.12.10...
- Page 16 CANOPY-TOP COLD FRAMES Revision date: 01.12.10...
- Page 17 CANOPY-TOP COLD FRAMES Revision date: 01.12.10...
- Page 18 CANOPY-TOP COLD FRAMES Revision date: 01.12.10...
- Page 19 CANOPY-TOP COLD FRAMES Revision date: 01.12.10...
Need help?
Do you have a question about the 104176 and is the answer not in the manual?
Questions and answers