Ambu aView Instructions For Use Manual
Hide thumbs
Also See for aView:
- Instructions for use manual (268 pages) ,
- User manual (16 pages) ,
- Instructions for use manual (33 pages)
Table of Contents

Related Manuals for Ambu aView


Summary of Contents for Ambu aView
- Page 1 Instruction for Use Ambu® aView™ For use by trained clinicians/physicians only. For in-hospital use. For use with Ambu® visualization devices. Further instruction details are available online: www.ambu.com...
- Page 2 3 aScope 2 aScope 4 Broncho Pat. Pending Ambu is a registered trademark and aScope and aView are trademarks of Ambu A/S.
- Page 3 Contents Page English (Instruction for Use) .........................4-17 Български (Указания за ползване) ...................... 18-33 Česky (Návod k použití) ..........................34-47 Dansk (Brugsanvisning) ..........................48-61 Deutsch (Bedienungsanleitung) ......................62-75 Eλληvıĸά (δηγίες Xρήσεως) ........................76-91 Español (Manual de instrucciones) ...................... 92-105 Eesti (Kasutusjuhised) ..........................106-118 Suomi (Käyttöohje) ........................... 119-132 Français (Mode d´emploi) ........................133-146 Hrvatski (Upute za uporabu) ........................
-
Page 4: Intended Use
Do not use the aView monitor if it is damaged in any way or if any part of the functional check fails. -
Page 5: System Description
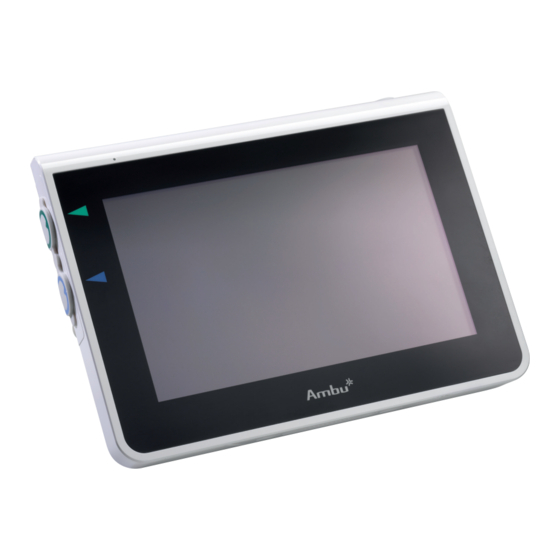
- Ambu® aScope™ 4 Broncho Family Only one visualization device can be connected to aView at a time. aScope 2, aScope 3 Family and aScope 4 Broncho Family are not available in all countries. Please contact your local sales office. - Page 6 2.3. aView Parts Part Function Material Monitor Casing PC / ABS Rubber Touch Screen Displays the image PET / Glass from the Ambu visualization device and a touch screen interface. Stand To place the display ZDC3 on a solid surface.
-
Page 7: Explanation Of Symbols Used
(WEEE). Battery type Lithium ion. Direct current. Li-ion Only applicable for the battery inside the aView. Re-chargeable battery. Alternating current. Only applicable for the battery inside the aView. Protection against IP30 Only for indoor use. - Page 8 Closely examine aView and all parts for any damage (free from wear and tear) 1 . Place aView on a solid flat surface by using the stand on the back of aView 2a . If needed, aView can be placed on a pole by using the supplied bracket 2b .
- Page 9 Battery status: During start up, aView powers up and configures the visualization device. If the aView battery icon on the screen changes from fully charged to low battery (red battery) within 30 minutes, aView must be replaced.
-
Page 10: After Use
If the battery level of aView is low, charge the aView (cf. section 4.1). 5. Cleaning and Disinfection of aView The aView should be cleaned and disinfected before and after each use. It is recommended that aView is cleaned and disinfected before and after use following the instructions below. Ambu has validated these instructions in accordance with AAMI TIR 12 &... - Page 11 The battery should be charged at temperatures between 10 - 40°C. 6.2. Disposal At the end of product life open up the aView and dispose of the batteries and aView separately in accordance with local guidelines. 7. Technical Product Specifications 7.1.
- Page 12 18V 1.67A DC input Battery type 10.8V 4300mAh Typical battery runtime of a new, fully charged battery Battery Operation (aView turned on and scope connected) is min. 3 hours Protection against electrical shock Internally Powered Fixture Mounting interface 75 mm (2.96”) Fits poles with thicknesses 10 mm ~ 45 mm (0.4 ~ 1.8”)
- Page 13 7.3. aView Power Supply Dimensions Weight 360g (0.79 lbs) Electrical power Power requirement 100 - 240V AC; 50-60Hz; 0.6A Power out 18V DC; 1.67A Protection against Class I electrical shock Operating environment Temperature 10 ~ 40° C (50 ~ 104° F)
-
Page 14: Troubleshooting
8. Trouble Shooting If problems occur with the aView monitor, please use this trouble-shooting guide to identify the cause and correct the error. Problem Possible cause Recommended action No live image An Ambu visualization Connect an Ambu visualization device to... - Page 15 Guidance and manufacturer’s declaration – electromagnetic immunity The system is intended for use in the electromagnetic environment specified below. The customer or the user of the system should assure that it is used in such an environment. Emissions Test Compliance Electromagnetic Environment Guidance RF emission CISPR 11 Group 1...
- Page 16 Power frequency 30 A/m 30 A/m Power frequency (50/60 Hz) magnetic fields magnetic field should be at levels IEC 61000-4-8 characteristic of a typical location in a typical commercial or hospital environment. Guidance and manufacturer’s declaration – electromagnetic immunity The system is intended for use in the electromagnetic environment specified below. The customer or the user of the system should assure that it is used in such an environment.
-
Page 17: Appendix 2. Warranty And Replacement Program
The warranty period for the aView is one year from delivery to the customer. Ambu agrees to replace an aView free of charge if proof can be provided of faulty materials or faulty workmanship. In doing so Ambu cannot accept the cost of transportation or risk of shipment. -
Page 18: Warnhinweise Und Vorsichtsmaßnahmen
Live-Bild auf dem aView-Monitor. Um einen Stromschlag zu vermeiden, muss das Gerät an ein Stromnetz mit Schutzlei- ter angeschlossen sein. Um den aView Monitor vom Stromnetz zu trennen, ziehen Sie den Netzstecker aus der Steckdose. Reinigen und desinfizieren Sie den aView-Monitor nach jeder Verwendung gemäß... -
Page 19: Kompatible Geräte
- Ambu® aScope™ 4 Broncho Familie Es kann jeweils nur ein Visualisierungsgerät an den aView angeschlossen werden. aScope 2, aScope 3 Familie und aScope 4 Broncho Familie sind nicht in allen Ländern erhältlich. Bitte wenden Sie sich an Ihr Vertriebsbüro vor Ort. - Page 20 Anschluss für Stromversorgung PC/ABS Ambu®-Visualisie- und Datenverbindung Gummi rungsgeräte Geschützt durch eine Gummiabdeckung. Stromeingang Stromanschluss zum Laden des aView. Gummi Geschützt durch eine Gummiabdeckung. Eingangs-/Ausgangs- Anschlussstecker (Videoaus- anschlüsse gang) und USB-Anschluss. Ein-/Aus-Taste Vor dem Verfahren Gummi einschalten und nach dem Verfahren ausschalten.
-
Page 21: Erklärung Der Verwendeten Symbole
Abfällen entsorgt werden müs- sen (Elektro- und Elekt- ronik-Altgeräte). Lithium-Ionen-Akku. Gleichstrom. Li-ion Gilt nur für den Akku im Inneren des aView. Akku. Gilt nur für Wechselstrom. den Akku im Inneren des aView. Schutz vor Nur zur Verwendung IP30 festen Gegenständen. - Page 22 Den aView und alle Teile auf Schäden überprüfen (frei von Verschleißerscheinungen) 1 . Den aView mit dem auf der Rückseite vorhandenen Ständer auf eine ebene Oberfläche stellen 2a . Bei Bedarf kann der aView auch mit der beiliegenden Halterung auf einer Stange aufgehängt werden 2b .
- Page 23 Vergewissern Sie sich, dass das Live-Bild auf dem Bildschirm angezeigt wird. Zeigen Sie mit dem distalen Ende des Ambu-Visualisierungsgeräts auf ein Objekt, z. B. auf Ihre Handfläche 6 . Passen Sie ggf. die Bildeinstellungen auf dem aView an (siehe Online-aView-Bedienungs- anleitung auf www.ambu.de).
- Page 24 Falls der Akkuladezustand des aView schwach ist, laden Sie den aView auf (siehe Abschnitt 4.1). 5. Reinigung und Desinfektion des aView Der aView muss vor der ersten Verwendung sowie direkt nach und vor jeder weiteren Verwen- dung gereinigt und desinfiziert werden. Der aView sollte vor und nach der Anwendung gemäß...
-
Page 25: Technische Daten
Wiederholen Sie die Schritte 1 bis 6. Desinfektion Wischen Sie die Oberfläche des aView mit einem Stück steriler Gaze (die ca. alle 2 Minuten mit der unten beschriebenen Alkoholmischung befeuchtet wird) über einen Zeitraum von etwa 15 Minuten ab. Befolgen Sie die Sicherheitsvorkehrungen für den Umgang mit Isopro- pyl. - Page 26 Stromversorgung Eingangsspannung 18 V, 1,67 A Gleichstrom Akkutyp 10,8 V 4300 mAh Die normale Akku-Laufzeit eines neuen vollständig gela- Akku-Betrieb denen Akkus (aView eingeschaltet und Endoskop ange- schlossen) beträgt mindestens 3 Stunden. Schutz vor Stromschlägen Interne Stromversorgung Befestigung Verbindungsstelle 75 mm Passend zu Stangen mit einer 10 mm ~ 45 mm Stärke von...
-
Page 27: Fehlerbehebung
Dänische Konfiguration: 2-5a, Netzstecker geerdet Konfiguration für die Schweiz: Typ J, Netzstecker geerdet Weitere Informationen erhalten Sie von Ambu. 8. Fehlerbehebung Falls Probleme mit dem aView-Monitor auftreten, versuchen Sie mithilfe dieser Anleitung die Ursache festzustellen und den Fehler zu beheben. Problem Mögliche Ursache Empfohlene Maßnahme... -
Page 28: Anhang 1. Elektromagnetische Kompatibilität
Ergebnisse erreichen Sie, indem Sie im Video-Ausgangsmenü auf dem aView zwischen NTSC und PAL wechseln. Der externe Monitor zeigt nur ein Live-Bild an, wenn der aView ein Live-Bild anzeigt. Die Bildgröße auf dem exter- nen Monitor wird in den Einstellungen des externen Monitors festgelegt. - Page 29 Empfehlungen und Herstellererklärung – elektromagnetische Störfestigkeit Das System ist für die Verwendung in den im Folgenden genannten elektromagnetischen Umgebungen vorgesehen. Der Kunde oder Anwender des Systems muss sicherstellen, dass es in einer solchen Umgebung verwendet wird. Immunitätstest IEC 60601-1 Konformitäts- Empfehlung zur elektro- Testebene ebene...
- Page 30 Empfehlungen und Herstellererklärung – elektromagnetische Störfestigkeit Das System ist für die Verwendung in den im Folgenden genannten elektromagnetischen Umgebungen vorgesehen. Der Kunde oder Anwender des Systems muss sicherstellen, dass es in einer solchen Umgebung verwendet wird. Störfestigkeits- IEC 60601 Konformi- Empfehlung zur elektromagne- prüfung Testebene...
- Page 31 Personen beeinflusst. Anhang 2. Garantie und Umtausch Für den aView gilt eine Garantiezeit von einem Jahr ab Lieferung an den Kunden. Ambu tauscht einen aView kostenfrei um, sofern nachgewiesen werden kann, dass Material- oder Herstellungsfehler vorliegen. Dabei kann Ambu weder die Versandkosten noch das Versandri- siko tragen.
-
Page 32: Utilisation Prévue
Les médecins doivent interpréter et étayer tout résultat par d’autres moyens, en fonction des données cliniques du patient. Ne pas se servir du moniteur aView s’il est détérioré ou en cas d’échec de l’un des points du test fonctionnel. -
Page 33: Description Du Système
Positionner le cordon d’alimentation de telle sorte que personne ne risque de mar- cher dessus. Ne rien placer sur le cordon d’alimentation. L’aView ne peut pas être réparé. En cas de défaut, l’aView doit être mis au rebut. Les batteries de l’aView ne peuvent pas être remplacées et ne doivent être ôtées qu’en cas de mise au rebut. - Page 34 - Gamme Ambu® aScope™ 4 Broncho L’aView peut être raccordé à un seul dispositif de visualisation à la fois. aScope 2, la gamme aScope 3 et la gamme aScope 4 Broncho ne sont pas disponibles dans tous les pays. Veuillez contacter votre représentant local.
-
Page 35: Explication Des Symboles Utilisés
Raccord au mentation locale et aux sys- moniteur externe. tèmes de collecte pour l’élimi- nation des déchets d’équipe- ments électriques et électro- niques (DEEE). Type de batterie : Li-ion. Courant continu. Li-ion Concerne uniquement la batte- rie à l’intérieur de l’aView. - Page 36 (aucune usure) 1 . Placer l’aView sur une surface plane solide à l’aide du socle situé à l’arrière de l’aView 2a . Si nécessaire, l’aView peut être installé sur une tige à l’aide de la console fournie 2b .
- Page 37 Si la batterie est trop faible, les fonctions d’enregistrement seront indisponibles. Si l’aView est éteint et que la batterie est trop faible, le bouton marche/arrêt clignote en orange cinq fois toutes les dix secondes pour vous rappeler que le dispositif a besoin d’être chargé.
-
Page 38: Après Utilisation
Connecter le moniteur externe à l’interface composite sur le côté droit de l’aView à l’aide du câble adaptateur fourni (se référer au mode d’emploi de l’aView en ligne sur www.ambu.com). Consulter le manuel du moniteur externe pour obtenir plus d’informations sur le raccordement d’une source vidéo externe par voie composite. - Page 39 à usage hospitalier classées EPA contenant au moins 70 % d’isopropyle. Se conformer aux précautions de sécurité et au mode d’emploi du fabricant). Au terme du nettoyage et de la désinfection, l’aView doit faire l’objet d’un contrôle préalable conformément à la procédure décrite à la section 4.1.
- Page 40 6.2. Élimination En fin de vie du produit, ouvrir l’aView et éliminer les batteries et l’aView séparément confor- mément aux directives locales. 7. Caractéristiques techniques 7.1. Normes appliquées Le fonctionnement de l’aView est conforme aux textes réglementaires suivants : – Directive européenne 93/42/CEE relative aux dispositifs médicaux.
-
Page 41: Alimentation Électrique
CA avec terre 4. Configuration européenne : CEE 7, prise d’alimentation CA avec terre 5. Configuration danoise : 2-5a, prise d’alimentation CA avec terre 6. Configuration suisse : prise d’alimentation CA avec terre de type J. Contacter Ambu pour en savoir plus. -
Page 42: Dépannage
8. Dépannage En cas de problème lié au moniteur aView, consulter ce guide de dépannage pour identifier la cause et y remédier. Problème Cause possible Action préconisée Aucune Aucun dispositif de visuali- Connecter un dispositif de visualisation image en sation Ambu n’est connecté... - Page 43 Conseils et déclaration du fabricant : immunité électromagnétique Le dispositif est destiné à une utilisation dans l’environnement électromagnétique indiqué ci-dessous. Le client ou l’utilisateur du dispositif doit s’assurer qu’il est utilisé dans un tel environnement. Test d’émissions Conformité Conseils sur l’environnement électroma- gnétique Émissions RF CISPR 11 Groupe 1...
- Page 44 Champ 30 A/m 30 A/m Les champs magnétiques magnétique à la fréquence du réseau à la fréquence doivent être à des du réseau niveaux caractéristiques (50/60 Hz) d’un environnement com- CEI 61000-4-8 mercial ou hospitalier typique. Conseils et déclaration du fabricant : immunité électromagnétique Le dispositif est destiné...
- Page 45 Annexe 2 : Garantie et programme de remplacement La période de garantie de l’aView est d’un an à compter de la livraison au client. Ambu accepte de remplacer gratuitement un aView sous réserve d’un vice de fabrication ou d’un défaut matériel.
- Page 46 I medici devono interpretare e giustificare eventuali conclusioni con altri mezzi e alla luce delle caratteristiche cliniche del paziente. Non usare il monitor aView in presenza di danni di qualsiasi genere o se il test funzio- nale non viene superato anche solo in parte.
-
Page 47: Descrizione Del Sistema
Prestare attenzione all’indicatore con il simbolo della batteria visualizzato sul monitor aView. Ricaricare aView quando la capacità della batteria è in esaurimento (vedere la sezione 6.1). Si raccomanda di ricaricare aView prima di ogni procedura e di tenere un caricabatteria a portata di mano durante l’uso. -
Page 48: Dispositivi Compatibili
– Linea Ambu® aScope™ 4 Broncho Al monitor aView è possibile collegare solo un unico dispositivo di visualizzazione alla volta. Le linee aScope 2, aScope 3 e aScope 4 Broncho non sono disponibili in tutti i Paesi. Contattare il proprio Ufficio vendite locale. - Page 49 (RAEE). Tipo di batteria: agli ioni Corrente continua. Ioni di litio di litio. Applicabile solo alla batteria all’interno di aView.
- Page 50 (non devono essere presenti tracce di usura) 1 . Posizionare aView su una superficie piana e solida utilizzando il supporto sul retro di aView 2a . Se necessario, aView può essere posizionato su un’asta con il supporto in dotazione 2b .
- Page 51 Collegare il dispositivo di visualizzazione selezionato Ambu ad aView inserendo il connetto- re del cavo nel rispettivo connettore femmina presente su aView (mettere da parte il coper- chio di gomma) 5a o 5b . Allineare le frecce sul dispositivo di visualizzazione e aView prima dell’inserimento.
- Page 52 Se la batteria di aView è scarica, caricare aView (vedere la sezione 4.1). 5. Pulizia e disinfezione di aView Pulire e disinfettare aView prima e dopo ogni utilizzo. Si consiglia di pulire e disinfettare aView prima e dopo ogni utilizzo attenendosi alle istruzioni riportate di seguito. Ambu ha convalidato queste istruzioni in conformità...
- Page 53 Prestare parti- colare attenzione al pulsante, alle coperture di gomma, allo schermo, alla struttura esterna e al supporto, alle scanalature e agli interstizi di aView. Per pulire questi punti servirsi di un tampone di cotone.
- Page 54 6.2. Smaltimento Al termine del ciclo di vita del prodotto, aprire aView e smaltire le batterie e aView in base alle regolamentazioni vigenti in loco. 7. Specifiche tecniche del prodotto 7.1. Norme applicabili Il funzionamento di aView è conforme alle direttive indicate di seguito.
- Page 55 La durata tipica di una batteria nuova, completamen- Funzionamento della batteria te carica (aView acceso e aScope connesso) è minimo 3 ore Protezione contro le Alimentazione interna scosse elettriche Fissaggio Interfaccia di montaggio 75 mm Compatibile con aste dello spes- 10-45 mm (0.4-1.8”)
-
Page 56: Risoluzione Dei Problemi
CA con collegamento a terra Tipo J Per maggiori informazioni, contattare Ambu. 8. Risoluzione dei problemi In caso di problemi con il monitor aView, servirsi delle presenti istruzioni per la risoluzione che consentono di identificare le cause e di correggere l’errore. Problema... -
Page 57: Appendice 1. Compatibilità Elettromagnetica
Il monitor esterno deve essere in grado di ricevere NTSC o PAL. Per migliori risultati alternare NTSC e PAL nel menu uscita video su aView. Il monitor esterno visualizza solo l’immagine dal vivo quando aView visualizza l’immagi- ne live. - Page 58 Raccomandazioni e dichiarazione del produttore – immunità elettromagnetica Il sistema è destinato all’uso nell’ambiente elettromagnetico specificato di seguito. Il cliente o l’utente del sistema deve garantire che venga usato in tale ambiente. Test di immunità Livello di test IEC Livello di con- Raccomandazioni 60601-1 formità...
- Page 59 Raccomandazioni e dichiarazione del produttore – immunità elettromagnetica Il sistema è destinato all’uso nell’ambiente elettromagnetico specificato di seguito. Il cliente o l’utente del sistema deve garantire che venga usato in tale ambiente. Test di Livello di test Livello di Raccomandazioni ambiente immunità...
- Page 60 Appendice 2. Garanzia e sostituzione del prodotto Il periodo di garanzia di aView dura un anno dalla data di consegna al cliente. Se viene fornita la prova che il materiale è difettoso o che il dispositivo presenta difetti di fabbricazione, aView verrà...
- Page 61 Ambu A/S Baltorpbakken 13, DK-2750 Ballerup, Denmark +45 72 25 20 00 +45 72 25 20 50 www.ambu.com...
Need help?
Do you have a question about the aView and is the answer not in the manual?
Questions and answers