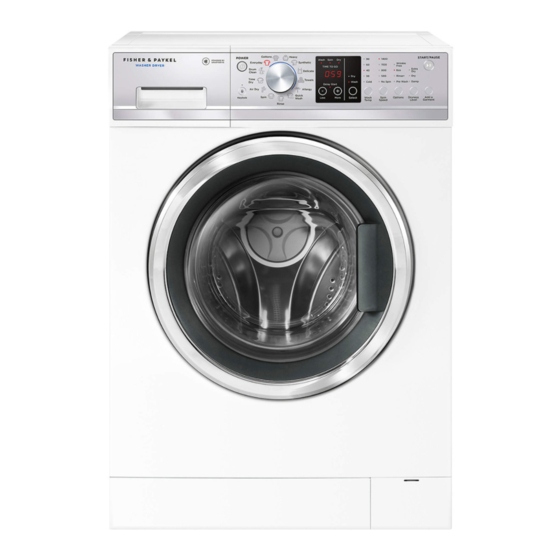
Fisher & Paykel WD7560P1 Installation Instructions Manual
Hide thumbs
Also See for WD7560P1:
- Installation instructions and user manual (60 pages) ,
- Installation leaflet (2 pages)
Table of Contents
Advertisement
Quick Links
Installation Instructions
Please read and follow the 'Safety and warnings' and 'Installation instructions' sections carefully before using
your washer dryer!
Accessories
Please check you received the following accessories with your Fisher & Paykel washer dryer. You will find them inside
the drum:
• 1 x Inlet hose
• 1 x Drain hose guide
• 1 x Installation instructions and user guide
• 1 x Spanner
• 1 x Installation leaflet (attached to the top of the washer)
• 1 x Hose clamp (WD8060P1 model only)
Unpacking
To ensure the best performance from your new washer dryer please follow the instructions below.
Removing The Packaging
1. Remove the outer packaging (including the polystyrene packer and plastic wrapping). All packaging must be
removed prior to use. Ensure these materials are kept out of reach of children.
https://producthelp.fisherpaykel.com/au/Wash/Front_Loaders/Washer_Dryer_Combo/WD8560F1/User_Guide_WD8560F1/03...
Updated: Sat, 15 Feb 2020 18:52:05 GMT
Powered by
1
Advertisement
Table of Contents

Subscribe to Our Youtube Channel
Related Manuals for Fisher & Paykel WD7560P1


Summary of Contents for Fisher & Paykel WD7560P1
-
Page 1: Installation Instructions
Installation Instructions Please read and follow the ‘Safety and warnings’ and ‘Installation instructions’ sections carefully before using your washer dryer! Accessories Please check you received the following accessories with your Fisher & Paykel washer dryer. You will find them inside the drum: •... -
Page 2: Removing The Transit Bolts
Asmall amount of water may be seen inside the packaging and inside the washer dryer. This is the result of factory testing and is normal. 2. Tilt the product backwards and ‘walk’ it off the base one foot at a time. Not doing so may cause damage to your floor and washer dryer. -
Page 3: Installation Location
Removing the transit safety bolts Installation Location • The washer dryer must be installed in a well-ventilated, dust-free environment. • The washer dryer must not be installed on any textured floor coverings (eg carpet, rugs) to ensure that openings at the base of the machine are not obstructed. •... - Page 4 TOP VIEW FRONT VIEW WD7560P1 WD8060P1 WD8560F1 Product Dimensions (mm) (mm) (mm) Overall height of product B Overall width of product C Overall depth of product (including dial and door when closed) D Depth with door open 1010 1010 1065 E Minimum door clearance to adjacent wall min.
-
Page 5: Levelling The Machine
WD7560P1 WD8060P1 WD8560F1 Product Dimensions (mm) (mm) (mm) Maximum Capacity Wash capacity Dry capacity The exact height of your washer dryer is dependent on how far the feet are extended from the base of the machine. The space where you install your washer dryer needs to be at least 40mm wider and 20mm deeper than its dimensions. -
Page 6: Connecting To The Water Supply
• back to front, • corner to corner. The machine is considered level when the bubble sits in the centre of the two lines when placed flat on top of the machine. 4. Using the spanner provided, tighten the lock nuts against the base of the machine to lock the feet in position. -
Page 7: Water Supply Requirements
further half-turn. Make sure there are no kinks in the hose. 2. Turn the tap on and check for leaks. Check for leaks again after 24 hours. The cold water temperature should not exceed 35°C. Water Supply Requirements: • Inlet water pressure: Maximum 1000kPa (150psi), Minimum 30kPa (4.5psi) •... -
Page 8: Electrical Connection
Fitting the drain hose guide • If the drain hose is placed on the ground or if the standpipe or tub is less than 800mm high, the machine will continuously drain while being filled (siphon). • Regularly check that your standpipe or tub is free from lint or other obstructions, which may... -
Page 9: Completing The Installation
2. Uncoil the power cord, remove and discard the plastic pin cover and plug into a wall socket. 3. Connect the appliance to an earthed outlet protected by a fuse of suitable capacity. • Check the power cord for damage and make sure it is not squashed or twisted when installing the washer. •... - Page 10 3. Touch the button. The machine will start to fill. • Observe the machine for any problems (eg leaking from the hose, excess noise or vibrations). • The washer will beep and display any faults on the screen if there are any problems. Refer to ‘Before you call for Service’...
Need help?
Do you have a question about the WD7560P1 and is the answer not in the manual?
Questions and answers