Table of Contents
Advertisement
Available languages
Available languages
Advertisement
Chapters
Table of Contents
Troubleshooting

Related Manuals for Dolphin WAVE


Summary of Contents for Dolphin WAVE
-
Page 2: Table Of Contents
Table of Contents SAFETY PRECAUTIONS ........................II GENERAL NOTES..........................II INTRODUCTION ............................1 DOLPHIN WAVE CADDY ASSEMBLY .....................1 ........................1 SSEMBLY INSTRUCTIONS FIRST POOL CLEANING SESSION ....................3 ....................3 TARTING THE IRST LEANING ESSION EVERYDAY OPERATION ........................5 ........................6 ANUAL ONTROL CUSTOMIZED SETTINGS........................7 MMI O ..........................7 PERATIONS ........................9... -
Page 3: Safety Precautions
The Dolphin Wave Robot Pool Cleaner should not be operated out of the pool at distance of more than 3 meters from pool's edge. Keep the Dolphin Wave Robot Pool Cleaner out of the reach of children. Only an original power cable must be used, at all times. Replaced by a Dolphin Wave Robot Pool Cleaner certified technician, in case of need. -
Page 4: Introduction
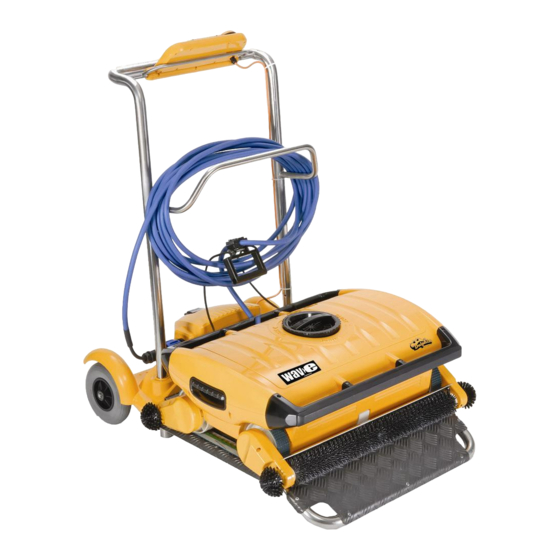
1. Attach the caddy handle to the caddy base and fasten with the screws and nuts provided. 2. Place the Dolphin Wave robot on the caddy in front of the power supply as shown in Figure 1. 3. Place the coiled Dolphin Wave's power cable on the caddy's cable support bracket and remove the binding sticker. - Page 5 Impeller cover MMI communications cable Wave Power supply Floating cable Connected to Wave Power supply Mail Power supply Cable Figure 1: The Dolphin Wave Disposable filter bags should be kept in a dark place - avoid exposure to direct sun light...
-
Page 6: First Pool Cleaning Session
1. Lift the MMI's protective cover. 2. Connect the Wave power supply to the main power supply line. 3. Switch on the power supply. The MMI Wave screen opens in the home window. 4. Position the caddy with robot about 0.5–1.0 meter from the pool edge... - Page 7 Pool Length Set Up back Figure 3: Pool Length Set Up 4. Using the arrows, , select the required pool length. Press Set. 5. The Align Robot to Pool Width screen displays. 6. Using the floating cable, move the robot so that it is parallel to the width of the pool with the cable behind it.
-
Page 8: Everyday Operation
Everyday Operation After you have set up the Dolphin Wave and configured it for the first time, the device is set for everyday operation. When performing your next cleaning session, proceed as follows: 1. Position the caddy about 0.5–1.0 meter from the pool edge with its front sloping edge facing the swimming pool and the floating cable pointing in the direction of the Dolphin Wave power supply unit. -
Page 9: Manual Stop Control
After 5 seconds the Manual Stop screen is displayed (Figure 6). Manual Stop Completed Time 01:20 Toal Hours Filter Bag Clean Exit Figure 6: Manual Stop screen 2. To stop the cleaning session completely, press Exit. The MMI display returns to the Wave screen. -
Page 10: Customized Settings
Press to return to the previous screen. Exit Press to return to the Wave screen. Defining the robot's parameters: 1. Switch on the power supply. The MMI Wave screen opens in the home window. 2. Press Menu to enter the Main Menu (Figure 7). - Page 11 Main Menu Pool Profile Filter Sate Clean Eror Report Statistics Select Exit Figure 7: Main Menu There are two Main Menu screens and you access the second screen by pressing the scroll down arrow, After "Statistics", scroll down to the second Main Menu screen (Figure 8). Main Menu Clock Setup Date Setup...
-
Page 12: Main Menu Parameters
The configured settings are stored in the MMI's memory. This section describes how to configure additional pool settings. To add a new pool configuration, proceed as follows: 1. Go to the Wave screen. "Pool A" is displayed as the currently defined setting as shown in Figure 9. - Page 13 Menu Start Pool A Figure 9: Wave screen showing Pool A as default setting 2. From the Wave screen, press Pool A. The Pool Profile screen opens (Figure 10). Select Pool Profile Pool A Pool B Pool C Pool D...
-
Page 14: Manual Procedure For Configuring Pool Profiles
Manual Procedure for Configuring Pool Profiles 1. From the Wave logo menu, press Menu. 2. From the Main Menu, with Pool Profile highlighted, press Select and then modify, to display the current active profile screen. 3. Press Select to enter the Pool Length Setup screen. - Page 15 13. Press Select to enter Delay Time. Setting a Delay Time allows you to delay the start of cleaning operations by a time factor selected from the MMI screen. To override the Delay Time instruction, from the Wave screen press Start.
-
Page 16: Starting Cleaning Operations
1. Prepare the Dolphin Wave for operation and immersion into the pool. 2. Proceed as in Everyday Operation, page 5. If a Delay Time has been set (see Configuring the Dolphin Wave, above), the countdown commences and the time remaining before automatic cleaning starts is displayed on the screen. -
Page 17: Operating Guidelines
1. Clean and replace filter as needed. When the MMI displays "Filter Bag Full", you should clean/replace the bag before the next operating cycle. It is not necessary to stop the Wave in the middle of the cycle when "Filter Full" indication appears. Clean the filter before the next cycle. -
Page 18: Remote Control Unit
5. Preventive Maintenance (PM): should be performed on the Wave robot pool cleaner, in order to keep it in good and long lasting working condition. MAYTRONICS provides the parts required – as a dedicated PM kit. - Page 19 2. Press the forward arrow briefly. The robot commences moving in a forward direction. To stop the forward movement, briefly press and release the forward arrow. 3. Press the backward arrow briefly. The robot commences moving in a backward direction. To stop the reverse movement, briefly press and release the backward arrow.
-
Page 20: Troubleshooting
Troubleshooting Error Message Check Action to Take Imp over load Is there dirt or other Unscrew the bolt that secures the protective foreign matter in the cover of the impeller. Turn it counter- impeller? clockwise slightly, until it is released. Remove any dirt around the impeller. - Page 21 Error Message Check Action to Take Robot is stuck on 1. Has the robot pool floor stopped on an obstacle? Move the robot from its position and remove the obstacle. Reactivate. 2. Is there an If this recurs, contact the Maytronics obstruction in the dealer/distributor.
- Page 24 Table de Matières PRÉCAUTIONS DE SÉCURITÉ......................II OBSERVATIONS GÉNÉRALES ......................II INTRODUCTION………………………………………………………………………………………1 ASSEMBLAGE DU BOÎTIER DU Dolphin Wave…………………………………………….…….1 INSTRUCTION D'ASSEMBLAGE…………………………………………….………………………………..1 PREMIERE SESSION DE NETTOYAGE ...................3 ................3 DEMARRAGE DE LA PREMIERE ESSION NETTOYAGE FONCTIONNEMENT QUOTIDIEN ....................5 ........................6 ONTRÔLE D’ARRÊT MANUEL RÉGLAGES PARTICULARISÉS ......................7 MMI ..........................7...
-
Page 25: Précautions De Sécurité
L’opérateur doit s’abstenir de s’approcher avec les mains au mécanisme de courroie d’entraînement Il est défendu de faire fonctionner le Robot Dolphin Wave nettoyeur piscines hors de la piscine à une distance de plus de 3 mètres du bord de la piscine. -
Page 26: Introduction
La console du MMI • Le robot Dolphin Wave et le câble flottant • Sacs filtre - 2 sacs à jeter assemblés dans le robot Wave, 2 sacs filtre permanents, 20 sacs à jeter additionnels • Une unité d'alimentation Instructions d’assemblage Voir Figure 1. - Page 27 à l’unité d'alimentation du Wave Câble d’alimentation électrique principale Figure 1: Le Dolphin Wave Les sacs filtre à jeter doivent être gardés à l’ombre – il faut éviter qu’ils soient exposés directement à la lumière du soleil. - 2 -...
-
Page 28: Demarrage De La Premiere Session Nettoyage
– télécommande Wave Figure 2: La console MMI du Dolphin Wave Pour démarrer une session nettoyage directement après avoir assemblé votre Dolphin Wave, agir de la manière suivante: 1. Soulever le couvercle protectif du MMI. 2. Brancher l’unité motrice du Wave à la source principale d’alimentation électrique. - Page 29 Détermination longueur piscine régl. arrier Figure 3: Détermination longueur piscine 4. Au moyen des flèches , sélectionner la longueur piscine requise. Appuyer sur Fix. 5. L’écran Aligner Robot à la largeur piscine apparaît. 6. Au moyen du câble flottant , déplacer le robot de manière qu’il soit parallèle à la largeur de la piscine avec le câble derrière lui.
-
Page 30: Fonctionnement Quotidien
Fonctionnement quotidien Après que les configurations du Dolphin Wave ont été fixées pour la première fois, l’appareil est prêt pour son utilisation quotidienne. Pour exécuter la session nettoyage suivante, agir de la manière suivante : 1. Placer le boîtier à une distance d’environs 0.5 - 1.0 mètre du bord de la piscine avec son bord antérieur en pente en face de la piscine et le câble flottant faisant face vers l’unité... -
Page 31: Contrôle D'arrêt Manuel
Après 5 secondes l’écran Arrêt manuel apparaît (Figure 6). Arrêt manuel Temp écoulé 01:20 Total heures Sac filtre Propre quitt Figure 6: L’écran Arrêt manuel 2. Pour arrêter complètement la session nettoyage, appuyer sur Sortie. L’affichage du MMI retourne à l’écran Wave. - 6 -... -
Page 32: Réglages Particularisés
Réglages particularisés Le robot Dolphin Wave est contrôlé depuis la console MMI. Vous pouvez particulariser les réglages du robot pour les adapter au modèle particulier de piscine à nettoyer. Il est possible d’établir quatre différentes configurations piscine et les sauvegarder dans la mémoire du MMI pour leur utilisation ultérieure. - Page 33 Main Menu Menu principal Pool Profile Profil piscine Propre État filtre Filter State Clean Rapport d’erreur Error Report Statistics Statistiques quitt Select sélectionner Figure 7: Menu principal Il y a deux écrans de Menu principal et vous accédez au deuxième écran en poussant sur la flèche de déroulement vers le bas, Après "Statistiques", déroulez vers le bas au deuxième écran du Menu principal (Figure 8).
-
Page 34: Parametres Du Menu Principal
Mode d’interface de langue. Comment configurer des profils piscine additionnels Comme il a été remarqué auparavant, il est possible de configurer le Dolphin Wave pour travailler dans quatre modèles de piscine différents. Les réglages configurés sont sauvegardés dans la mémoire du MMI. - Page 35 Session de nettoyage, dans la page 3. Pour aller à un réglage piscine défini auparavant : 1. Dès l’écran Wave, appuyer sur le réglage piscine couramment affiché au côté droit de l’écran (Voir Figure 9) pour ouvrir l’écran Profil piscine.
- Page 36 Méthode manuelle pour la configuration des Profils piscine 1. À partir du menu avec le logo Wave, appuyer sur Menu. 2. Du Menu principal, avec Profil piscine accentué, appuyer sur Sélect et puis modifier, pour visualiser l’écran du profil couramment actif.
- Page 37 La détermination du temps de délai vous permet de retarder le début des opérations de nettoyage pour une période de temps sélectionnée depuis l’écran du MMI. Pour outrepasser l’instruction Période de délai, depuis l’écran Wave appuyer sur Démarrer. - 12 -...
- Page 38 . (Longueur piscine, Durée du cycle, Mode Navigation, Période délai…) Pendant les opérations de réglage paramètres: Conseil • Appuyer sur arrier pour retourner à l’écran antérieur • Appuyer sur 'HOME' sur la console, pour retourner à l’écran Wave - 13 -...
-
Page 39: Demarrage Des Activites De Nettoyage
2. Agir d’après les instructions définies dans Fonctionnement quotidien, page 5. Si on a fixé un certain Temps de Délai (voir Configuration du Dolphin Wave, ci-dessus), le compte à rebours commence et la période de temps qui reste avant le démarrage automatique du nettoyage est affiché... -
Page 40: Règles D'exploitation
8. Une fois achevée la direction désirée, appuyer sur Suivant pour confirmer la fin du procédé de réglage de précision. 9. Appuyer sur 'HOME' pour retourner à l’écran Wave et puis appuyer sur Démarrer pour continuer la session nettoyage. Règles d’exploitation •... - Page 41 exécuter le service PM toutes les 1,500 heures de travail ou 1 fois par an (le premier qui arrive). 6. Un message d’avertissement pour l’exécution du PM apparaîtra au moment approprié sur l’écran du MMI,. Il est obligatoire d’exécuter le service PM. Prière de contacter votre distributeur.
- Page 42 3. Appuyer brièvement sur la flèche de marche en arrière. Le robot commence à se déplacer en arrière. Pour arrêter la marche en arrière, effleurer et relâcher la flèche de marche en arrière. Comment exécuter des tournants sur-le-champ: On peut exécuter des tournants pendant que le robot est en mouvement ou lorsqu’il est à l’arrêt. 4.
-
Page 43: Dépannage
Dépannage Rapport d’Erreur Vérifier Mesures à prendre Roue à aubes Est-ce qu’il y a des impuretés ou Dévisser le boulon serrant le couvercle surchargée d’autres matières étrangères dans de protection de la roue à aubes. Le faire la roue à aubes? tourner légèrement dans le sens contraire aux aiguilles d’une montre, jusqu’à... - Page 44 Rapport d’Erreur Vérifier Mesures à prendre Le robot est bloqué 1. Est-ce que le robot a sur le plancher de rencontré un obstacle? Déplacer le robot de sa position et retirer la piscine 2. Est-ce qu’il y a une l’obstacle. Remettre en activité. obstruction quelconque dans Si le problème réapparaît, contacter le le conduit d’eau ou dans les...
- Page 46 Sommario PRECAUZIONI DI SICUREZZA ......................II NOTE GENERALI ..........................II INTRODUZIONE ............................1 ASSEMBLAGGIO DEL CARRELLO DI DOLPHIN WAVE..............1 ’ .......................1 STRUZIONI PER L ASSEMBLAGGIO PRIMA SESSIONE DI PULIZIA DELLA PISCINA................3 ....................3 NIZIO DELLA PRIMA SESSIONE DI PULIZIA FUNZIONAMENTO QUOTIDIANO .....................5 ’...
-
Page 47: Precauzioni Di Sicurezza
Tenere il robot per la pulizia di piscine Dolphin Wave al di fuori della portata dei bambini. Deve essere usato solo e sempre un cavo d’alimentazione elettrica originale. -
Page 48: Introduzione
Introduzione Questa Guida per l’Uso descrive come fare uso della plancia operativa MMI del robot per la pulizia delle piscine Dolphin Wave. La plancia moderna interattiva di controllo MMI consente la gestione completa del funzionamento del robot e permette di determinare il tempo del ciclo, la durata di funzionamento ed il tipo di escursione che il robot esegue. - Page 49 All’alimentatore elettrico di Wave Cavo galleggiante collegato all’alimentatore elettrico di Wave Cavo di alimentazione elettrica Figura 1: Il Dolphin Wave I sacchetti filtro usa-e-getta devono essere conservati in luogo buio - evitare la loro esposizione alla luce diretta del sole...
-
Page 50: Prima Sessione Di Pulizia Della Piscina
Per iniziare la sessione di pulizia della piscina subito dopo aver assemblato Dolphin Wave, procedere come segue: 1. Sollevare il coperchio di protezione di MMI. 2. Collegare l’alimentatore elettrico di Wave alla presa elettrica. 3. Attivare l'alimentatore elettrico. Sulla finestra d’inizio appare la schermata MMI Wave. - Page 51 Impostazione lunghezza della piscina Imposta Indietro Figura 3: Impostazione lunghezza della piscina 4. Selezionare la lunghezza desiderata della piscina, facendo uso delle frecce . Premere il pulsante Imposta. 5. Appare la schermata Allinea Robot al lato corto della piscina. 6. Servendosi del cavo galleggiante, spostare il robot e portarlo in posizione parallela alla larghezza della piscina con il cavo all’indietro.
-
Page 52: Funzionamento Quotidiano
Per rimuovere il robot dalla piscina, procedere come illustrato in Estrazione del robot dalla piscina a pagina 6. Funzionamento quotidiano Dopo aver predisposto Dolphin Wave ed averlo configurato perla prima volta, il dispositivo è pronto per il funzionamento quotidiano. Per l’esecuzione della prossima sessione di pulizia, procedere come segue: 1. -
Page 53: Arresto Manuale
Dopo 5 secondi appare la schermata Arresto manuale (Figura 6). Arresto manuale Tempo completato 01:20 Ore totali Sacchetto filtro Pulito Uscita Figura 6: Schermata d’arresto manuale 2. Per arrestare definitivamente la sessione di pulizia, premere il pulsante Uscita. Lo schermo di MMI ritorna alla schermata Wave. -
Page 54: Impostazioni Customizzate
Impostazioni customizzate Il robot Dolphin Wave è comandato dalla plancia MMI. Si possono customizzare le impostazioni del robot per adeguarlo al tipo di piscina che si vuole pulire. Sono quattro le configurazioni diverse di piscina che possono essere impostate e memorizzate da MMI per uso futuro. - Page 55 Menu Principale Profilo piscina Stato del filtro Pulito Report errore Statistica Uscita Seleziona Figura 7: Il menù principale Ci sono due schermate di Menu Principale e si può accedere alla seconda schermata premendo la freccia di scorrimento in basso, Dopo "Statistica", scorrere in giù verso la seconda schermata di menù principale Menu Principale (Figura 8).
-
Page 56: Iparametri Del Menù Principale
Modalità Lingua per la lingua di interfaccia Configurazione di ulteriori profili di piscina Come indicato precedentemente, Dolphin Wave può essere configurato per quattro tipi diversi di piscina. Le impostazioni configurate sono conservate nella memoria di MMI. Questa sezione descrive come configurare ulteriori impostazioni di piscina. - Page 57 Menu Avvio Piscina A Figura 9: Schermata Wave che visualizza Piscina A nelle sue impostazioni default 2. Dalla schermata Wave, premere Piscina A. Appare la schermata Profilo piscina (Figura 10). Seleziona profile piscina Piscina A Piscina B Piscina C Piscina D...
-
Page 58: Procedura Manuale Per La Configurazione Dei Profili Di Piscina
Procedura manuale per la configurazione dei profili di piscina 1. Premere Menu dal menu Wave. 2. Dal Menu Principale, con Profilo Piscina evidenziato, premere Seleziona e quindi modifica, per visualizzare la schermata del corrente profilo attivo. 3. Premere Seleziona per aprire la schermata Impostazione lunghezza piscina. - Page 59 13. premere Seleziona per impostare il Tempo di ritardo. L’impostazione del tempo di ritardo consente di ritardare l’inizio delle operazioni di pulizia di un fattore di tempo scelto sulla schermata MMI. Per aggirare le prescrizioni del tempo di ritardo, premere Avvio dalla schermata Wave.
- Page 60 15. Reimpostare Profilo piscina- Consente di cancellare tutti i parametri correnti di profilo della piscina. (Lunghezza piscina, Durata del ciclo, Modalità Navigazione, Tempo di ritardo…) Durante le operazioni di impostazione dei parametri: Premere Indietro per fare ritorno alla schermata precedente Premere 'HOME' sul quadrante per fare ritorno alla schermata Wave...
-
Page 61: Iniziare Le Operazioni Di Pulizia
Una volta configurate tutte le impostazioni customizzate, si può procedere alla sessione di pulizia: 1. Preparare Dolphin Wave per la messa in opera e per l’immersione in piscina. 2. Procedere come indicato in Funzionamento quotidiano, a pagina 5. Se è stato impostato un tempo di ritardo Tempo di ritardo (vedere nelle precedenti sezioni di configurazione di Dolphin Wave), il conto alla rovescia comincia ed il tempo che resta prima che la pulizia automatica inizi è... -
Page 62: Direttive Di Funzionamento
1. Pulire e sostituire il filtro quando necessario. Quando MMI visualizza "Filter Bag Full", è necessario pulire o sostituire il sacchetto filtro prima del prossimo ciclo di funzionamento. Non è necessario arrestare il robot Wave durante il ciclo quando appare l’indicazione "Filtro otturato". Pulire il filtro prima del prossimo ciclo. - Page 63 5. Manutenzione preventiva (PM): per mantenere il robot in buone e durevoli condizioni di funzionamento vanno eseguite le operazioni di manutenzione preventiva del robot Wave. La ditta MAYTRONICS fornisce le parti necessarie – quali il kit opportuno PM. La manodopera ed il servizio saranno forniti dal distributore.
-
Page 64: Telecomando
Telecomando Il telecomando (Remote Control Unit - RCU) si trova sulla plancia di MMI ed è tenuto in posizione da una calamita. Tirare leggermente verso l’alto per estrarlo dal suo alloggiamento. Quando il robot si trova in funzionamento automatico, usare il telecomando per ignorare le impostazioni programmate della direzione del robot. - Page 65 Giro su se stesso: Il giro su se stesso può avvenire sia quando il robot si trova in movimento che quando è fermo. 4. Per girare il robot in senso orario, premere e tenere premuta la freccia destra. Il robot gira su se stesso. Rilasciare il pulsante per arrestare il giro del robot.
-
Page 66: Ricerca Ed Eliminazione Dei Guasti
Ricerca ed eliminazione dei guasti Messaggio Verifica Azione da intraprendere d'errore C’è dello sporco o del Svitare le viti che assicurano il coperchio materiale estraneo protettivo della girante. Girarlo lentamente in Girante in nella girante? senso anti-orario, finché si libera. Rimuovere sovraccarico ogni traccia di sporco attorno alla girante. - Page 67 Messaggio Verifica Azione da intraprendere d'errore Il robot si è 7. Il robot si è inceppato sul bloccato su un Spostare il robot dalla sua posizione e rimuovere fondale della ostacolo? l’ostacolo. Riattivare. piscina 8. C’è un’ostruzione Se il problema si ripresenta, contattare il nel canale rappresentante/distributore Maytronics.
- Page 69 Lista de Contenido MEDIDAS DE PRECAUCIÓN DE SEGURIDAD ................2 NOTAS GENERALES ..........................2 INTRODUCCIÓN............................ 3 ENSAMBLE DEL CARRITO DE DOLPHIN WAVE ................ 3 ......................3 NSTRUCCIONES DE NSAMBLAJE PRIMERA SESIÓN DE LIMPIEZA DE PISCINA................5 ................. 5 OMENZANDO LA RIMERA ESIÓN DE...
-
Page 70: Medidas De Precaución De Seguridad
Limpiador de Piscinas "Dolphin Wave". El operador debe mantener sus manos alejadas del mecanismo de correa propulsora. El Robot Limpiador de Piscinas "Dolphin Wave" no debe ser activado fuera de la piscina a una distancia mayor que 3 metros del borde de la misma. -
Page 71: Introducción
1. Adhiera la manija del carrito a la base del mismo y sujete con los tornillos y las tuercas suministrados. 2. Coloque el robot Dolphin Wave en el carrito frente a la fuente de potencia tal como lo ilustra la Figura 1. - Page 72 Cable flotante Manija de cable flotante Suministro de potencia eléctrica Tapa de impulsor Cable de comunicaciones de la MMI Fuente de potencia de Wave Cable flotante conectado a la fuente de potencia de Wave Cable de conexión a la red eléctrica Figura 1: El Dolphin Wave Las bolsas de filtro desechables deben ser guardadas en un sitio oscuro –...
-
Page 73: Primera Sesión De Limpieza De Piscina
2. Conecte el suministro de potencia del Wave a la línea de suministro de potencia de la red. 3. Encienda el suministro de potencia. La pantalla Wave de la MMI se abrirá en la ventana de casa. 4. Posicione el carrito con el robot a una distancia de aproximadamente 0.5–1.0 metro del borde de la piscina con su borde inclinado dirigido hacia la piscina de natación asegurándose de que el... - Page 74 Ajuste de Longitud de Piscina Fije Atrás Figura 3: Ajuste de Longitud de Piscina 4. Utilizando las flechitas, , elija la longitud necesaria de la piscina. Oprima Fije (Set). 5. Aparecerá la pantalla Alineación del Robot con el Ancho de Piscina. 6.
-
Page 75: Operación Diaria
Operación Diaria Luego de haber ajustado el Dolphin Wave y configurado al mismo por primera vez, el artefacto se halla listo para operación diaria. Para realizar la siguiente sesión de limpieza, proceda de la siguiente manera: 1. Posicione el carrito a 0.5–1.0 metro del borde de la piscina con su borde inclinado dirigido hacia la piscina de natación asegurándose de que el cable flotante esté... -
Page 76: Control De Interrupción Manual
Interrupción Manual Tiempo Transcurrido 1:20 Total de Horas Limpie Bolsa de Filtro Salga Figura 6: Pantalla de Interrupción Manual 2. Para interrumpir la sesión de limpieza definitivamente, oprima Salga (Exit). El visualizador de la MMI volverá a la pantalla Wave. -
Page 77: Ajustes Personalizados
Oprima Salga (Exit) para regresar a la Salga pantalla Wave. Definición de los parámetros del robot: 1. Encienda el suministro de potencia. Se abrirá la pantalla Wave de la MMI en la ventana de casa. 2. Oprima Menú para entrar al Menú Principal (Figura 7). - Page 78 Menú Principal Perfil de Piscina Estado de Filtro Limpio Informe de Error Estadística Elija Salga Figura 7: Menú Principal Existen dos pantallas de Menú Principal y se puede acceder a la segunda oprimiendo la flechita de desplazamiento hacia abajo, Después de "Estadística" ("Statistics"), desplace hacia abajo a la segunda pantalla del Menú Principal (Figura 8).
-
Page 79: Parámetros Del Menú Principal
MMI. La presente sección describe cómo configurar ajustes de piscinas adicionales. Para agregar una nueva configuración de piscina, proceda de la siguiente manera: 1. Diríjase a la pantalla Wave. "Piscina A" queda expuesta como el ajuste presentemente definido, tal como ilustrado en la Figura 9. -
Page 80: Procedimiento Manual De Configuración De Perfiles De Piscina
Piscina A Menú Inicio Figura 9: Pantalla Wave exponiendo Piscina A como el ajuste en defecto 2. Oprima Piscina A en la pantalla Wave. Se abrirá la pantalla Perfil de Piscina (Figura 10). Elija Perfil de Piscina Piscina A Piscina B... - Page 81 Perfil de Piscina A Longitud de Piscina Tiempo de Ciclo Modo de Navegación Rec. 1 Trayecto de Barrido Defecto Elija atrás Figura 11: Pantalla de ajuste de Longitud de Piscina 4. Utilizando los botones de Elija y Desplazamiento , fije cada parámetro en su turno, por ejemplo: 5.
- Page 82 MMI. Para evadir la instrucción de Tiempo de Demora, oprima Inicio en la pantalla Wave. 14. Espaciamiento de Líneas – utilizado únicamente al utilizar el trayecto de barrido Líneas a la Derecha / Izquierda, con el propósito de optimizar el barrido.
-
Page 83: Iniciando Las Operaciones De Limpieza
2. Proceda como en Operación Diaria, en la página 7. Si ha sido fijado un Tiempo de Demora (vea Configurando el Dolphin Wave más arriba), comenzará la cuenta atrás y el tiempo que quede hasta iniciar la limpieza automática se hallará proyectado en la pantalla. -
Page 84: Líneas Directivas Para La Operación
8. Una vez conseguida la dirección deseada, oprima Siguiente para confirmar el final del procedimiento de ajuste fino. 9. Oprima HOME para regresar a la pantalla Wave y luego oprima Inicio para continuar la sesión de limpieza. Líneas Directivas para la Operación •... -
Page 85: Unidad De Control Remoto
Unidad de Control Remoto La unidad de control remoto (UCR) se halla ubicada en la consola de la MMI y sujetada en su sitio por un imán. Jale hacia arriba dócilmente para retirarla de su base. Cuando el robot se halla en funcionamiento automático, utilice el control remoto para evadir los ajustes preprogramados de dirección del robot. - Page 86 5. Para girar el robot en sentido opuesto a las agujas del reloj, mantenga oprimida la flecha izquierda. Suelte el botón para interrumpir el giro. 6. Para desactivar la unidad remota, mantenga oprimido el botón de contacto. Las luces de activación se apagarán.
-
Page 87: Localización De Fallas (Troubleshooting)
Localización de Fallas (Troubleshooting) Mensaje de Error Revise Acción a Tomar Sobrecarga del ¿Hay suciedad u otra materia ajena Destornille el tornillo que asegura la tapa protectora del en el impulsor? impulsor. Gire levemente en sentido opuesto a las agujas del reloj hasta que se suelte. - Page 89 Inhaltstabelle SICHERHEITSHINWEISE ........................ II ALLGEMEINE ANMERKUNGEN ....................II EINFÜHRUNG ............................1 MONTAGE DES DOLPHIN WAVE – CADDYS ................1 MONTAGEANWEISUNGEN ......................1 ERSTMALIGE REINIGUNG DES SCHWIMMBADS ..............3 BEGINN DER ERSTEN REINIGUNGSSESSION................3 TAGTÄGLICHER BETRIEB.......................5 ......................6 ANUELLE UNTERBRECHUNG KUNDENSPEZIFISCHE EINSTELLUNGEN..................7 MI - ......................7 BEDIENUNG DER M KONSOLE ......................9...
-
Page 90: Sicherheitshinweise
Die folgenden Warnhinweise müssen genauestens befolgt werden: Benutzen Sie den Dolphin Wave Poolreinigungs-Roboter nicht, wenn sich Personen im Schwimmbad befinden. Ziehen Sie den Stecker aus der Steckdose, bevor Sie den Dolphin Wave Poolreinigungs-Roboter überprüfen. Vergewissern Sie sich, dass die folgenden Sicherheitshinweise beachtet werden: Nur ausgebildete Personen sollten den Dolphin Wave Poolreinigungs- Roboter benutzen und bedienen. -
Page 91: Einführung
1. Befestigen Sie den Caddy-Griff mit Hilfe der gelieferten Schrauben und Muttern an der Caddy-Basis. 2. Setzen Sie den Dolphin Wave – Roboter auf den Caddy, so dass er sich vor der Stromversorgungseinheit befindet. Siehe Abbildung 1. 3. Legen Sie das aufgerollte Stromkabel des Dolphin Wave – Roboters in den Kabelhalter des Caddys und entfernen dann das Klebeband. - Page 92 Schwimmkabel Schwimmkabelgriff Stromversorgungseinheit Flügelradabdeckung MMI – Kommunikationskabel Wave – Stromversorgungseinheit An die Stromversorgung des Wave – Roboters angeschlossenes Schwimmkabel Hauptstromversorgungskabel Abbildung 1: Der Dolphin Wave Die Einweg-Filterbeutel sollten an einem dunklen Ort aufbewahrt werden, um sie vor Sonnenlicht zu schützen.
-
Page 93: Erstmalige Reinigung Des Schwimmbads
Wave – Startbildschirm Funktionstasten Abbildung 2: Die MMI Dolphin Wave - Konsole Führen Sie folgende Schritte aus, um nach der Montage Ihres Dolphin Wave – Roboters Ihr Schwimmbad zum ersten Mal zu reinigen: 1. Heben Sie die Schutzabdeckung der MMI-Konsole an. - Page 94 2. Warten Sie, bis der WAVE – Bildschirm erscheint. 3. Drücken Sie auf Start. Daraufhin erscheint auf dem Bildschirm die Aufforderung "Bitte wählen Sie die Beckenlänge aus". Nach 2 Sekunden erscheint der Bildschirm Einstellung der Beckenlänge. Einstellung der Beckenlänge Zurück Einstellen Abbildung 3: Einstellung der Beckenlänge...
-
Page 95: Tagtäglicher Betrieb
Roboter aus dem Wasser zu nehmen. Tagtäglicher Betrieb Nachdem Sie den Dolphin Wave – Roboter selbst zum ersten Mal eingestellt und konfiguriert haben, ist er jetzt bereit zum tagtäglichen Einsatz. Führen Sie folgende Schritte aus, um den nächsten Reinigungszyklus zu beginnen: 1. -
Page 96: Manuelle Unterbrechung
Beendete Zeit Gesamtzeit Sauber Filterbeutel Resume Exit Beenden Abbildung 6: Bildschirm Manuelle Unterbrechung 2. Um einen Reinigungszyklus vollständig zu stoppen, drücken Sie auf die Taste Beenden. Die Anzeige auf dem Bildschirm der MMI-Konsole kehrt zum Wave-Bildschirm zurück. - 6 -... -
Page 97: Kundenspezifische Einstellungen
Kundenspezifische Einstellungen Der Dolphin Wave – Roboter wird über die MMI-Konsole gesteuert. Sie können die Einstellungen des Roboters auf das spezielle zu reinigende Schwimmbad abstimmen. Sie können vier verschiedene Schwimmbad-Konfigurationen einstellen und im Speicher der MMI-Konsole speichern. Bei der Konfigurierung des Schwimmbad-Profils können Sie gleichzeitig die Reinigungszyklus- Zeit und die Zeitverzögerung bis zum Beginn des Reinigungszykluses einstellen. - Page 98 Einstellung der Roboter-Parameter: 1. Schalten Sie die Stromversorgung ein. Der Wave –Bildschirm zeigt den Startbildschirm. 2. Drücken Sie auf die Taste Menü, um zum Hauptmenü zu gelangen (Abbildung 7). Hauptmenü Schwimmbadprofil Filterzustand Sauber Fehlermeldung Statistik Auswählen Beenden Abbildung 7: Hauptmenü...
-
Page 99: Profile
Hauptmenü-Parameter In der folgenden Tabelle finden Sie Erklärungen bezüglich des Hauptmenüs und der Parameter: Parameter Beschreibung Schwimmbad- Drücken Sie auf die Taste Auswählen, um zum Profile Bildschirm Schwimmbad-Profile zu gelangen. Der Bildschirm Schwimmbad-Profile bietet vier verschiedene Schwimmbadarten zur Auswahl. Schwimmbadtyp A ist die Standardeinstellung. Filterzustand Zeigt den Zustand des Filters an: •... - Page 100 Die konfigurierten Einstellungen werden im Speicher der MMI-Konsole gespeichert. Dieser Abschnitt beschreibt, wie Sie zusätzliche Schwimmbadeinstellungen konfigurieren können. So fügen Sie eine neue Schwimmbadkonfiguration hinzu: 1. Öffnen Sie den Wave-Bildschirm. Wie Sie in Abbildung 9 sehen können, ist der Roboter auf "Schwimmbadtyp A" eingestellt. Menu Start Pool A Menü...
- Page 101 4. Zur Konfigurierung von Schwimmbad B, C und D beginnen Sie wieder mit Schritt 1 auf Seite 3: Beginn der ersten Reinigung. So können Sie eine bereits konfigurierte Schwimmbadart öffnen: 1. Klicken Sie im Wave – Bildschirm auf die auf der rechten Bildschirmseite angezeigte Schwimmbad-Einstellung (siehe Abbildung 9), um den Bildschirm Schwimmbad-Profile zu öffnen.
- Page 102 Einstellung der Beckenlänge Einstellen Zurück Abbildung 12: Bildschirm zur Einstellung der Beckenlänge 6. Wählen Sie mit Hilfe der Pfeile die gewünschte Beckenlänge aus. Drücken Sie dann auf die Taste Auswählen und scrollen zum nächsten Parameter, der Zykluszeit. Der Parameter Zykluszeit bestimmt die Länge jedes Reinigungszykluses. 7.
- Page 103 Sobald alle kundenspezifischen Einstellungen konfiguriert wurden, können Sie einen Reinigungszyklus beginnen: 1. Machen Sie den Dolphin Wave – Roboter betriebsbereit und lassen ihn auf den Schwimmbadboden absinken. 2. Fahren Sie wie im Abschnitt Tagtäglicher Betrieb auf Seite 5 beschrieben fort.
-
Page 104: Einstellung Der Richtung
Wenn eine Verzögerungszeit eingestellt wurde (siehe Konfigurierung des Dolphin Wave Roboter weiter oben), beginnt jetzt der Countdown und die Zeit, die bis zum Beginn der automatischen Reinigung verbleibt, wird auf dem Bildschirm angezeigt. Wenn keine Verzögerungszeit eingestellt wurde, beginnt der Roboter sofort mit dem Reinigungsvorgang. -
Page 105: Wartung
8. Sobald die gewünschte Richtungskorrigierung erreicht wurde, drücken Sie auf die Taste Weiter, um die Feineinstellung zu beenden. 9. Drücken Sie auf die Taste 'HOME', um zum Wave – Bildschirm zurückzukehren und danach auf Start, um den Reinigungsvorgang zu beginnen. - Page 106 6. Sobald einer der beiden Zeitpunkte eingetreten ist, erscheint eine entsprechende Warnmeldung auf dem MMI-Bildschirm. Wenden Sie sich dann bitte an Ihren Fachhändler. Bei Nichtausführen der vorbeugenden Wartungsmassnahmen erlischt die Garantie. Fernbedienung Die Fernbedienung (RCU) befindet sich auf der MMI-Konsole und wird von einem Magneten gehalten.
- Page 107 Auf-der-Stelle Drehen: Der Roboter kann sowohl während er in Bewegung ist als auch wenn er still steht auf der Stelle gedreht werden. 4. Um den Roboter im Uhrzeigersinn zu drehen, drücken Sie auf den rechten Pfeil und halten ihn gedrückt. Der Roboter dreht sich auf der Stelle. Lassen Sie den Pfeil wieder los, und der Roboter hört auf sich zu drehen.
-
Page 108: Fehlerbehebung
Fehlerbehebung Fehlermeldung Zu überprüfen Zu ergreifende Massnahmen Überlastung des Befindet sich Dreck oder Lösen Sie die Schraube, welche die Flügelrads andere Fremdkörper im Schutzabdeckung des Flügelrads sichert. Drehen Flügelrad? Sie die Abdeckung leicht gegen den Uhrzeigersinn, bis sie sich gelöst hat. Entfernen Sie alle Verschmutzungen aus dem Flügelrad. - Page 109 Fehlermeldung Zu überprüfen Zu ergreifende Massnahmen Der Roboter sitzt 1. Ist der Roboter an einem Bringen Sie den Roboter zu einer anderen Stelle auf dem Hindernis und entfernen das Hindernis. Schalten Sie ihn Schwimmbadboden hängengeblieben? wieder ein. Wenn das Problem erneut auftritt, fest 2.
- Page 111 Inhoudsopgave VEILIGHEIDSMAATREGELEN ......................II ALGEMENE OPMERKINGEN......................II INTRODUCTIE ............................1 DOLPHIN WAVE CADDY ASSEMBLAGE ..................1 ........................1 SSEMBLAGE INSTRUCTIES DE EERSTE ZWEMBADSCHOONMAAKBEURT ................3 ..................3 E EERSTE SCHOONMAAKBEURT BEGINNEN DAGELIJKSE OPERATIE ........................5 .......................6 ANDMATIGE STOPCONTROLE AANGEPASTE INSTELLINGEN ......................7 MMI- ............................7 OPERATIES ........................9 OOFDMENU PARAMETERS BIJKOMSTIGE ZWEMBAD PROFIELEN CONFIGUREREN ............9 ..........11...
-
Page 112: Veiligheidsmaatregelen
Er mag alleen een originele voedingskabel worden gebruikt. Indien nodig kan de kabel door een gekwalificeerde technicus van Dolphin Wave Robot zwembadschoonmaker worden vervangen. Pas op dat u geen rugletsel oploopt als u de Dolphin Wave Robot zwembadschoonmaker optilt. Algemene opmerkingen •... -
Page 113: Introductie
Niet-geassembleerde Caddy om de Dolphin Wave robot op te slaan en te vervoeren • MMI-console • Dolphin Wave robot en drijvende kabel • Filterzakken - 2 afvalzakken die al in de Wave robot zijn, 2 permanente filterzakken, 20 extra afvalzakken • Stroomtoevoereenheid Assemblage instructies Zie Figuur 1. - Page 114 MMI-communicatiekabel Kabelhouder Drijvende kabel Handvat voor drijvende kabel Stroomtoevoer Rotorblad dop MMI-communicatiekabel Wave-stroomtoevoer Drijvende kabel verbinding met Wave-stroomtoevoer Hoofdstroomtoevoer kabel Figuur 1: de Dolphin Wave Wegwerp filterzakken moeten in een donkere plaats opgeslagen worden - vermijd blootstelling aan direct zonlicht...
-
Page 115: Eerste Zwembadschoonmaakbeurt
Figuur 2: de MMI Dolphin Wave console Nadat u uw Dolphin Wave heeft geassembleerd, gaat u als volgt te werk om een zwembadd schoonmaakbeurt te geven: 1. Til het deksel van de MMI op. - Page 116 Instelling zwembadlengte instellen terug Figuur 3: Zwembadlengte instellen 4. Met de pijltjes selecteert u de gewenste zwembadlengte. Druk op Instellen. 5. Het scherm Align Robot to Pool Width (Stel Robot naar zwembadbreedte in) verschijnt. 6. Met de drijvende kabel verplaatst u de robot zodat het parallel aan de breedte van het zwembad komt te liggen met de kabel aan de achterkant.
-
Page 117: Dagelijkse Operatie
Dagelijkse operatie Nadat u de Dolphin Wave heeft geïnstalleerd en hem voor de eerste keer heeft geconfigureerd, wordt het apparaat voor dagelijkse operatie ingesteld. Voor de volgende schoonmaakbeurt gaat u als volgt te werk: 1. Plaats de caddy met robot ongeveer 0,5–1,0 meter vanaf de rand van het zwembad met de aflopende voorkant naar het zwembad gericht, waardoor de drijvende kabel in de richting van de stroomtoevoer eenheid van de Dolphin Wave is. -
Page 118: Handmatige Stopcontrole
Na 5 seconden verschijnt het scherm Handmatig stoppen (Figuur 6). Handmatig stoppen Voltooide tijd 01:20 Totale uren Schoon Filterzak afsluiten Figuur 6: scherm handmatig stoppen Om de schoonmaakbeurt helemaal te stoppen drukt u op Afsluiten. Het MMI display gaat weer naar het Wave scherm terug. -
Page 119: Aangepaste Instellingen
Aangepaste instellingen De Dolphin Wave robot wordt beheerd vanaf de MMI console. U kunt de instellingen van de robot aanpassen aan het specifieke type zwembad dat moet worden schoongemaakt. Er kunnen vier verschillende zwembad configuraties voor toekomstig gebruik in het MMI-geheugen worden ingesteld en opgeslagen. - Page 120 Main Menu Hoofdmenu Zwembadprofiel Schoon Filterstatus Foutrapportage Statistieken Select Exit Afsluiten Selecteer Selecteer Figuur 7: hoofdmenu Er zijn twee Hoofdmenu schermen, u bereikt het tweede scherm door op de naar beneden pijl te drukken. Na "Statistieken", scrollt u naar beneden naar het tweede Hoofdmenu scherm (Figuur 8). Hoofdmenu Klok instelling Datum instelling...
-
Page 121: Hoofdmenu Parameters
MMI opgeslagen. In deze sectie wordt beschreven hoe nog meer zwembadinstellingen worden geconfigureerd. Om een nieuwe zwembadconfiguratie in te stellen doet u het volgende: 1. Ga naar het Wave scherm. "Zwembad A" wordt als de huidige standaard gedefinieerde instelling aangegeven zoals aangetoond in Figuur 9. - Page 122 Menu Start Zwembad A Figuur 9: Wave scherm met zwembad A als standaard instelling. 2. In het Wave scherm drukt u op Zwembad A. Het scherm Zwembadprofiel opent (Figuur 10). Zwembadprofiel selecteren Zwembad A Zwembad B Zwembad C Zwembad D...
-
Page 123: Handmatige Procedure Om Zwembadprofielen Te Configureren
Handmatige procedure om zwembadprofielen te configureren 1. In het Wave logo menu drukt u op Menu. 2. In het Hoofdmenu, met Zwembadprofiel gemarkeerd drukt u op Selecteer en daarna Wijzigen om het huidige actieve profielscherm te zien. 3. Druk op Selecteren om het scherm Zwembadlengte instellen te openen. - Page 124 13. Druk op Selecteer om de Uitsteltijd in te stellen. Als de Uitsteltijd wordt ingesteld kunt u de schoonmaakbeurten met een tijdsfactor die van het MMI scherm is geselecteerd instellen. Om de Uitsteltijd instructie te annuleren drukt u in het Wave scherm op Start.
- Page 125 15. Zwembadprofiel resetten - hiermee kunnen alle huidige zwembadprofiel parameters worden gereset. (Zwembadlengte, Cyclustijd, Navigatiemodus, Uitsteltijd) Tijdens het instellen van parameters: • Druk op Terug om naar het vorige scherm terug te keren • Druk op 'HOME' op de console om naar het Wave scherm terug te keren...
-
Page 126: De Schoonmaakbeurt Beginnen
De schoonmaakbeurt beginnen Als alle aangepaste instellingen zijn geconfigureerd, kunt u aan de schoonmaakbeurt beginnen: 1. Maak de Dolphin Wave gereed voor operatie en onderdompeling in het zwembad voor. 2. Vervolg als beschreven in Dagelijkse operatie op pagina 5. Als de Uitsteltijd is ingesteld (zie De Dolphin Wave configureren hierboven) begint de aftelling. -
Page 127: Operatie Richtlijnen
8. Als de gewenste richting is bereikt drukt u op Volgende om het einde van de instelprocedure te bevestigen. 9. Druk op 'HOME' om naar het Wave scherm terug te keren en druk vervolgens op Start om de schoonmaakbeurt te vervolgen. -
Page 128: Afstandsbedieningeenheid
Afstandsbedieningeenheid De afstandsbedieningeenheid (RCU) bevindt zich op het MMI console en wordt door een magneet op zijn plaats gehouden. U kunt het verwijderen door het voorzichtig naar boven te halen. Als de robot in de automatische modus is kunt u de afstandsbediening gebruiken om de geprogrammeerde richtinginstellingen van de robot te annuleren. - Page 129 4. Om de robot met de klok mee te draaien drukt u op het rechter pijltje en houdt u het ingedrukt. De robot draait op zijn plaats om. Laat de knop los waardoor de robot stil gaat staan. 5. Om de robot tegen de klok in te draaien drukt u op het linker pijltje en houdt u het ingedrukt.
-
Page 130: Problemen Oplossen
Problemen oplossen Foutbericht Controle Te nemen actie Imp overbelasting Is er vuil of een object Draai de schroef van het deksel van het in het rotorblad? rotorblad los. Draai het tegen de klok in totdat het los zit. Verwijder het vuil rondom het rotorblad. - Page 131 Foutbericht Controle Te nemen actie De robot loopt vast 1. Is de robot op een op de bodem van obstakel terecht Beweeg de robot naar een andere plaats en het zwembad gekomen? verwijder het obstakel. Zet de robot weer 2. Is er een obstakel aan.
- Page 133 Índice PRECAUÇÕES DE SEGURANÇA ......................II NOTAS GERAIS ............................II INTRODUÇÃO ............................1 MONTAGEM DO GABINETE DO DOLPHIN WAVE..............1 DE M ........................1 NSTRUÇÕES ONTAGEM PRIMEIRA SESSÃO DE LIMPEZA DA PISCINA ................3 ..................3 NICIANDO A PRIMEIRA SESSÃO DE LIMPEZA OPERAÇÃO DIÁRIA..........................5 ......................ONTROLE DE PARADA MANUAL CONFIGURAÇÕES PERSONALIZADAS ..................7...
-
Page 134: Precauções De Segurança
Piscinas Robô Dolphin Wave. O operador deve manter as mãos distantes do mecanismo da correia impusionadora. O Limpador de Piscinas Robô Dolphin Wave não deve ser operado fora da piscina a uma distância de mais de 3 metros de sua borda. -
Page 135: Introdução
2. Coloque o robô Dolphin Wave no gabinete em frente da fonte de alimentação conforme mostra a Figura 1. 3. Coloque o cabo de força em espiral do Dolphin Wave no suporte do cabo do gabinete e remova o adesivo. - Page 136 Cabo de comunicação MMI Fonte de alimentação Wave Cabo flutuante conectado à fonte de alimentação Wave Cabo de alimentação principal Figura 1: O Dolphin Wave Filtros descartáveis devem ser mantidos em um local escuro – evite a exposição à luz solar direta...
-
Page 137: Primeira Sessão De Limpeza Da Piscina
Wave, faça o seguinte: 1. Erga a tampa protetora do MMI. 2. Conecte a fonte de alimentação do Wave à linha da fonte de alimentação principal. 3. Ligue a fonte de alimentação. A tela do MMI Wave abre a janela Inicial. - Page 138 Configuração da largura da piscina Configurar voltar Figura 3: Configuração da largura da piscina 4. Usando as setas, , selecione a largura necessário da piscina. Pressione Set (Configurar). 5. A tela Align Robot to Pool Width (Alinhar robô à largura da piscina) aparece. 6.
-
Page 139: Operação Diária
Operação diária Após ter configurado o Dolphin Wave pela primeira vez, o dispositivo é configurado para operação diária. Ao relaizar sua próxima sessão de limpeza, faça o seguinte: 1. Posicione o gabinete a cerca de 0,5 m a 1,0 m da borda da piscina, com sua borda inclinada para a frente na direção da piscina e o cabo flutuante apontando na direction da unidade de... -
Page 140: Controle De Parada Manual
Após 5 segundos, a tela Manual Stop (Parada manual) é exibida (Figura 6). Prada Manual 01:20 Tempo Terminado Total de Horas Filtr Limpo sair Figura 6: Tela Parada manual 2. Para parar a sessão de limpeza completamente, pressione Exit (Sair). A tela do MMI volta para a tela Wave. -
Page 141: Configurações Personalizadas
Configurações personalizadas O robô Dolphin Wave é controlado a partir do console do MMI. É possível personalizar as configurações do robô para que correspondam ao tipo específico de piscina que deve ser limpa. Quatro configurações de piscinas diferentes podem ser realizadas e armazenadas na memória do MMI para utilização posterior. - Page 142 Main Menu Menu Principal Perfil da Piscina Pool Profile Estado do Filtro Limpo Filter State Clean Relatório de Erros Error Report Statistics Estatisticas Selecionar Sair Figura 7: Menu principal Há duas telas de menu principais e é possível acessar a segunda tela pressionando a seta de rolagem para baixo, Após "Statistics"...
-
Page 143: Parâmetros Do Menu Principal
As configurações feitas são armazenadas na memória do MMI. Esta seção descreve como realizar configurações adicionais de piscinas. Para adicionar uma nova configuração de piscina, faça o seguinte: 1. Vá para a tela Wave. "Pool A" aparece como a configuração atualmente definida conforme mostra a Figura 9. - Page 144 1. A partir da tela Wave, pressione a configuiração de piscina atualmente exibida do lado direito da tela (veja a Figura 9) para abrir a tela Pool Profile (Perfil da tela). 2. Role até a piscina necessária e pressione Select. A tela Wave é exibida com a configuração da piscina escolhida.
-
Page 145: Procedimento Manual Para Configurar Perfis De Piscinas
Procedimento manual para configurar perfis de piscinas 1. A partir do menu com o logotipo Wave, pressione Menu. 2. A partir do Main Menu (Menu principal), com o item Pool Profile destacado, pressione Select e, em seguida, modify, para exibir a tela do perfil atualmente ativo. - Page 146 13. Pressione Select para entrar na tela Delay Time (Tempo de espera). Configurar um Delay Time permite atrasar o início das operações de limpeza por um fator de tempo selecionado na tela do MMI.. Para ignorar a instrução Delay Time, pressione Start na tela Wave.
- Page 147 (Pool Length, Cycle Time, Navigation Mode, Delay time…). Durante as operações de configuração de parâmetros: • Pressione (Voltar) para retornar para a tela anterior Dica Back • Pressione 'HOME' (Incial) no console, para retornar para a tela Wave...
-
Page 148: Iniciando As Operações De Limpeza
1. Prepare o Dolphin Wave para operação e imersão na piscina. 2. Continue em operação diária, página 5. Se um Delay Time foi configurado (veja Configurando o Dolphin Wave, acima), a contagem regressiva começa e o tempo restante antes de a limpeza automática iniciar é exibido na tela. -
Page 149: Diretrizes Operacionais
8. Quando a direção desejada for atingida, pressione Next (Próximo) para confirmar o final do procedimento de sintonia fina. 9. Pressione 'HOME' para retornar para a tela Wave e, em seguida, pressione Start para continuar a sessão de limpeza. Diretrizes Operacionais •... -
Page 150: Unidade De Controle Remoto
Unidade de controle remoto A unidade de controle remoto (RCU) é localizada no console do MMI e mantida em sua posição por meio de um imã. Puxe-a para cima gentilmente para removê-la de sua base. Quando o robô estiver na operação automática, use o controle remoto para ignorar as configurações de direção programadas no robô. - Page 151 5. Para virar o robô no sentido anti-horário, pressione e mantenha pressionada a seta para a esquerda. Solte o botão para parar o giro do robô. 6. Para desativar a unidade remota, pressionee mantenha pressionado o painel de toque. As luzes de ativação desligam.
-
Page 152: Resolução De Problemas
Resolução de problemas Mensagem de Verifique Ação a ser tomada erro Sobrecarga Prop Há sujeira ou outros Solte o parafuso que prende a tampa materiais estranhos no protetora do propulsor. Vire-o levemente no propulsor? sentido anti-horário, até que fique solto. Remova qualquer sujeira em torno do propulsor. - Page 153 Mensagem de Verifique Ação a ser tomada erro Robô preso no piso 1. O robô parou em da piscina um obstáculo? Mova o robô de sua posição e remova o 2. Há uma obstrução obstáculo. Reative-o. no canal da água Se isto ocorrer novamente, entre em contato ou nas correias de com o distribuidor/fornecedor Maytronics.
Need help?
Do you have a question about the WAVE and is the answer not in the manual?
Questions and answers