Table of Contents
Advertisement
DIGITAL FULL COLOUR MULTIFUNCTIONAL SYSTEM
DIGITAL FULL COLOUR MULTIFUNCTIONAL SYSTEM
DIGITAL FULL COLOUR MULTIFUNCTIONAL SYSTEM
Quick Start Manual
Quick Start Manual
MODEL:
MODEL:
BP-10C20
BP-10C20
BP-20C20
BP-20C20
BP-20C25
BP-20C25
BEFORE USING THE MACHINE
Functions of the machine and procedures
for placing originals and loading paper
COPIER
Using the copy function
PRINTER
Using the printer function
FACSIMILE
Using the fax function
SCANNER
Using the scan function
SYSTEM SETTINGS
Configuring settings to make the
machine easier to use
Advertisement
Table of Contents

Related Manuals for Sharp BP-10C20


Summary of Contents for Sharp BP-10C20
- Page 1 MODEL: MODEL: BP-10C20 BP-10C20 BP-20C20 BP-20C20 BP-20C25 BP-20C25 DIGITAL FULL COLOUR MULTIFUNCTIONAL SYSTEM DIGITAL FULL COLOUR MULTIFUNCTIONAL SYSTEM DIGITAL FULL COLOUR MULTIFUNCTIONAL SYSTEM Quick Start Manual Quick Start Manual BEFORE USING THE MACHINE Functions of the machine and procedures for placing originals and loading paper...
-
Page 2: Operation Manuals And How To Use Them
OPERATION MANUALS AND HOW TO USE THEM Start Guide This manual explains basic procedures for using the machine, cautions for safe use of the machine, and information for the administrator. Read this manual before using the machine. For detailed operating procedures and troubleshooting information, see the manuals in PDF format. - Page 3 Other manual Like the "User's Manual", some manuals as follow can be downloaded from our website and viewed on your computer. Manual types may be updated. For more information, see our website. User's Manual Software Setup Guide (Address Book Registration) This manual explains how to This guide explains how to install register, edit, and delete the...
-
Page 4: Accessing The Web Server In The Machine
ACCESSING THE WEB SERVER IN THE MACHINE When the machine is connected to a network, the machine's built-in Web server can be accessed from a Web browser on your computer. OPENING THE WEB PAGES Open the System Settings screen. Select "Network" with the [ ] or [ ] Mode Select key, and press the [OK] key. -
Page 5: Downloading The Operation Guide
DOWNLOADING THE OPERATION GUIDE The Operation Guide, which is a more detailed manual, can be downloaded from the machine's Web pages. Click [Operation Manual Download] in the menu of the Web page. Logout Select the desired language. Only the displayed languages are supported. Select the manual you want to download, and click the [Download] button. -
Page 6: Table Of Contents
TABLE OF CONTENTS OPERATION MANUALS AND HOW TO USE THEM ......2 ACCESSING THE WEB SERVER IN THE MACHINE ......4 BEFORE USING THE MACHINE PART NAMES AND FUNCTION . -
Page 7: Before Using The Machine
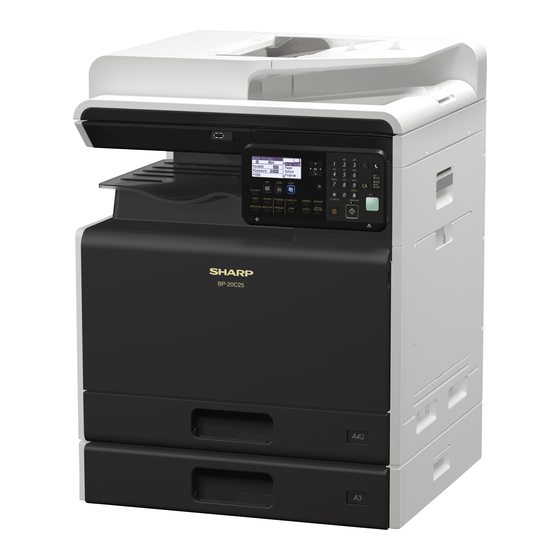
BEFORE USING THE MACHINE This section provides general information about the machine, including the names and functions of the parts of the machine and its peripheral devices, and the procedures for placing originals and loading paper. PART NAMES AND FUNCTION (10) Output tray (exit tray cabinet) Bypass tray... - Page 8 BEFORE USING THE MACHINE (8) (9) (10) (11) Fusing unit Handle Heat is applied here to fuse the transferred image onto Grasp it when moving the machine. the paper. Side cover Open this cover to remove a paper misfeed. The fusing unit is hot. Take care not to burn yourself Telephone line socket (LINE) when removing a misfeed.
- Page 9 BEFORE USING THE MACHINE AUTOMATIC DOCUMENT FEEDER AND DOCUMENT GLASS BP-10C20 BP-20C20/BP-20C25 Document cover Original exit tray Open to make copies from the document glass. The original is discharged to this tray after scanning. Document feeding cover Scanning area Open this cover to remove an original misfeed.
-
Page 10: Operation Panel
BEFORE USING THE MACHINE OPERATION PANEL This section describes the names and functions of the respective parts of the operation panel. Depending on the country and region, display on the operation panel is divided into symbol type and English display type. - Page 11 Blinks when print data is being received. Lights steadily during printing. (32) Error indicator Lights solidly or blinks to indicate the status of the error. * The BP-10C20 does not have this key or indicators.
- Page 12 BEFORE USING THE MACHINE DISPLAY This section explains how to use the display. LEFT MENU AND RIGHT MENU The display on the machine has a right menu containing frequently used settings and a left menu for display of the settings and setting screens of each function. Ready to copy.
-
Page 13: How To Use The Display
BEFORE USING THE MACHINE Right Menu Connection status display (Models with the wireless LAN function only) Displayed when wireless LAN is on. Wireless infrastructure mode: Connecting Orig. Size Wireless infrastructure mode: Not connected Paper Output Wired + wireless access point mode Program Connection failure of wireless LAN device inside machine... -
Page 14: Turning On/Off The Power
BEFORE USING THE MACHINE TURNING ON/OFF THE POWER This section describes how to turn on/off the machine's power and how to restart the machine. The power switch is located on the left side of the machine. Turning on the power Turn the main power switch to the "... -
Page 15: Placing Originals
BEFORE USING THE MACHINE PLACING ORIGINALS The automatic document feeder can be used to automatically scan many originals at once, and this saves you the trouble of manually feeding each original. For originals that cannot be scanned using the automatic document feeder, such as a book or a document with notes attached, use the document glass. - Page 16 BEFORE USING THE MACHINE Specifying the size of the original (Document glass) Select "Orig. Size" in the right menu of the base screen of copy mode and press the [OK] key. Orig. Size Paper Output Program Select Inch or AB with the [ ][ ] keys. Orig.
-
Page 17: Loading Paper
BEFORE USING THE MACHINE LOADING PAPER NAMES AND LOCATIONS OF TRAYS The names of the trays are as follows. Bypass tray Tray 1 Tray 2 (when a 500-sheet paper feed tray is installed) Tray 3 (when a stand/2x500 sheet paper drawer is installed) Tray 4 (when a stand/2x500 sheet paper drawer is installed) - Page 18 BEFORE USING THE MACHINE Insert the paper into the tray. • Load the paper with the print side facing up. Make sure the stack of paper is straight before loading it. • Place the paper under the roller on the right side of the tray.
- Page 19 BEFORE USING THE MACHINE LOAD PAPER INTO THE TRAY 2 - 4 Pull out the paper tray. Gently pull the tray out until it stops. To load paper, go to step 3. To load a different size of paper, go to the next step. Adjust guide plates A and B to match the longitudinal and transversal dimensions of the paper to be loaded.
-
Page 20: Bypass Tray
BEFORE USING THE MACHINE Bypass tray Open the bypass tray. If you are loading paper of length greater than 250 mm (9-27/32"), open the extension tray. Do not place heavy objects on the bypass tray or press down on the tray. Push the centre of the pressure plate down until it locks into place. - Page 21 BEFORE USING THE MACHINE • Do not forcefully push in paper that you are loading. This may cause misfeeds. • If the bypass tray guides are set wider than the paper, move the bypass tray guides in until they correctly fit the width of the paper.
-
Page 22: Tray Settings
BEFORE USING THE MACHINE TRAY SETTINGS These programs are used to change the paper size and type setting of a tray. Changing the paper size setting of a tray If the size of the loaded paper is different from the size shown in the display, follow the steps below to change the paper size setting of the tray. -
Page 23: User Authentication Mode
BEFORE USING THE MACHINE USER AUTHENTICATION MODE When user authentication mode is enabled, a count is kept of the pages printed by each account. The page counts can be viewed in the display. Users that can transmit faxes (up to 30) can be established and transmission time and other information can be tracked for each account. -
Page 24: Copier
COPIER This section explains the basic procedures for using the copier function. MAKING COPIES This section explains how to set a Copy Ratio. Switch to copy mode. Place the original. Place the original in the document feeder tray of the automatic document feeder, or on the document glass. -
Page 25: Copying On Special Paper (Bypass Copy)
COPIER COPYING ON SPECIAL PAPER (Bypass Copy) This section explains how to load A4 heavy paper 1 in the bypass tray. Load the paper with the print side facing down. When you load paper in the bypass tray, "Paper Type Set" is displayed. -
Page 26: Printer
PRINTER This section explains the basic procedure for printing using the printer driver of the machine. The explanations of ® ® screens and procedures are primarily for Windows 10 in Windows environments, and macOS 10.12 in macOS environments. The window varies depending on the operating system version, the printer driver version, and the application. - Page 27 PRINTER Select print settings. (1) Click the [Main] tab. (2) Select the original size. To select settings on other tabs, click the desired tab and then select the settings. (3) Click the [OK] button. • Help can be displayed for a setting by clicking the setting and pressing the [F1] key.
-
Page 28: Printing In A Macos Environment
PRINTER PRINTING IN A macOS ENVIRONMENT The following example explains how to print an A4 size document from "TextEdit", which is a standard accessory program in macOS. To install the printer driver and configure settings in a macOS environment, see the Software Setup Guide. On the PS3 expansion kit is required to use the machine as a printer in a macOS environment. - Page 29 PRINTER Select print settings. (1) Make sure that the correct printer is selected. (2) Select items from the menu and configure the settings as needed. (3) Click the [Print] button. PRINTING ON ENVELOPES The bypass tray can be used for envelope printing. Select the envelope size in the settings of the application ("Page Setup"...
-
Page 30: Directly Printing A File In Usb Memory
PRINTER DIRECTLY PRINTING A FILE IN USB MEMORY Files in a USB memory device connected to the machine are printed from the operation panel of the machine without using the printer driver. The file types (and corresponding extensions) that can be printed directly are shown below. File Type TIFF JPEG... -
Page 31: Facsimile
FACSIMILE This section explains the basic procedures for using the fax function of the machine. SENDING A FAX This section explains the basic procedure for sending a fax. In fax mode, colour originals are sent as black and white images. Switch to fax mode. - Page 32 FACSIMILE Press the [B/W START] key. Scanning begins. If scanning is completed normally, the display returns to the base screen. To cancel the transmission while "Reading" appears or before the [READ-END] key ( ) is pressed, press the [C] or [CA] key.
-
Page 33: Scanner
SCANNER This section explains the uses of the network scanner function and the basic procedure for using scan mode. ABOUT THE SCANNER FUNCTIONS With this machine a document or photo can be scanned into an image file. 1. Scanning from a TWAIN-compliant application 4. -
Page 34: Scanning An Original
SCANNER SCANNING AN ORIGINAL The basic operation for scanning is explained below. The procedure for sending a scanned file by E-mail to a destination stored in the address book is explained here. For the how to regist Address Book, refer to the "User's Manual (Address Book Registration)". Switch to scan mode. -
Page 35: System Settings
SYSTEM SETTINGS The system settings let you adjust the operation of the machine to suit the needs of your workplace. This section briefly introduces several of the system settings. For detailed explanations of the system settings, see "SYSTEM SETTINGS" in the User's Manual. SYSTEM SETTINGS Date &... - Page 36 SYSTEM SETTINGS Press the [OK] key and follow the instructions in the setting screen. Several settings will have checkboxes in front of them. To enable a function (make a checkmark appear), press the [OK] key. To disable the setting, press the [OK] once again to remove the checkmark. To configure a setting that has a checkbox, go to step 6.
- Page 37 SHARP Service Department. • Aside from instances provided for by law, SHARP is not responsible for failures occurring during the use of the product or its options, or failures due to incorrect operation of the product and its options, or other failures, or for any damage that occurs due to use of the product.
- Page 38 2019E-EX1...
Need help?
Do you have a question about the BP-10C20 and is the answer not in the manual?
Questions and answers