Moza AirCross 2 User Manual
Hide thumbs
Also See for AirCross 2:
- User manual (180 pages) ,
- Disclaimer and safety manuallines (8 pages)

Related Manuals for Moza AirCross 2


Summary of Contents for Moza AirCross 2
- Page 1 User Manual Note: The users manual is suitable for AirCross 2 V0.1.19 firmware. 封4 封1...
-
Page 2: Table Of Contents
Contents MOZA AirCross 2 Overview Installation and Balance Adjustment Installing the Battery Attaching the Tripod Unlocking Motors Mounting the Camera Balancing Buttons and OLED Display Button Functions LED Indicators Main Interface Menu Description Features Description Camera Control Motor Output PFV,Sport Gear Mode... -
Page 3: Moza Aircross 2 Overview
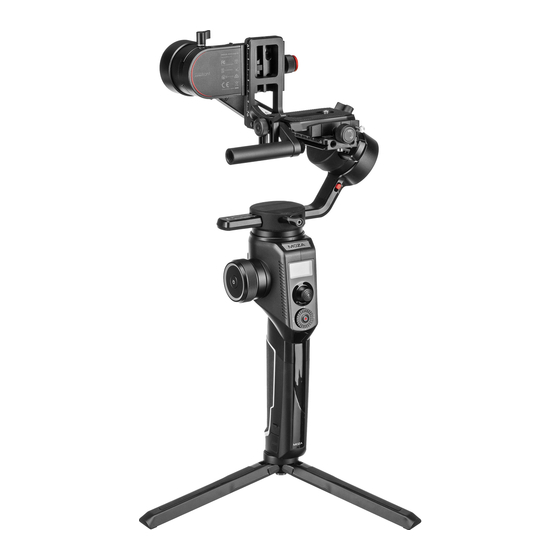
AirCross 2 Overview Tilt Knob Pan Motor Lock 3/8”Screw USB Type-C Charging Port Tilt Motor Trigger Battery Level OLED Screen Indicator Tilt Arm Roll Motor Lock Safety Lock Joystick Camera Pan Knob Roll Motor Lock Dial Wheel Control Port Baseplate Knob... -
Page 4: Installation And Balance Adjustment
Screw the tripod tightly into the 1/4" hole at the bottom of the gimbal. b. Expand three support feet, place the gimbal on a flat surface Unlocking Motors The AirCross 2 gimbal has 3 locks which are used to lock motors to prevent rotation. 3 Motor Locks... -
Page 5: Mounting The Camera
Mounting the Camera Horizontal Mounting a. Place the longer side of the L-Bracket b. Loosen the quick release knob screw, Pull out the safety lock at the end of the quick-release under the camera, and lock the camera knob, insert the shorter end of the L-Bracket into with a 1/4”screw. -
Page 6: Buttons And Oled Display
Note: Please release the motor lock of the axes before balance adjustment, otherwise it can’t be adjusted accurately. Please ensure that the MOZA AirCross 2 is balanced well before use. Buttons and OLED Display... -
Page 7: Led Indicators
OLED Display Tilt 50 L Roll 50 L 50 F A: Smart wheel working modes Controlling external follow focus motor 1 Controlling external follow focus motor 2 Electronic follow focus Controlling the tilt axis Controlling the roll axis Controlling the pan axis B: Focus motor connection status. -
Page 8: Menu Description
Menu Description Value Function Shutter Cable set the connection type to universal shutter cable MCSC-Multi set the connection type to Sony-Multi port MCSC-Multi/C set the connection type to Sony-Multi port and power supply MCSC-Remote set the connection type to Panasonic-Remote port camera M3C-USB set the connection type to USB port... - Page 9 Value Function habits dial rotate the dial clockwise to increase/decrease value gimbal operation switch turn on/off LED light on the wheel ?/ok brightness 0-100 adjust the brightness autotune ?/ok auto tune balance chk check the balance state of camera switch ?/ok/err turn on/off the focus motor 1 set A...
-
Page 10: Features Description
Refer to the list to choose and connect the camera control cable. Connect the Mini-USB end of the control cable to the control port of AirCross 2. Connect the other end to the corresponding control port of the camera. -
Page 11: Motor Output
Motor Output The payload of AirCross 2 is from 300g to 3200g. Different payload requires different motor power to achieve the best stability. There are three methods for adjusting the output of the motor: Auto-tuning operation method: a. -
Page 12: Pfv,Sport Gear Mode
Exit the roll follow Note: 1. The AirCross 2 is in pan follow mode by default. 2. In addition to switches that enable the follow mode of each axis independently, commonly used follow modes can be also enabled by trigger, please refer to Page4 ‘Button Functions’ for more details. -
Page 13: Manual Positioning
The manual positioning of the tilt axis is enabled by default on the AirCross 2. Manual positioning of the roll and pan axes can be enabled in the menu. -
Page 14: Balance Check
release or turn to a specified angle, the gimbal stops. ● Turn the dial: adjust the rotation speed ● Press the left button on the dial once: the gimbal rotates to the left automatically.If the gimbal is rotating, press once to stop. ●... -
Page 15: Sensor Calibration
Turn off the motors(double press the power button/enter the menu, select gimbal>motor>switch, set ‘off’) c. Leave the AirCross 2 on the table and don't shake it or the desktop. d. Enter the menu, select advanced>calibrate>Gyro cali and press the dial right button, wait about 5 seconds, when the ‘?’... -
Page 16: Language Switch
> User Configuration Management The AirCross 2 can save 3 groups of user data like camera type, motor output, button operations and other parameters, so users can retrieve relevant parameters previously used and avoid trouble of setting parameters each time when changing the camera. -
Page 17: Extension
,TheArka quick release plate can be mounted on the side of the camera rabbit cage with a 1/4" screw and then mounted to AirCross 2. 3.When camera is mounted in this way, the camera control port or HDMI port will be blocked. -
Page 18: Smartphone And Pc Connection
Users can set parameters, shot time-lapse video, upgrade firmware and make other operations via the MOZA Master App. With a Type-C USB interface, the AirCross 2 is able to be connected to a computer. Users can set parameter, upgrade firmware and make other operations via the MOZA Master software. -
Page 19: Specs
’Boot Mode’ appears on the screen. c.Start App, press Bluetooth to search for AirCross 2 device and connect. d.The App will automatically enter the firmware upgrade interface, please wait for the firmware download to complete, press the ‘upgrade’...
Need help?
Do you have a question about the AirCross 2 and is the answer not in the manual?
Questions and answers