Table of Contents
Advertisement
Advertisement
Table of Contents

Related Manuals for Moza Air 2


Summary of Contents for Moza Air 2
- Page 1 User Manual 用户手册...
-
Page 2: Table Of Contents
Contents MOZA Air 2 Overview Air 2 Installation Attaching the Tripod Installing Batteries Mounting the Camera Connecting Camera Control Cable Installing the Support Rod Mounting the Riser Plate Balance Adjustment Lock the Roll Axis Balancing the Camera Balancing the Tilt Axis... - Page 3 目录 认识Air 2 安装Air 2 三脚架的安装和使用 电池的安装拆卸 相机的安装和拆卸 相机控制线的安装 跟焦安装管的安装和拆卸 增高组件的使用 平衡调节 锁定横滚轴 快装板前后调节 俯仰臂调节 横滚臂调节 航向臂调节 按键功能和屏幕显示 按键定义 主界面说明 菜单说明 功能说明 相机控制 电机出力 跟随模式、态极、极速跟随 手动定位 按键自定义 盗梦空间 平衡检查 传感器校准 切换显示语言 用户配置管理 扩展使用 连接智能手机或电脑 安装手机支架 固件升级 规格参数...
-
Page 4: Moza Air 2 Overview
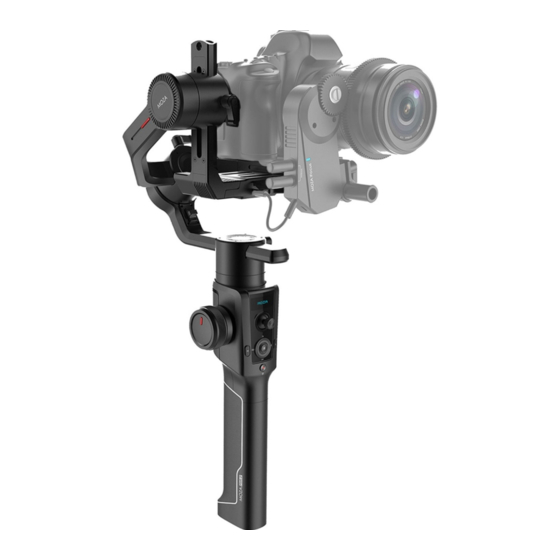
MOZA AIR 2 Overview Tilt Motor Power Button Joystick Roll Motor Lock Mechanical Memory Battery Hatch Fn Button Pan Arm Quick Release System Pan Motor Tilt Arm Dial 3/8” Extension Port Wheel Roll Arm DC Input Port Smart Trigger M Button... -
Page 5: Air 2 Installation
AIR 2 Installation Attaching the Tripod 2 screw holes are equipped at the bottom of grip: 1/4” for mini tripod and 3/8” for large accessories like slider and big tripod. Screw the mini tripod, then expand as shown below. Installing Batteries Note: Please pay attention to the battery poles for fear of short circuit. -
Page 6: Mounting The Camera
Mounting the Camera The Air 2 quick release plate is equipped with 2 screws, select an appropriate one according to the camera type. There is no limit to the installing direction of the quick release plate. When mounting the camera, make sure the lens slightly extends beyond... -
Page 7: Connecting Camera Control Cable
MCSC-Multi/C cable: For Sony cameras with Multi port and USB power supply like A7sⅡ, A7Ⅲ, etc Connect the control cable to the CAM CTRL port on the Air 2 gimbal, and then the other end to the control port on the camera. The camera icon will be displayed on the OLED screen. -
Page 8: Mounting The Riser Plate
Mounting the Riser Plates The riser plates need to be used in the follow cases: a. The camera is too short to balance the tilt axis b. The lens is too short to install the follow focus c. The follow focus needs to be installed for zoom Note:If the rod adaptor has been installed before mounting the riser plates, please remove the adaptor first. -
Page 9: Balance Adjustment
Lock Balancing the Camera Unlock a. Mount the camera onto the Air 2, release hands to check if the camera is top or bottom heavy. b. If the camera is bottom heavy, loosen the knob to slide the quick release baseplate forwards until the lens points forward. -
Page 10: Balancing The Roll Axis
Tighten the knob 1. Balancing the Pan Axis a. Grab the Air 2 horizontally, make the pan arm level. Release hands to check the direction in which the camera swings. b. Loosen the knob 1 on the pan motor. Move the pan arm 2 leftwards or rightwards until it keeps level. -
Page 11: Buttons And Oled Display
Buttons and OLED Display Button Functions: Button Operation Function Customizable Function Meun —— Focus Photo —— —— —— The same Re-Center Re-Center Selfie —— —— —— The same Trigger Selfie Re-Center Selfie —— —— —— The same Sport gear mode FPV mode Hold Pan-Tilt Follow Pan-Tilt Follow... -
Page 12: Menu Description
Menu Description Value Function Shutter Cable set the connection type to universal shutter cable MCSC-Multi set the connection type to Sony-Multi port MCSC-Multi/C set the connection type to Sony-Multi port and power supply MCSC-Remote set the connection type to Panasonic-Remote port camera M3C-USB set the connection type to USB port... - Page 13 Value Function operation dial habits rotate the dial clockwise to increase/decrease value gimbal autotune ?/ok auto tune balance chk check the balance state of camera switch ?/ok/err turn on/off the focus motor 1 set A ?/ok/err set the point A of focus motor 1 set B set the point B of focus motor 1 ?/ok/err...
-
Page 14: Features Description
Features Description Camera Control The Air 2 can support camera video recording, photo taking and electronic focus control. Please refer to the compatibility list for more details ( * Please set the lens to "MF"mode) - Page 15 b. Refer to the list to choose and connect the camera control cable. Connect the Mini-USB end of the control cable to the control port of AirCross 2. Connect the other end to the corresponding control port of the camera. c.
-
Page 16: Motor Output
Motor Output The payload of Air 2 is from 300g to 4200g. Different payload requires different motor power to achieve the best stability. There are three methods for adjusting the output of the motor: Auto-tuning operation method: a. Install the camera and adjust the balan b. -
Page 17: Follow Mode,Fpv,Sport Gear Mode
Exit the roll follow Note: 1. The Air 2 is in pan follow mode by default. 2. In addition to controlling the follow mode by the switches of each axis independently, follow modes can be also enabled by the trigger, please refer to Page 8 ‘Button Functions’... -
Page 18: Manual Positioning
The adjustment speed is faster than using the joystick or the following mode.The manual positioning of the tilt axis is enabled by default on the Air 2. Manual positioning of the roll and pan axes can be enabled in the menu. -
Page 19: Balance Check
release or turn to a specified angle, the gimbal stops. ● Turn the dial: adjust the rotation speed ● Press the left button on the dial once: the gimbal rotates to the left automatically.If the gimbal is rotating, press once to stop. ●... -
Page 20: Sensor Calibration
Leave the L-shaped quick release plate on the horizontal table. Avoid the bottom screw and keep the Air 2 at static position. Do not shake the it or tilt it. (or mount the camera to refer to its level) d. -
Page 21: Language Switch
> User Configuration Management The Air 2 can save 3 groups of user data like camera type, motor output, button operations and other parameters, so users can retrieve relevant parameters previously used and avoid trouble of setting parameters each time when changing the camera. -
Page 22: Management
Users can set parameters, shot time-lapse video, upgrade firmware and make other operations via the MOZA Master App. With a Type-C USB interface, the Air 2 is able to be connected to a computer. Users can set parameter, upgrade firmware and make other operations via the MOZA Master software. - Page 23 Long press the joystick, then press the power button with your another hand until the prompt “Boot Mode” appears on the screen. c.Start App, press Bluetooth to search for Air 2 device and connect. d. The App will automatically enter the firmware upgrade interface, please wait for the firmware download to complete, press the ‘upgrade’...
-
Page 24: Specs
产品保修卡 用户资料 产品型号 MOZA Air 2 购买日期 姓 名 电 话 地 址 经销商信息(签章) 产品保修条例 保修期 自购机日起,云台主体保修12个月;云台电机、电池保修3个月。设备外壳、说明书、USB 线材、包装等不在"一年免费保修服务"范围内,您可以选择有偿服务。 七日内免费退货 自购机日起7日内,根据国家最新三包规定,您可以选择退货(按票面金额一次性退清货款 )、换货(更换同型号同规格的产品)或修理。 八至十五日免费换货或修理 自购机日起第8日至第15日内,主机出现性能故障,并经特约维修中心检测,确认非人为损 坏的本身质量问题,您可以选择换货(更换同型号、同规格产品)或修理;但是更换的范围, 只限于产品主机,其他配件无质量问题,不能更换;购买者在以下条件下不享受免费保修 服务,您可以选择有偿服务。 1. 超过三包有效期的 ; 2. 无三包凭证及有效发货票的,但能够证明该产品在三包有效期内的除外 ; 3. 包修凭证上的型号与修理产品型号不符或者涂改的 ; 4. 非本公司特约维修人员拆动造成损坏的 ; 5. 因不可抗拒力造成损坏的 ;... - Page 25 Shenzhen Gudsen Technology Co., Ltd Web: www.gudsen.com...
Need help?
Do you have a question about the Air 2 and is the answer not in the manual?
Questions and answers