Table of Contents
Advertisement
Advertisement
Table of Contents

Related Manuals for Launch EasyDiag


Summary of Contents for Launch EasyDiag
- Page 1 EasyDiag user’s manual V1.00.000...
- Page 2 The equipment power is supplied by 12v battery voltage; do not use other voltage power. Turn off the ignition switch when connect or disconnect the diagnostic connector. Please put the EasyDiag in its place on the back of the protective casing in order to avoid lost.
-
Page 3: Table Of Contents
1.2 Parameters ..................1 1.3 Features..................2 1.4 Accessories..................2 2. Configuration and Structure............3 3. Connection and Installation ............4 3.2 EasyDiag connection ..............4 3.3 Software download and install .............4 3.4 Bluetooth setting ................5 4. How to use ..................5 4.1 Initial use..................6 4.2 EasyDiag registration..............9 4.3 Acquire software ................10... - Page 4 LAUNCH EasyDiag user’s guide 5.1 Preparation ................29 5.2 Diagnosis ...................29...
-
Page 5: Overview
EasyDiag user’s guide 1. Overview 1.1 Product introduction EasyDiag, based on iOS/Android operation system design, research and development, is an internet vehicle trouble diagnosis tester customized for mobile intelligent terminals. After being connected with mobile terminal through Bluetooth, it achieves for x-431 serial... -
Page 6: Features
LAUNCH EasyDiag user’s guide Working humidity: <60% Net weight: about 26g 1.3 Features Most of the electronic system of vehicle, including Europe, Asia, America and domestic models, can be detected; Applies to iOS and Android system, simple interface, elegant and easy to operate;... -
Page 7: Configuration And Structure
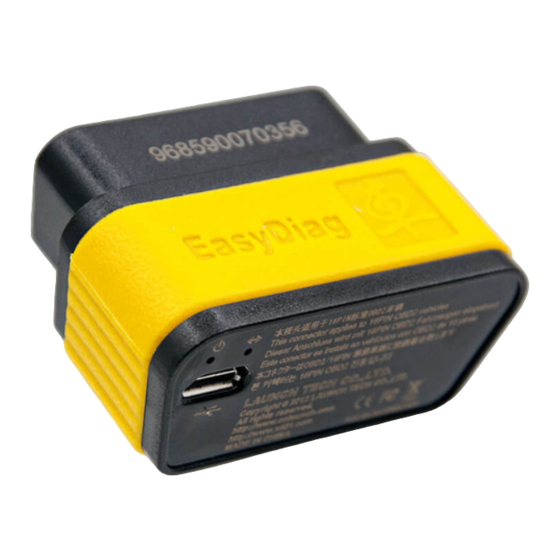
EasyDiag user’s guide 2. Structure Fig2.2 OBD-16 diagnostic To connect vehicle’s OBD2 ① connector diagnostic socket Power indicator It will light up once EasyDiag is ② plugged into OBD2 diagnostic socket. Communication It will flash when EasyDiag is ③ indicator communicating with mobile terminal or EasyDiag is resetting. -
Page 8: Connection And Installation
EasyDiag user’s guide 3. Connection and Installation 3.1 EasyDiag connection Find out the vehicle’s DLC socket, plug EasyDiag into DLC socket and the EasyDiag power indicator will light up. Note: vehicle’s DLC socket is generally located under the dashboard, in the fuse-box or near the shift lever. For the detail position, please refer to corresponding vehicle’s repair manual. -
Page 9: Bluetooth Setting
Enter Bluetooth setting interface to set “ON”, see Fig3.4, Fig3.5, and select the serial number to pair. Default name (product SN): iOS: 96699xxxxxxx Fig3.4 Note: Bluetooth setting operation should be done before operating software client. 4. How to use Click EasyDiag client software icon “ ”... -
Page 10: Initial Use
LAUNCH EasyDiag user’s guide 4.1 Initial use Note: before operating, you need to log in software first. When open the software, the screen will pop up disclaimer, see Fig4.1. Fig4.1 Click “I’ve read it” to enter login interface, see Fig4.2. - Page 11 LAUNCH EasyDiag user’s guide Fig4.3 After login, the screen will display the interface as shown in Fig4.4. Fig4.4 Click “reading” to open quick start guide. Choose “No more reminder”, the prompt will not appear next time. The software initial interface, see Fig4.5.
- Page 12 : Partial display area : Full screen display switch button If you don’t have a EasyDiag, you can click DEMO icon “ ” to get into the demo function interface, and experience the vehicle...
-
Page 13: Easydiag Registration
LAUNCH EasyDiag user’s guide If you have already got a EasyDiag, please continue the registration. 4.2 EasyDiag registration Click “management” to enter the interface as shown in Fig4.6。 Fig4.6 Click “EasyDiag Register”, the screen will display registration interface, see Fig4.7 Fig4.7... -
Page 14: Acquire Software
LAUNCH EasyDiag user’s guide Note: the product SN and password are available in the password envelope. See Fig4.8. Product SN Product SN Product code Fig4.8 4.3 Acquire software Before software download, please complete software acquisition The icon means the diagnostic software has not been downloaded, if you want to diagnose this car, please click it to acquire the diagnostic software. - Page 15 LAUNCH EasyDiag user’s guide Fig4.9 In the EasyDiag app, click the brand icon software which you want. Take “HONDA” as an example, click “HONDA” icon, the screen will display the software message, see Fig4.10. Fig4.10...
- Page 16 LAUNCH EasyDiag user’s guide If only this software to be purchased, click “Add to cart”. If you also want to add other software into the cart, close this page and select others. If someone feels the above behavior trouble, because he want to...
- Page 17 LAUNCH EasyDiag user’s guide Fig4.11 Select the desired package, for example, Click the apace marked in red circle in Fig4.11, you can see all of the software in this package. See Fig4.12.
- Page 18 LAUNCH EasyDiag user’s guide Fig4.12 When selection has completed, the following operation is payment. Press “create order”. Fig4.13 Order list will be created, see Fig4.14...
- Page 19 Fig4.15 PAYMENT: Right now, it only supports payment on our web site, like Fig4.16. In the future, we will launch more type of payment. After click button, the browser will automatic jump into LAUNCH user center login page.
- Page 20 LAUNCH EasyDiag user’s guide Use the Login name and password, which you have registered before, which is same as EasyDiag app login account. Fig4.16 WARM TIPS: Payment done with RMB can only access Chinese diagnostic software. Subsequent purchase with this serial number must be paid in RMB only.
- Page 21 LAUNCH EasyDiag user’s guide Fig4.17 Click “PAY”, and conform purchasing the diagnosis software you ordered. Fig4.18 In the Fig4.19, there are two options, one is called “支付宝”,which is use for Chinese currency. The other one is “PayPal”, which for...
- Page 22 LAUNCH EasyDiag user’s guide Fig4.19 You must have a PayPal account before you made the payment. Fig4.20 In Fig4.20, login your PayPal account, which is your email address, and password, and click “continue”. See Fig4.21.
- Page 23 EasyDiag user’s guide Fig4.21 Pay sucess, see Fig4.22. Fig4.22 DOWNLOAD: After made payment, screen dispaly will be back to EasyDiag app. If not, please move back to EasyDiag app. And click the diagnosis software icon which have already paid. See Fig4.23...
- Page 24 LAUNCH EasyDiag user’s guide Fig 4.23 Take “HONDA” as an example, press “Check Download”. See Fig4.24 Fig 4.24 Select HONDA, and start to download. See Fig4.25...
- Page 25 LAUNCH EasyDiag user’s guide Fig4.25 Download until completed. See Fig4.26 Fig4.26 When diagnosis software download is completed, the icon on the right bottom will disappear. See Fig4.27. Fig4.27...
-
Page 26: My Space
LAUNCH EasyDiag user’s guide 4.5 My space “My space” is used to view reports, operated records and my order and shopping cart. When software was added to the cart but the order didn’t created, you can go into “shopping cart” to generate the order, and then complete the payment in “my order”... -
Page 27: Instant Info
LAUNCH EasyDiag user’s guide Fig4.31 4.6 Instant info. To view the latest news of our company, market, product and upgrade. NOTE: Marketing information could not be seen until user is login and the corresponding SN is selected. -
Page 28: Social Circle
LAUNCH EasyDiag user’s guide Fig4.32 4.7 Social Circle See Fig4.33, “Public circle” is used to looking for a public circle. “Private circle”, for managing the circle created by user themselves. Pull-down and release the circle list can refresh the circle To add to an interactive discussion, click one circle and input the message in the input frame and then click “sent”... - Page 29 LAUNCH EasyDiag user’s guide Fig4.33 Click the place where marked in yellow circle in Fig4.34 to create a new circle Fig4.34...
-
Page 30: Management
LAUNCH EasyDiag user’s guide 4.9 Management For registration management, see Fig4.39 Fig4.39 4.9.1 EasyDiag Register See Fig4.2. 4.9.2 Change password Click “change password”, see Fig4.40, input user’s message and click “Confirm”, click “Cancel” to cancel operation. -
Page 31: Type Password Hint
LAUNCH EasyDiag user’s guide F4.40 4.9.3 Type Password Hint Click “Type Password Hint”, input messages follow prompts. See Fig4.41, and then click “Confirm”. Fig4.41 Note: please record this hints well in order to get back the password. 4.9.4 Forgot password... -
Page 32: Only Display Available Models
LAUNCH EasyDiag user’s guide Fig4.42, if the message input is correct, the screen will display a new password. Fig4.42 4.9.5 Only display available models When the switch is set to ON, the initial interface will display the icon of the vehicle which had download diagnostic software. -
Page 33: How To Diagnose
1. Product has registered, see 4.2; 2. Diagnostic software has downloaded. see 4.3; 3. Product has linked with vehicle, see 3.2; 4. EasyDiag has connected with iOS and Android equipment via Bluetooth. See 3.4 5.2 Diagnosis Select the serial number, click one car brand to start diagnosis operation;... - Page 34 LAUNCH EasyDiag user’s guide agreed. After choosing, the screen will display software version and its uses, see Fig5.2. Fig5.1 Click”Demo”, the screen will display system selection interface, see Fig5.2. Click “ ”, quit Demo.
- Page 35 LAUNCH EasyDiag user’s guide Fig5.2 Take engine system as an example. Click” Engine”, when the system initialize is completed, the screen will display diagnostic function selection interface, see Fig5.3. Fig5.3...
- Page 36 LAUNCH EasyDiag user’s guide A. Read trouble code Click” Read trouble code”, the screen will display diagnostic results, see Fig5.4 Click “ ”, return to function selection interface. Fig5.4 Generate word report: save the current diagnostic results in text form to “My space”.
- Page 37 LAUNCH EasyDiag user’s guide Fig5.7 Note: the trouble code would not disappear until the trouble was ruled out. C. Read data stream Click “Read data stream”, the screen will display DataStream item, see Fig5.8; click the circle before the item you desired to select it. If you want to select all, Click “...
- Page 38 LAUNCH EasyDiag user’s guide Fig5.8 When communication is completed, the system will display real-time data of the selected item, see Fig5.9 Fig5.9 Click one item (only display waveform of this item) or “Data stream” (up to four waveforms can be displayed simultaneously), the system...
- Page 39 LAUNCH EasyDiag user’s guide will display data changes in wave form, see Fig 5.10, if you want to suspend reading, click “ ”, click “ ” to continue the reading operation, click “ ”, stop reading and return to the function selection interface.
- Page 40 LAUNCH EasyDiag user’s guide Fig5.11 Take “1#injector” as an example. Click “1#injector”, the system will automatically test 1#injector, see Fig5.12. Fig5.12...
- Page 41 IMPLIED, INCLUDING WARRANTY MERCHANTABILITY OR FITNESS FOR A PARTICULAR PURPOSE. Order Information Replaceable and optional parts can be ordered directly from your LAUNCH authorized tool supplier. Your order should include the following information: Quantity Part number Item description Customer Service...
- Page 42 LAUNCH EasyDiag user’s guide North of Wuhe Avenue, Banxuegang, Bantian, Longgang, Shenzhen, Guangdong P.R.China, 518129 Launch website: http://www.cnlaunch.com Car cloud website: http:www.x431.com...
- Page 43 LAUNCH EasyDiag user’s guide Statement: LAUNCH reserves the rights to make any change to product designs and specifications without notice. The actual object may differ a little from the descriptions in the manual in physical appearance, color and configuration. We have tried our best to...
Need help?
Do you have a question about the EasyDiag and is the answer not in the manual?
Questions and answers