Symbol PDT 3200 Quick Reference
Hide thumbs
Also See for PDT 3200:
- Product reference manual (132 pages) ,
- Technical reference manual (158 pages)
Advertisement
Quick Links
Advertisement

Related Manuals for Symbol PDT 3200


Summary of Contents for Symbol PDT 3200
- Page 1 RS 2200/3200 Series PDT 3200 Quick Reference...
- Page 2 © 1997 SYMBOL TECHNOLOGIES, INC. All rights reserved. Symbol reserves the right to make changes to any product to improve reliability, function, or design. Symbol does not assume any product liability arising out of, or in connection with, the application or use of any product, circuit, or application described herein.
-
Page 3: Table Of Contents
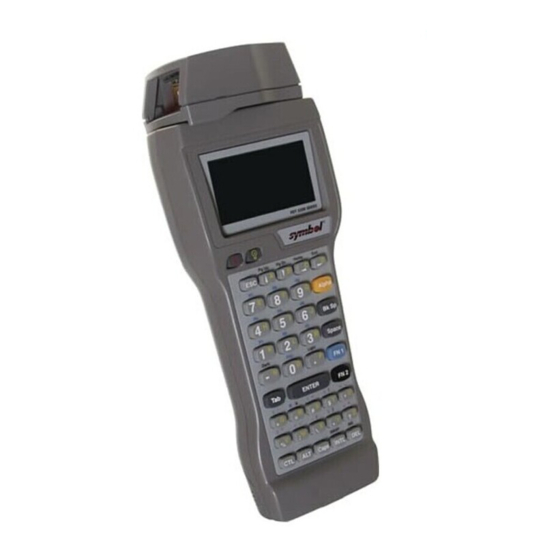
Introduction Symbol Technologies’ PDT 3200 is a handheld DOS computer. An integrated laser scanner makes the PDT 3200 a high- performance portable bar code data collection device. Models without the laser scanner accept input from most industry- standard bar code readers. The PDT 3200’s wireless models provide instant communication of data between the unit and a host computer or terminal. - Page 4 Parts of the PDT 3200 Laser Warning Label Scanner Head Screw Antenna Scanner Head Scan Good Read Power Lamp Key Scanner Window Keyboard Handstrap Left Batteries Scan Battery Trigger Compartment Cover Right Scan Trigger Battery Compartment Left Release Scan Switch...
-
Page 5: Accessories
- NiMH - NiCd • Power Supplies: Two power supplies are available: - 110V - 220V • Holster: The holster allows you to carry the PDT 3200 on your belt. • Softcase: The softcase protects the PDT 3200 during transport. -
Page 6: Installing And Charging The Batteries
The NiCD and NiMH batteries are available in battery packs, which makes them very easy to replace. The PDT 3200 also has a built-in lithium backup battery which temporarily saves data when the main NiCD or NiMH batteries lose their charge. - Page 7 3. The battery compartment cover has a tab on one edge. Use your thumb to firmly press the tab toward the top of the PDT 3200 until the cover is released from the body of the unit. 4. Pull the end of the plastic ribbon sticking out of the bat-...
- Page 8 5. Lay the plastic ribbon along the bottom of the battery compartment with the end sticking out of the compart- ment. 6. Alkaline Batteries: Insert the batteries in the positions in- dicated by the diagram inside the battery compartment. NiCD or NiMH Battery Pack: Find the positive(+) and negative (-) symbols on the battery pack’s label.
-
Page 9: Powering The Pdt 3200 On And Off
Powering the PDT 3200 On and Off To power the terminal on and off, press the power key. POWER... -
Page 10: Adjusting The Display
Adjusting the Display The PDT 3200’s display is a backlit liquid crystal display of 21 characters in 8 rows. If you enter more than 21 characters without a line break, the text in the display scrolls to the left to make the additional characters visible. - Page 11 Using the Backlight When using the PDT 3200 in dim light, you can turn on the backlight to see the display better. Press the lamp key (the key with the light bulb icon) below the LCD display to turn the backlight on or off.
-
Page 12: Using The Keyboard
See the PDT 3200 Product Reference Guide for details about the available keys. The best way to learn how the PDT 3200’s keypad works is to play with it. The color coding of the keys and characters should help you. -
Page 13: Using The Integrated Scanner
Using the Integrated Scanner The PDT 3200 terminal has an integrated scanner. To use the scanner, point the scanning window at a bar code and press the trigger. A green LED indicates when a scan is successful. - Page 14 2. Gently lift the laser module away from the top of the main part of the PDT 3200. The module does not completely separate from the rest of the PDT 3200. Do not try to force the units apart. 3. Swivel the module around until the laser window faces the opposite direction.
- Page 15 Attaching a Tethered Scanner If your PDT 3200 does not have an integrated laser scanner, you can attach a bar code reader to the connector at the top. The reader’s cable must have a standard 9-pin squeeze connector at the end.
-
Page 16: Setting Up For Communications
Serial Port Installing and Removing a PCMCIA Card The PDT 3200 has a slot for plugging in PC cards, and each unit is factory-equipped with PhoenixCARD Manager Plus PC card drivers. PC cards provide such features as network connectivity, modem connectivity, and wireless capability. Their primary purpose in the PDT 3200 is to provide additional memory storage by functioning as a disk drive. - Page 17 The PC card slot is located near the bottom on the back of the PDT 3200 . Detach the elastic hand strap on the back of the PDT 3200 by pulling its hook out of the holder near the base. The slot is protected by a cover.
- Page 18 With the PDT 3200 face down and the PC card face up, insert the socket-end of the card into the card slot, as shown in the illustration below. There are two tracks inside the slot to help guide the card. Push the card firmly into the slot until the ejector tab slides out.
-
Page 19: Warranty Information
This warranty is limited to repair or replacement at Symbol’s option, with reasonable promptness after being returned to Symbol by a carrier selected and paid for by the customer. These provisions do not prolong the original warranty term for any product which has been repaired or replaced by Symbol. - Page 20 RF Devices Symbol’s RF products are designed to be compliant with the rules and regulations in the locations into which they are sold and will be labeled as required. The majority of Symbol’s RF devices are type approved and do not require the user to obtain license or authorization before using the equipment.
- Page 22 70-31467-01 Revision A — July, 1997...
Need help?
Do you have a question about the PDT 3200 and is the answer not in the manual?
Questions and answers