Symbol PDT 8000 Series Manual
Hide thumbs
Also See for PDT 8000 Series:
- Product reference manual (352 pages) ,
- Quick reference manual (44 pages) ,
- Product reference manual (224 pages)
Table of Contents
Advertisement
Quick Links
Download this manual
See also:
Quick Reference Manual
Advertisement
Table of Contents

Related Manuals for Symbol PDT 8000 Series


Summary of Contents for Symbol PDT 8000 Series
- Page 2 Symbol reserves the right to make changes to any product to improve reliability, function, or design. Symbol does not assume any product liability arising out of, or in connection with, the application or use of any product, circuit, or application described herein.
-
Page 3: Table Of Contents
Q u i c k R e f e r e n c e Introduction Congratulations on your purchase of Symbol Technologies’ PDT 8000 Series Terminal! Its unique combination of features make this product superior for use in a wide range of applications. These features include: ®... -
Page 4: Accessories
Regulatory Information on page 30 • Service Information on backcover. The PDT 8000 Series Product Reference Guide (p/n 72-58169-xx) details the applications available for the terminal. For the latest version of this guide go to: http://www.symbol.com/manuals. Accessories Each terminal requires one 7.4 volt 1130 mAh prismatic lithium-ion battery. -
Page 5: Parts Of The Terminal
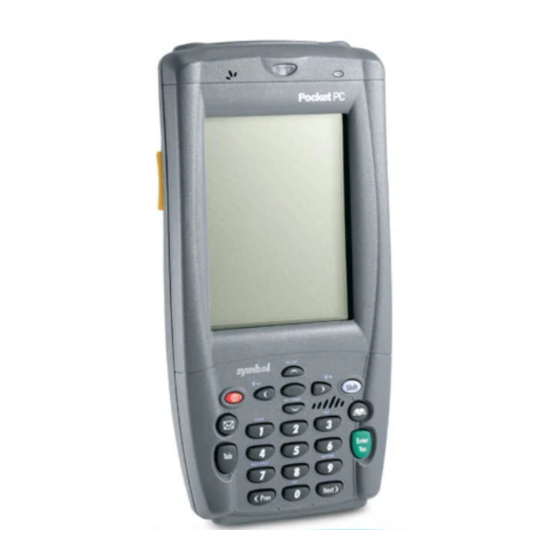
Q u i c k R e f e r e n c e Parts of the Terminal Front View Scan Charge Microphone TFT LCD (color) Power Button Speaker Top View 1-D Exit Audio Jack Window... - Page 6 P D T 8 0 0 0 S e r i e s Parts of the Terminal (continued) Back View Scan Button Scan Button Handstrap IrDA Port Stylus Battery Door Bottom View Serial & Charge Port...
-
Page 7: Inserting A Compact Flash Storage Card
Q u i c k R e f e r e n c e Inserting a Compact Flash Storage Card The PDT 8000 has a slot for a compact flash storage card which includes a compartment door that prevents the card from coming out if the PDT 8000 is dropped. -
Page 8: Installing Batteries
P D T 8 0 0 0 S e r i e s Installing Batteries 1. Remove the battery door. 2. Slide the latches on both sides of the battery down, to ensure they are in the unlock position. Insert the battery into the compartment. -
Page 9: Charging The Battery
Q u i c k R e f e r e n c e Charging the Battery Charging the Main Battery and Memory Backup Battery Before using your terminal for the first time, charge the lithium-ion battery in the terminal for approximately three hours, using the Serial Charging Cable or an appropriate accessory. -
Page 10: Starting The Terminal
Press the red power button to turn the terminal on. If the terminal does not power on see Troubleshooting on page Power Button As the terminal initializes its unique Flash File system, the Symbol splash screen displays for about 30 seconds. When the Welcome... -
Page 11: Aligning The Screen
Q u i c k R e f e r e n c e screen appears, tap anywhere on the screen to continue to the Align screen. Note that these screens also appear every time you perform a hard reset. Aligning the Screen To align your terminal so the cursor on the touch screen aligns with the tip of your stylus:... -
Page 12: Adjusting The Backlight
P D T 8 0 0 0 S e r i e s Adjusting the Backlight Use the key combinations below to adjust the backlight. Keys Description Shift + App Key 2 or Turn backlight on or off. Shift + App Key 3 Shift + Left Arrow Decrease backlight (decrease brightness) Shift + Right Arrow... - Page 13 Q u i c k R e f e r e n c e Right Left Arrow Page-up & Down Keys Key 1 Arrow Key Power Key Shift Key Key 2 Key 3 Clear Key Top Key Enter/Yes Tab Key Backspace Bottom Key Previous...
-
Page 14: Using The Stylus
P D T 8 0 0 0 S e r i e s Action App Key 3 Launches application assigned to Button 3. Refer to the PDT 8000 Series Product Reference Guide for more information on assigning appilcations to button. Also see Adjusting the Backlight on page Power... -
Page 15: Today Screen
Q u i c k R e f e r e n c e Today Screen When you turn on your terminal for the first time each day (or after 4 hours of inactivity), the Today screen appears. You can also display it by tapping Start - Today. -
Page 16: Navigation Bar And Command Bar
P D T 8 0 0 0 S e r i e s Navigation Bar and Command Bar The navigation bar at the top of the screen displays the active program and current time, and allows you to switch to programs and close screens. -
Page 17: Input Methods
Q u i c k R e f e r e n c e Input Methods Enter information in any program by typing with the keyboard, or use the input panel to type with the soft keyboard, write using Block Recognizer, Letter Recognizer or Transcriber. In any case, the characters appear as typed text on the screen. - Page 18 P D T 8 0 0 0 S e r i e s Using the Block Recognizer 1. Tap the arrow next to the Input Panel button, then Block Rec- ognizer. 2. Write a letter in the left side of the box, or a number in the right side, using special character strokes.
- Page 19 Q u i c k R e f e r e n c e Using the Transcriber 1. Tap the arrow next to the Input Panel button, then Transcriber. 2. Write anywhere on the screen. What you write on the screen will be converted to text.
-
Page 20: Scanning With The Terminal
S e r i e s Scanning with the Terminal The terminal has an integrated scanner which collects data by scanning bar codes. Refer to the PDT 8000 Series Product Reference Guide for information on configuring your terminal for scanning. - Page 21 1. Remove the battery door. 2. Press and release Power Key + Scan Button. 3. Replace the battery door. 4. As the terminal reboots, the Symbol splash screen displays for about 30 seconds. 5. Realign the screen as described on...
- Page 22 P D T 8 0 0 0 S e r i e s 3. Begin host communications as specified by your application. Using the Cradle The terminal can communicate with a host computer using the CRD 8000-1000S, CRD 8000-1000M, or MDM 8000. For more information, see the connection instructions in the respective Quick Reference Guides.
-
Page 23: Led Indicators
Q u i c k R e f e r e n c e LED Indicators Indicator Charge LED - Amber Not connected to charger. Slow blinking amber Terminal is charging. Fast blinking amber Error in charging. Solid amber Charging is complete. Scan LED Not scanning. - Page 24 Using the holster An optional holster, to store the terminal when not in use, is available through Symbol. Hook the holster on to your belt and insert the terminal, with the display facing you, as shown.
-
Page 25: Troubleshooting
Incorrect cable con- See your System Administrator. data was incom- figuration. plete. Communication Perform setup as described in the software was incor- PDT 8000 Series Product Reference rectly installed or Guide. configured. - Page 26 See the PDT 8000 Series Product Refer- ence Guide for information about how to write character strokes. Character strokes Make the character strokes in the low-...
- Page 27 Q u i c k R e f e r e n c e Problem Cause Solution A message ap- Too many files Delete unused memos and records. pears stating that stored on the termi- You can save these records on your your terminal’s nal.
- Page 28 See your Sys- scan input. tem Administrator. Unreadable bar Ensure the symbol is not defaced. code. Distance between Ensure you are within proper scanning exit window and bar range. code is incorrect.
- Page 29 Q u i c k R e f e r e n c e END-USER LICENSE AGREEMENT MICROSOFT WINDOWS FOR POCKET PC DATA EXCHANGE COMPONENT: MICROSOFT ACTIVESYNC, VERSION 3.1 IMPORTANT-READ CAREFULLY: This End-User License Agreement (“EULA”) is a legal agreement between you (either an individual or a single entity) and the manufacturer (“Manufacturer”) of the special purpose computing device (“SYSTEM”) with which you acquired the Microsoft software product(s) identified above (“SOFTWARE”).
- Page 30 P D T 8 0 0 0 S e r i e s 2. DESCRIPTION OF OTHER RIGHTS AND LIMITATIONS. • Speech/Handwriting Recognition. If the SOFTWARE includes speech and/or handwriting recognition component(s), you should understand that speech and handwriting recognition are inherently statistical processes; that recognition errors are inherent in the processes;...
- Page 31 Q u i c k R e f e r e n c e 4. COPYRIGHT. All title and intellectual property rights in and to the SOFTWARE (in- cluding, but not limited to, any images, photographs, animations, video, audio, mu- sic, text, and “applets”...
-
Page 32: Regulatory Information
S e r i e s Regulatory Information All Symbol devices are designed to be compliant with rules and regulations in locations they are sold and will be labeled as required. Any changes or modifications to Symbol Technologies equipment, not expressly approved by Symbol Technologies, could void the user’s authority to operate the... - Page 33 LE FAISEAU APPARIEL À LASER DE CLASSE 2 LASER LIGHT- DO NOT STARE INTO BEAM CLASS 2 LASER PRODUCT 630-680nm, 1mW S/N: ######### FCC ID: ############# Made in XXXXX MOD: PDT8000-XXXXXXXX Symbol Technologies Inc. Holtsville, New York 11742 MONTH, 2002...
- Page 34 P D T 8 0 0 0 S e r i e s In accordance with Clause 5, IEC 825 and EN60825, the following information is provided to the user: ENGLISH HEBREW CLASS 1 CLASS 1 LASER PRODUCT CLASS 2 LASER LIGHT DO NOT STARE INTO BEAM CLASS 2 LASER PRODUCT...
-
Page 35: Power Supply
R e f e r e n c e Power Supply Note: Use only a Symbol-approved power supply 50-14001-005 output rated 15VDC and minimum 2.5A. The power supply is certified to EN60950 with SELV outputs. Hinweis: Benutzen Sie nur eine Symbol Technologies genehmigt Stromversorgung 50-14001-005 in den Ausgabe: 15VDC und minimum 2.5A. - Page 36 P D T 8 0 0 0 S e r i e s Persons with Pacemakers: • Should always keep the device more than 15cm (6 inches) from their pace- maker when turned on • Should not carry the device in a breast pocket •...
- Page 37 Q u i c k R e f e r e n c e Radio Frequency Interference Requirements Note: This equipment has been tested and found to comply with the limits for a Class B digital device, pursuant to Part 15 of the Tested to comply with FCC Standards FCC rules.
- Page 38 • Sri Lanka - Restrict Frequency Range to: 2.400 - 2.430 GHz. Statement of Compliance Symbol Technologies, Inc., hereby, declares that this device is in compliance with the essential requirements and other relevant provisions of Directives 1999/5/EC, 89/ 336/EEC and 73/23/EEC. Declaration of Conformities may be obtained from http://...
- Page 39 Q u i c k R e f e r e n c e Warranty (A) Seller’s hardware Products are warranted against defects in workmanship and materials for a period of twelve (12) months from the date of shipment, provided the Product remains unmodified and is operated under normal and proper conditions.
-
Page 40: Service Information
Distributor Operations +44 118 945 7360 Customer support is available 24 hours a day, 7 days a week. For the latest version of this guide go to: http://www.symbol.com/manuals. 72-58168-01 Revision A — September 2002 Symbol Technologies, Inc. One Symbol Plaza, Holtsville, N.Y. 11742-1300...
Need help?
Do you have a question about the PDT 8000 Series and is the answer not in the manual?
Questions and answers