Table of Contents
Advertisement
Quick Links
Download this manual
See also:
Instruction Manual
230V
BISCUIT JOINTER
83611
These instructions accompanying the product are the original instructions. This document is part of the product,
keep it for the life of the product passing it on to any subsequent holder of the product. Read all these
instructions before assembling, operating or maintaining this product.
This manual has been compiled by Draper Tools describing the purpose for which the product has been
designed, and contains all the necessary information to ensure its correct and safe use. By following all the
general safety instructions contained in this manual, it will ensure both product and operator safety, together
with longer life of the product itself.
AlI photographs and drawings in this manual are supplied by Draper Tools to help illustrate the operation of the
product.
Whilst every effort has been made to ensure the accuracy of information contained in this manual, the Draper
Tools policy of continuous improvement determines the right to make modifications without prior warning.
Advertisement
Table of Contents
Troubleshooting

Subscribe to Our Youtube Channel
Related Manuals for Draper 83611


Summary of Contents for Draper 83611
- Page 1 AlI photographs and drawings in this manual are supplied by Draper Tools to help illustrate the operation of the product.
-
Page 2: Title Page 1.1 Introduction
Commercial copying, redistribution, hiring or lending is prohibited. No part of this publication may be stored in a retrieval system or transmitted in any other form or means without written permission from Draper Tools Limited. In all cases this copyright notice must remain intact. -
Page 3: Table Of Contents
CONTENTS TITLE PAGE INTRODUCTION ......................2 REVISION HISTORY .......................2 UNDERSTANDING THIS MANUAL ................2 COPYRIGHT NOTICE......................2 CONTENTS CONTENTS........................3 WARRANTY WARRANTY........................4 INTRODUCTION SCOPE ..........................5 SPECIFICATION ......................5 HANDLING AND STORAGE ....................5 HEALTH AND SAFETY INFORMATION GENERAL SAFETY INSTRUCTIONS FOR POWER TOOL USE ........6 ADDITIONAL SAFETY INSTRUCTIONS FOR BISCUIT JOINTERS.......8 RESIDUAL RISK ......................9 CONNECTION TO THE POWER SUPPLY..............10 TECHNICAL DESCRIPTION... -
Page 4: Warranty
This warranty applies in lieu of any other warranty expressed or implied and variations of its terms are not authorised. Your Draper warranty is not effective unless you can produce upon request a dated receipt or invoice to verify your proof of purchase within the warranty period. -
Page 5: Introduction
As part of our core range, this product is suitable for enthusiasts and tradespeople alike. Any other application other than what it was intended for is considered misuse. 4.2 SPECIFICATION Stock No..........................83611 Part No........................... PT8100D Motor: Rated voltage...................... -
Page 6: Health And Safety Information
HEALTH AND SAFETY INFORMATION 5.1 GENERAL SAFETY INSTRUCTIONS FOR POWER TOOL USE When using any type of power tool there are steps that should be taken to make sure that you, as the user, remain safe. Common sense and a respect for the tool will help reduce the risk of injury. Read the instruction manual fully. - Page 7 HEALTH AND SAFETY INFORMATION Remove and check setting tools. Some machinery requires the use of additional tools or keys to set, load or adjust the power tool. Before starting the power tool always check to make certain they have been removed and are safely away from the machine. Prevent unintentional starting.
-
Page 8: Additional Safety Instructions For Biscuit Jointers
HEALTH AND SAFETY INFORMATION 5.2 ADDITIONAL SAFETY INSTRUCTIONS FOR BISCUIT JOINTERS Safe Working Practice Blades must be rated for at least the speed marked on the tool. Blades running over rated speed can come apart and cause injury. Always use the guard. The guard is there to protect the operator from broken blade fragments and unintentional contact with the blade. -
Page 9: Residual Risk
HEALTH AND SAFETY INFORMATION 5.3 RESIDUAL RISK Important note: Although the safety instructions and operating manuals for our tools contain extensive instructions of safe working with power tools, every power tool involves a certain residual risk which can not be completely excluded by safety mechanisms. Power tools must therefore always be operated with caution! - 9 -... -
Page 10: Connection To The Power Supply
HEALTH AND SAFETY INFORMATION 5.4 CONNECTION TO THE POWER SUPPLY Caution: Risk of electric shock. Do not open. This appliance is supplied with a moulded 3 pin mains plug for your safety. The value of the fuse fitted is marked on the pin face of the plug. Should the fuse need replacing, ensure the substitute is of the correct rating, approved to BS1362 and ASTA or BSI Kite marked. -
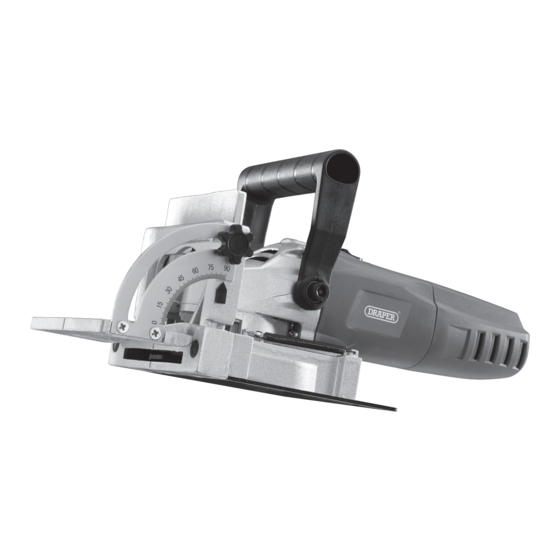
Page 11: Technical Description
TECHNICAL DESCRIPTION 6.1 IDENTIFICATION Auxiliary handle. On/off switch. Depth selector. Front rest. Angle locking knob. Blade, inner and outer flanges (Fitted). Dust collection bag and dust extraction chute. Height locking knob. Blade cover plate. Plug and cable. Spindle lock. - 11 -... -
Page 12: Unpacking And Checking
Lay the contents out and check them against the parts shown below. If any part is damaged or missing; please contact the Draper Help Line (the telephone number appears on the Title page) and do not attempt to use the product. -
Page 13: Basic Biscuit Jointer Operations
BASIC BISCUIT JOINTER OPERATIONS IMPORTANT: Make sure that the mains voltage matches the voltage stated on the machines rating plate. Note: Remove the plug from the socket before carrying out adjustment, servicing or maintenance. 8.1 ON/OFF LOCKING SWITCH – FIG. 1 To switch the biscuit jointer "ON"... -
Page 14: Blade Replacement
BASIC BISCUIT JOINTER OPERATIONS Note: Remove the plug from the socket before carrying out adjustment, servicing or maintenance. 8.4 BLADE REPLACEMENT – FIGS. 4 -5 Remove the blade height/angle adjustment by loosening knob and sliding mechanism upwards until free of the tool. Remove the four screws and cover plate Push and hold the spindle lock button and then turn... -
Page 15: Maintenance And Troubleshooting
This could cause difficulty in the movement of the blade when setting up cutting operations. Frequently vacuum up the sawdust. 9.2 RECOMMENDED ACCESSORIES Warning! To avoid injury from unsafe accessories, use only Draper accessories. 9.3 PROHIBITED ACCESSORIES The use of any cutting tool except saw blades which meet the requirement under recommended accessories is prohibited. -
Page 16: Troubleshooting Guide
MAINTENANCE AND TROUBLESHOOTING 9.5 TROUBLESHOOTING GUIDE Note: Remove the plug from the socket before carrying out adjustment, servicing or maintenance. Problem Possible Cause Remedy Motor does not start. 1. Fuse. 1. Replace the fuse. 2. Brushes worn. 2. Have brushes replaced by an authorised service agent. -
Page 17: Optional Accessories
10. OPTIONAL ACCESSORIES 10.1 OPTIONAL ACCESSORIES A full range of accessories are available from Draper Tools. Please visit our website for details: www.drapertools.com 11. DISPOSAL 11.1 DISPOSAL – At the end of the machine’s working life, or when it can no longer be repaired, ensure that it is disposed of according to national regulations. -
Page 18: Explanation Of Symbols
12. EXPLANATION OF SYMBOLS 12.1 EXPLANATION OF SYMBOLS Read the instruction manual. Warning! Class II construction Wear face mask and safety (Double insulated). glasses. WEEE – Waste Electrical & Do not abandon into the Electronic Equipment. environment. Do not dispose of Waste Electrical &... - Page 19 NOTES - 19 -...
- Page 20 ©Published by Draper Tools Limited. No part of this publication may be reproduced, stored in a retrieval system or transmitted in any form or by any means, electronic, mechanical photocopying, recording or otherwise without prior permission in writing from Draper Tools Ltd.
Need help?
Do you have a question about the 83611 and is the answer not in the manual?
Questions and answers