Table of Contents
Advertisement
Available languages
Available languages
Quick Links
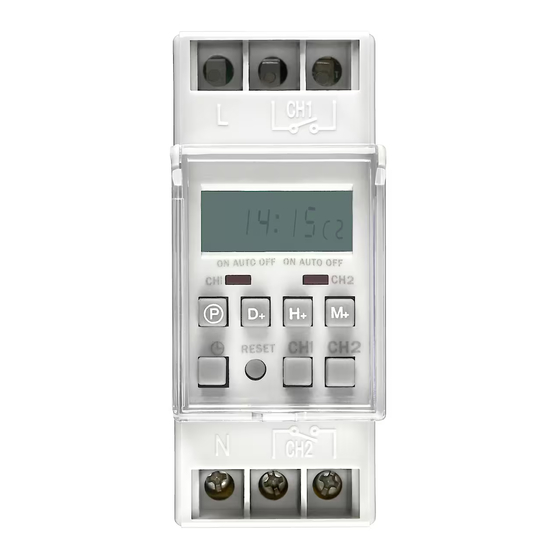
DIN Rail Digital Time Switch
Art.no 36-5391
Model TH-8472S
Please read the entire instruction manual before using the product and save it for future refe-
rence. We reserve the right for any errors in text or images and any necessary changes made
to technical data. If you have any questions regarding technical problems please contact our
Customer Services.
Safety
•
Installation must only be carried out by certified electricians.
•
Do not position the product where it is exposed to moisture or water.
•
This product should only be repaired by a qualified service technician.
•
The product should not be taken apart or modified.
•
Do not open the housing. Certain components within the product's casing carry dangerous
currents. Contact with these may give you an electric shock.
Buttons and functions
Buttons
1.
[ D+ ] Day setting
2.
CH1 lights up when channel 1 is
activated
3.
[
] Program
P
4.
[ ] Hold in for setting the day and time
1
5.
[ RESET ] Press to reset settings to zero
6.
[ H+ ] Hours setting
2
7.
CH2 lights up when channel 2 is
activated
8.
[ M+ ] Minutes setting
3
9.
[ CH2 ] Manual on/off timer settings for
channel 2
4
10. [ CH1 ] Manual on/off timer settings for
channel 1
5
Display
11
15
12
13
14
11. MO, TU, WE, TH, FR, SA and SU
Day/s display (Monday-Tuesday-Wednesday-Thursday-Friday-Saturday-Sunday).
12. ON
Flashes when the channel's output is on. At the same time the active
programmed on/off time will flash.
13. OFF
Flashes when the channel's output is off.
14. 8
Displays which of the 8 programmable on/off times are active.
15. 88:88
Clock hours:minutes.
16. S
Summer time activated.
17. C1/ C2
Displays which channels are activated.
18. ▼
Shows channel status: ON , AUTO (timer controlled), OFF.
GREAT BRITAIN • customer service tel: 08545 300 9799 e-mail: customerservice@clasohlson.co.uk internet: www.clasohlson.com/uk
Installation
The time switch is designed for mounting onto a DIN rail in your consumer unit/distribution box
and may only be installed by a qualified electrician.
1.
Install the time switch by hooking the time switch's hooks over the DIN rail. Then press
the time switch's bottom edge to lock it against the DIN rail.
2.
Connect the phase (live) and neutral wires to the L and N connections. Protect the current
carrying lead (phase) with a max 16 A fuse.
3.
Connecting channel 1: Connect the desired circuit to be controlled to the CH1 terminals.
4.
Connecting channel 2: Connect the desired circuit to be controlled to the CH2 terminals.
5.
Tighten the screws securely for proper contact. Make sure that the connected leads are
properly stripped free of cable insulation to ensure a clean contact area.
Things to consider:
Since all electronic equipment is sensitive to voltage peaks, you should try to isolate the time
switch by connecting it to a separate phase circuit than the one you will use for controlling your
electronic equipment.
Settings
Setting the time and day
1.
Hold in [ ]. The set day will appear in the upper right hand corner: MO, TU, WE, TH, FR,
SA and SU (Monday–Tuesday–Wednesday–Thursday–Friday–Saturday–Sunday).
2.
Press [ D+ ] repeatedly to set the day.
3.
Hold in [ ]. Press [ H+ ] repeatedly to set the hours. Hold in [ H+ ] to advance through
the settings rapidly.
6
4.
Hold in [ ]. Press [ M+ ] repeatedly to set the minutes. Hold in [ M+ ] to advance through
the settings rapidly.
5.
Release [ ] to save your settings. The seconds setting will automatically start from 0 when
7
you release the button.
8
British Summer Time (GMT+1)
Press [ H+ ] and [ M+ ] simultaneously in order to activate/deactivate summer time. S will appear
when summer time is active.
9
Programming on/off times
10
1.
Press [
]. 1, ON and C1 will appear (first ON time, channel 1).
P
2.
Set the day/s and time for the first on time using [ D+ ], [ H+ ] and [ M+ ]. The days setting
can be set in various ways. Press [ D+ ] repeatedly to select between various settings:
-
MO, TU, WE, TH, FR, SA and SU (Monday–Tuesday–Wednesday–Thursday–Friday–
Saturday–Sunday).
-
Individual days
-
MO, TU, WE, TH, FR
-
SA, SU
16
-
MO, TU, WE, TH, FR, SA
-
MO, WE, FR
-
TU, TH, SA
17
-
MO, TU, WE
-
TH, FR, SA
3.
Press [
] for saving the first on time setting.
P
18
4.
1 and OFF will then appear (first off time).
5.
Set the day/s and time for the first off time using [ H+ ] and [ M+ ].
6.
Press [
] for the first OFF time.
P
7.
Follow the same procedures for the remaining on/off times.
8.
Press [ ] to return to normal time mode. The display automatically returns to normal time
mode after approximately 2 minutes of inactivity.
Display programmed times
Check the programmed on/off times by pressing [
on/off times.
Changing and deleting programmed on/off times
1.
Press [
-
-
2.
Press [
3.
Press [ RESET ] in order to clear all programmed on/off times and normal time setting.
Channel 1 and 2
The 2 channels, CH1 and CH2, both have potential-free outputs.
The first 8 on/off times are automatically assigned to channel 1 (C1).
To change to channel 2 (C2) you must first toggle past the first 8 programmed on/off times by
pressing [
Programming example
Set the on time for channel 1 to 08:15 on Tuesday and the off time for 16:30 (4:30 pm) on
the same day.
1.
[
P
2.
[ D+ ] All days are shown.
3.
Press [ D+ ] twice and TU will appear (Tuesday).
4.
Press [ H+ ] 8 times (hold in the button to advance through the settings quicker).
5.
Press [ M+ ] 15 times.
6.
[
P
7.
[ D+ ] All days are shown.
8.
Press [ D+ ] twice and TU will appear (Tuesday).
9.
Press [ M+ ] 16 times.
10. Press [ M+ ] 30 times.
11. [
P
Note: Press [ CH1 ] repeatedly until the arrow symbol appears over AUTO, indicating timer
controlled mode.
Manual activation of on/off and timer controlled
Both channels can be activated manually using the [ CH1 ] and [ CH2 ] buttons. The selected
function will be indicated by the arrow symbol.
Toggle between: ON (permanent on), AUTO (programmed controlled on/off times) or OFF.
The LED indicator will light continuously in ON mode and only when a programmed on time is
activated in AUTO mode.
RESET (reset to zero)
Press [ RESET ] in order to clear all programmed on/off times.
Care and maintenance
Wipe off the time switch with a dry cloth. Do not use cleaning solutions or solvents.
Turn the power off before cleaning the time switch.
Disposal
This product should be disposed of in accordance with local regulations.
If you are unsure how to proceed, contact your local authority.
Specifications
Operating voltage
Outputs
Operating temperature
] repeatedly to toggle between all
Minimum operating time
P
Battery backup
Module width
Cable connection
Protection class
Size
] repeatedly to select the programmed on/off time you wish to change.
P
Change the desired on/off time using [ D+ ], [ H+ ] and [ M+ ].
Set the time to 0:00 to delete the selected on/off time.
] to save your changes.
P
] until 1, ON and C2 appear (first ON time, channel 2).
P
] ON appears.
] OFF appears.
] Save settings.
220–250 V AC, 50/60 Hz
2 × NO potential-free: CH1 16 A (8 A with inductive load), 230 V,
CH2 16 A (8 A with inductive load), 230 V
0 to 40 °C
1 minute
1 × NiMH, 1.2 VDC
2 modules
0.75–4 mm²
IP20
85 × 65 × 35 mm
Advertisement
Table of Contents

Related Manuals for Clas Ohlson 36-5391


Summary of Contents for Clas Ohlson 36-5391
-
Page 1: Specifications
The time switch is designed for mounting onto a DIN rail in your consumer unit/distribution box Change the desired on/off time using [ D+ ], [ H+ ] and [ M+ ]. Art.no 36-5391 Model TH-8472S and may only be installed by a qualified electrician. - Page 2 ] upprepade gånger och välj det program som du vill ändra. Kopplingsuret är avsett för montering på en DIN-skena i apparatskåp/elcentral, installationen får Ändra programmet med [ D+ ], [ H+ ] och [ M+ ]. Art.nr 36-5391 Modell TH-8472S endast utföras av behörig elinstallatör.
- Page 3 ] gjentatte ganger og velg det programmet du skal endre. Koblingsuret er beregnet for montering på en DIN-skinne i sikringsskapet/elsentralen. Programmet endres med [ D+ ], [ H+ ] og [ M+ ]. Art. nr. 36-5391 Modell TH-8472S Installasjonen skal kun utføres av registrert installasjonsvirksomhet.
- Page 4 Valitse muutettava asetus painikkeella [ Ajastin on tarkoitettu asennettavaksi DIN-kiskoon laitekaappiin/sähkökeskukseen. Laitteen saa Muuta asetuksia painikkeilla [ D+ ], [ H+ ] ja [ M+ ]. Tuotenumero 36-5391 Malli TH-8472S asentaa ainoastaan valtuutettu sähköasentaja. Jos haluat poistaa asetuksen, aseta kellonajaksi 0:00.
- Page 5 ] drücken und das zu ändernde Programm auswählen. Die Zeitschaltuhr ist für die Montage an eine DIN-Schiene im Schaltschrank/Verteilerkasten Das Programm mit [ D+ ], [ H+ ] und [ M+ ] ändern. Art.Nr. 36-5391 Modell TH-8472S vorgesehen, diese Installation darf nur von einem qualifizierten Elektriker durchgeführt werden.
Need help?
Do you have a question about the 36-5391 and is the answer not in the manual?
Questions and answers